sirsasana
"headstand"

Feedback We are looking forward to hear what you think about this description, give us feedback via email to: postmeister@yogabuch.de
last updated: 30.12.2018
name: sirsasana
trivial name: headstand
level: FA
classification .
classically: inversion pose
psychomentally: . mentally stimulating
physiologically: . strengthening of neck/shoulder and back
effects:
preparations:
  • the inability to stretch the hips or an excessive hollow back in this position indicate shortened hip flexors. About the risks of a hollow back see the FAQ. The following preparations are helpful:
    1. hip opening 1st
    2. hip opening 2nd
    3. warrior pose 1rd
    with given back health - i. e. if there is no damage to the spinal column and the intervertebral discs - additionally:
    1. upface dog
    2. urdhva dhanurasana (back arch)
    3. ustrasana (camel)
    as well as several other back bends with hip extension
  • headstand needs less flexibility than handstand and other 180°+ frontal abduction arm positions. The arms are clearly exorotated, but the frontal abduction angle is significant smaller. Nevertheless, it can be helpful in individual cases to improve the flexibility of the shoulder, so that pushing the elbows onto the ground is eased and can be held uninterruptedly for a longer period of time, which is important for beginners! Preparations:
    1. downface dog, esp variant "wide" as a general stretching of the shoulder
    2. back stretching, esp variant "high" as a general stretching of the shoulder
    3. rectangular handstand as a related pose that in essence only differs in the rotation of the arms
    4. handstand as a related and synergistic pose
    5. elbow stand as a related and synergistic pose that in essence only differs in the rotation of the arms
    6. rectangular elbowstand like rectangular elbow stand only stronger
    7. elbow downface dog as a very related and strongly synergistic pose
    8. hyperbola as one of the most effective and efficient stretches in the direction of frontal abduction without exorotation of the arms
    9. shoulder opening at the chairas one of the most effective and efficient stretches towards frontal abduction with exorotation of the arms
  • To awaken the power of the deltoids and the triceps, with which the elbows are pushed onto the ground in headstand, practice:
    1. "dips" variant of downface dog
    2. transition from downface dog to stick pose and back
    3. dips-variant of handstand
    4. repeatedly taking and leaving the back arch
    5. hip opening 2nd
  • If a high tonus of shortened adductors is known, they should also be stretched beforehand so that they do not show any tendency to cramp:
    1. baddha konasana
    2. warrior pose 2nd
    3. parsvakonasana
    4. bar pose
    5. caturkonasana
  • The stretching of the back can also be prepared:
    1. "table"-variant of uttanasana
    2. rectangular uttanasana
    3. warrior pose 3rd
    4. upavista konasana, variant "pulling on the feet"
    5. upavista konasana, variant "with a brick"
  • If there is a weakness in the muscles of the lumbar spine or if it is hpertensive due to a hollow back, prepare the lower back also:
    1. parsva uttanasana
    2. balasana, (virasana forward bend, "child's pose")
    3. parsva upavista konasana
    4. parivrtta trikonasana
    5. parsvottanasana
    6. half lotus forward bend
    7. karnapidasana
  • post practice poses:
  • Depending on the constitution of the lower back and a possible inclination to a hollow back, the tonus in the lower back can rise unpleasantly during the headstand. Helping against it:
    1. parsva uttanasana
    2. balasana, (virasana forward bend, "child's pose")
    3. parsva upavista konasana
    4. parivrtta trikonasana
    5. parsvottanasana
    6. half lotus forward bend
    7. karnapidasana
  • The tonus of the neck muscles may also increase in an unpleasant way. Helping against that:
    1. karnapidasana
    2. halasana
    3. shoulderstand (sarvangasana)
    4. Drehsitz
    5. pushing the head onto the floor
  • similar asanas:
    diagnostic hints (Nos.):
  • (201) (204) shoulder : If it is difficult to keep the elbows firmly and continuously pressed on the ground, the shoulder can be seen to have little flexibility. Side differences also appear and there may be evidence of shoulder disorders:
    1. Irritating hypertonus of the deltoids: especially ambitious beginners in yoga tend to develop irritable states in the deltoids, which are located in the region of the muscle origins, presumably originate from an overstrain of the structures due to repeated demands in full frontal abduction and are also noticeable under the same strain, see also the FAQ.
    2. Various pathological changes of the shoulder joint, such as impingement syndrome (highlight: pain between 70° and 130° frontal abduction), frozen shoulder, calcification of the biceps tendon, which cannot all be discussed here and require clarification. Until further notice the specialist is the orthopedist.
    3. Side differences in mobility may be secondary, caused by daily habits or activities such as abdominal sleep, sitting with legs turned over or due to other imbalances
    The flexibility of the shoulder can be recognized by the degree of evasion in the three movement dimensions
  • (711) An excessive hollow back and the inability to bring the hips to 0° indicates shortened hip flexors. About the risks of the hollow back see the FAQ Hilfreiche Haltungen siehe oben.
  • (753) A tendency to cramp in the adductors indicates a high tone, low power endurance or clear exorotation moments, which are mostly caused by restricted flexibility of hip flexors..
  • (203) A tendency to cramp or excessive tension in the neck can indicate its weakness or a defective position.
  • (101) (104) head: headache or other Pain in the head can increase significantly in the headstand
    1. An unfamiliar feeling of pressure in the head is normal at first, but should improve as the practice progresses. If there is no improvement, look for factors that cause the pressure, such as increased blood pressure.
    2. latent headache can be significantly intensified under increased pressure. As the differential diagnosis of headache is very large and it must be distinguished from migraine headache, it is not possible to go into all the details. Sometimes a longer headstand helps against headache of different genesis and intensity, where the pain worsens a little in the first 3-4 minutes and then decreases. Running also often helps.
    3. Pressure on the eyes: increased intraocular pressure requires clarification. Specialist is the eye doctor
    4. Latent or manifest colds can cause increased sensation of pressure in the head
    5. Dizziness is also an intolerable symptom that can have many causes and should be clarified.
  • (680) esophagus/stomach/intestines: A disturbed closing function of the stomach or oesophagus can be particularly noticeable here, as well as an overfilled stomach or intestine, which also can exert pressure on the heart and lungs up to pectanginous complaints
  • variants::
    baddha konasana in headstand
    two-legged upswing
    three-point
    single-legged upswing
    eka pada
    elbows raised
    pushing the elbows apart
    pushing the elbows towards each other
    free
    learn to stand free
    hanumanasana in headstand
    head raised
    wagging the legs
    with bound feet
    padmasana in headstand
    supta padmasana in headstand
    padmasana forward bend in headstand
    samakonasana in headstand
    twist
    transition to elbowstand
    transition to uttanasana
    vrksasana in headstand
    krouncasana in headstand
    rectangular headstand
    rectangular headstand at the wall
    lower bent legs
    (P) support on upswing
    (P) learn to stand free
    (P) krouncasana in headstand

    instruction details/hints
    1. sit upright, stretch your head to the ceiling and reach up to the top of the head with your arched palm to find the highest point of the head. From this point forward is a relatively flat area where you are supposed to stand on. For most people, the highest point of the head is approximately at the beginning of the last third of the head (seen from the front), but for some, it may also be further forward.
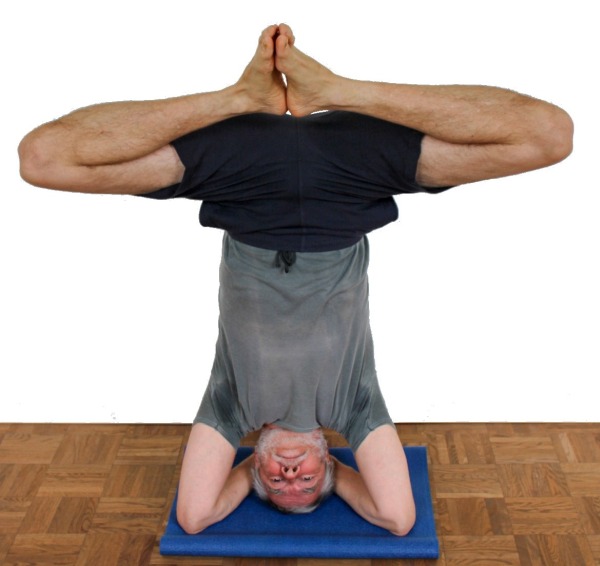
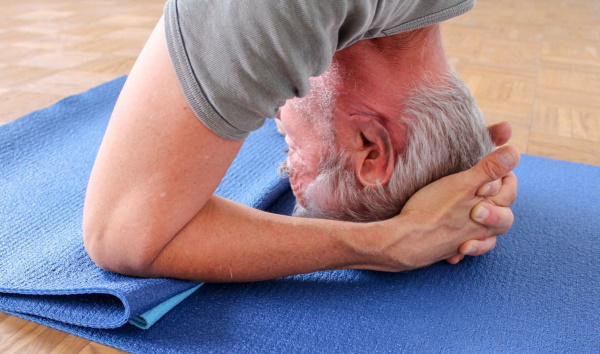
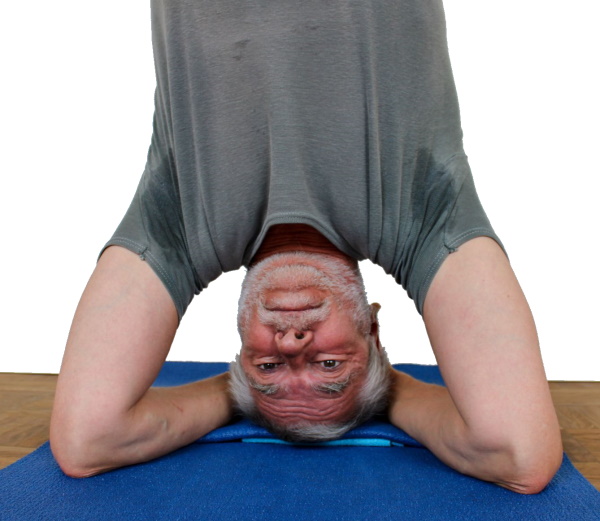
    2. interlock your fingers firmly. Place the small finger underneath in front of the other little finger on the inside of the hand, so that it is not squeezed.
    3. Move the wrists as far apart as possible
    4. use a twice-folded yoga mat (i. e. 4 layers on top of each other) as a base.
    5. put your hands with your forearms on the mat so that the elbows are shoulder wide.
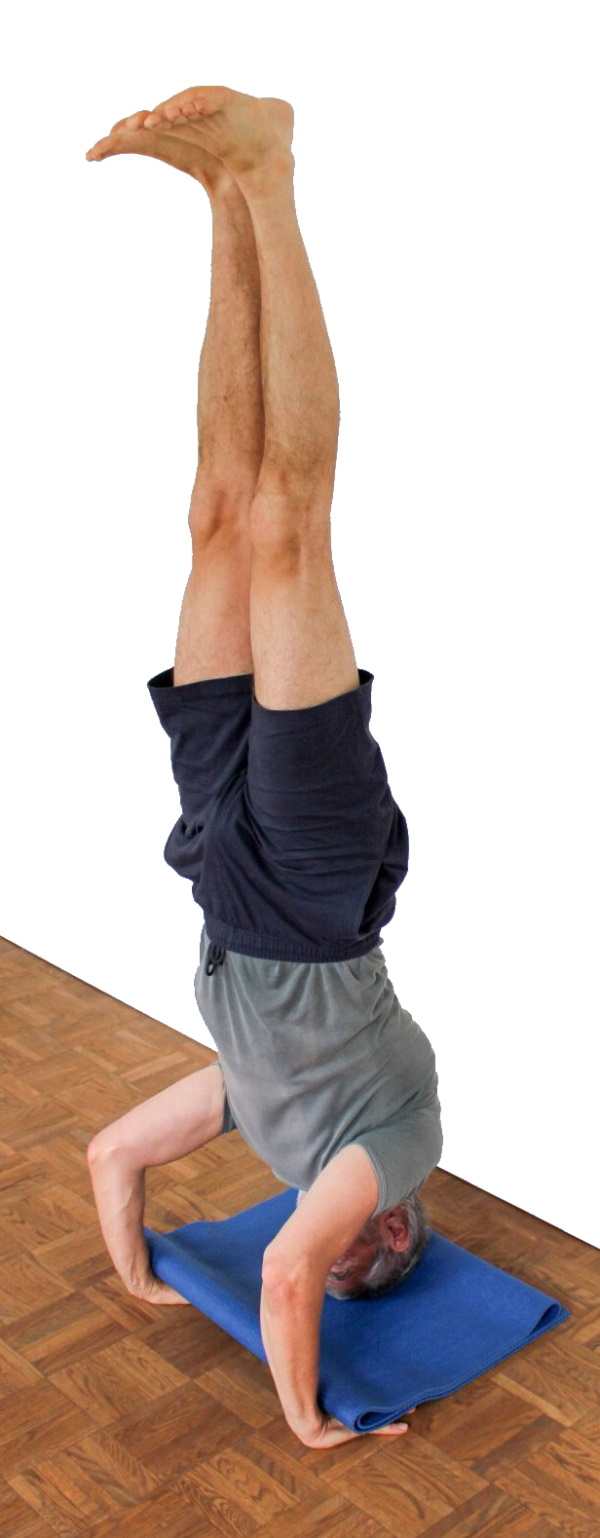
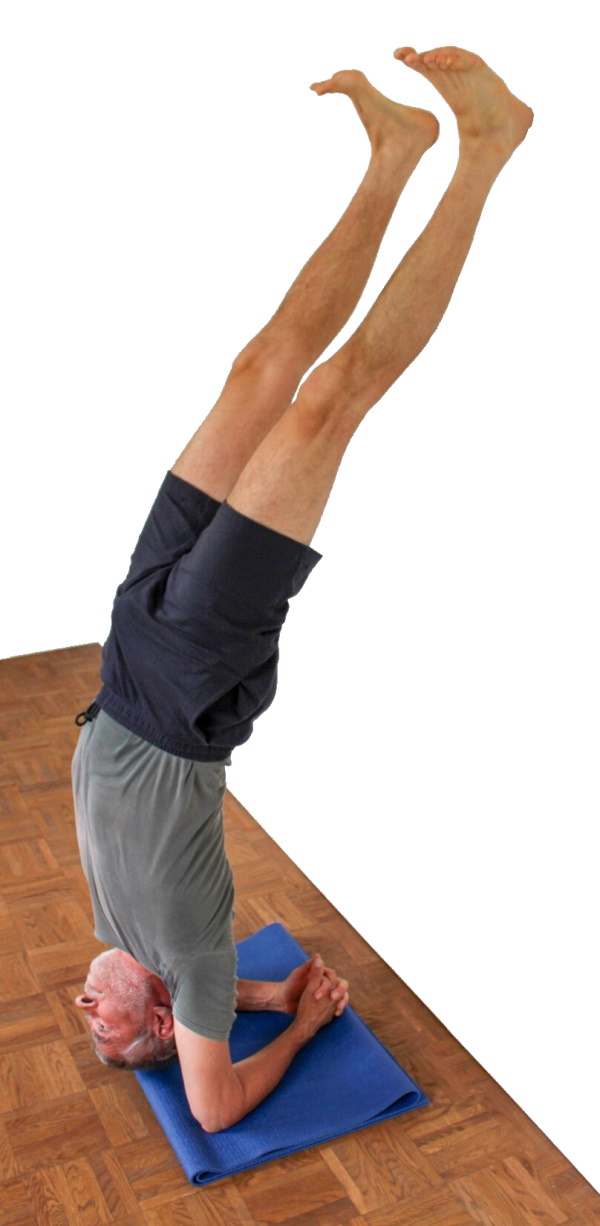
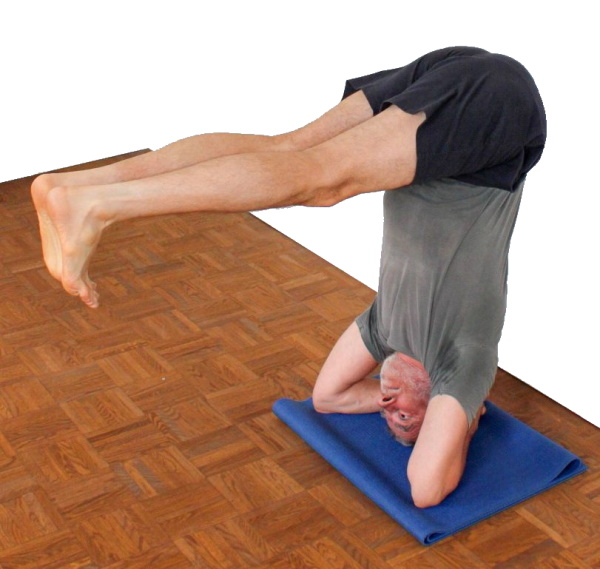
    6. run with your feet so far in front towards the head that the pelvis stands about above the shoulders; keep your back as straight as possible and make sure not to change the area with which your head is standing on the ground.
    7. put maximum weight on hands and arms
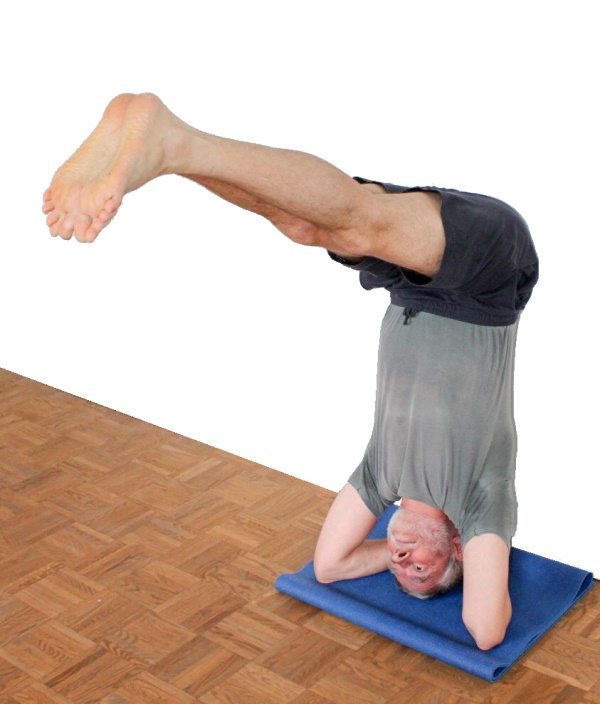
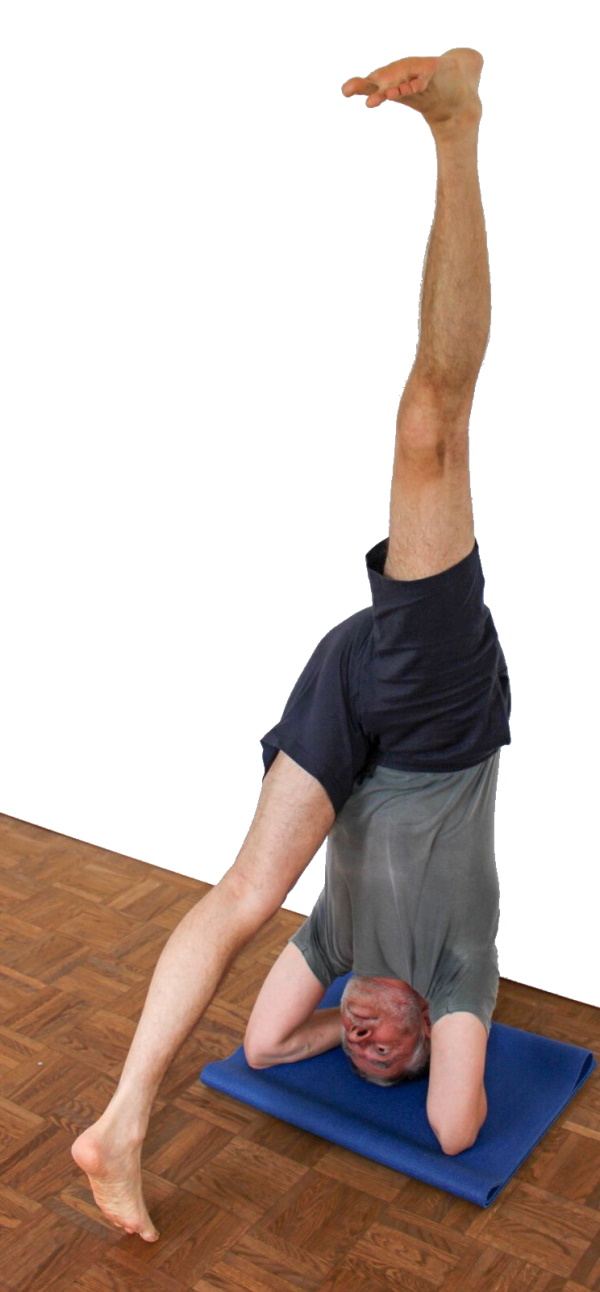
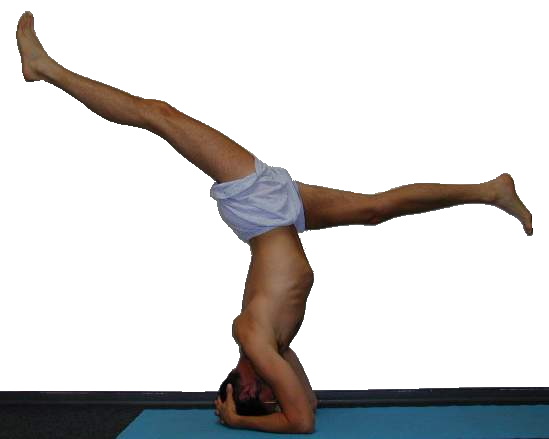
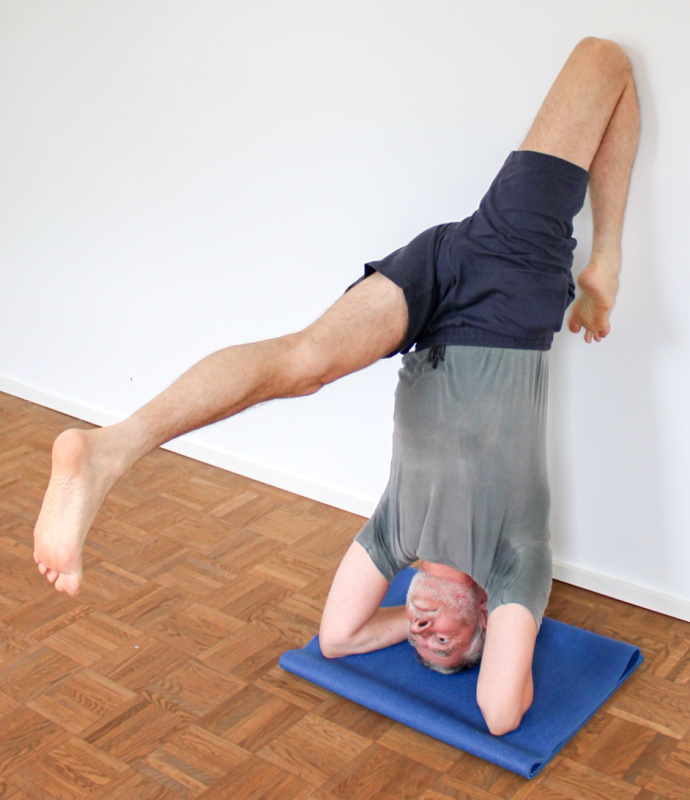
    8. lift one stretched leg and swing it up and down to estimate the possible momentum
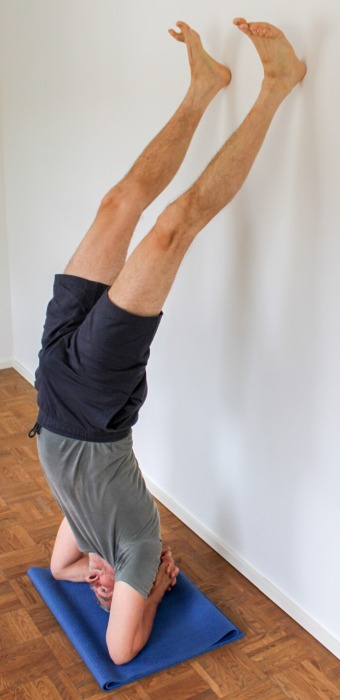
    9. with a strong swinging up of the leg jump off with the other leg. When the first leg touches the wall, pull the second leg forward towards the wall.
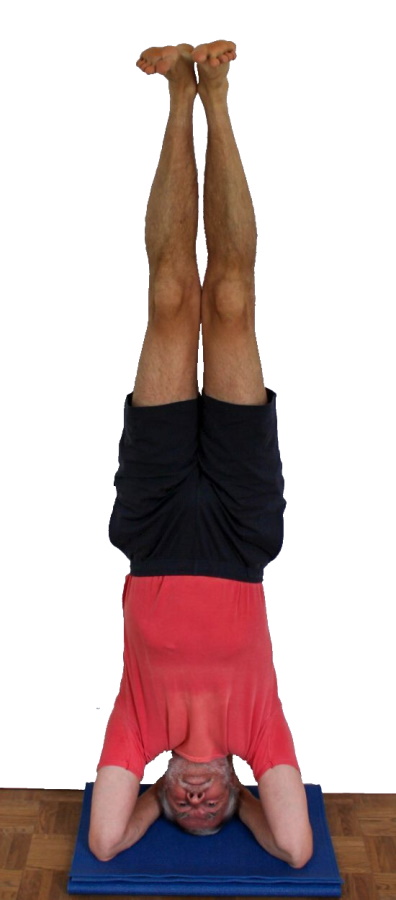
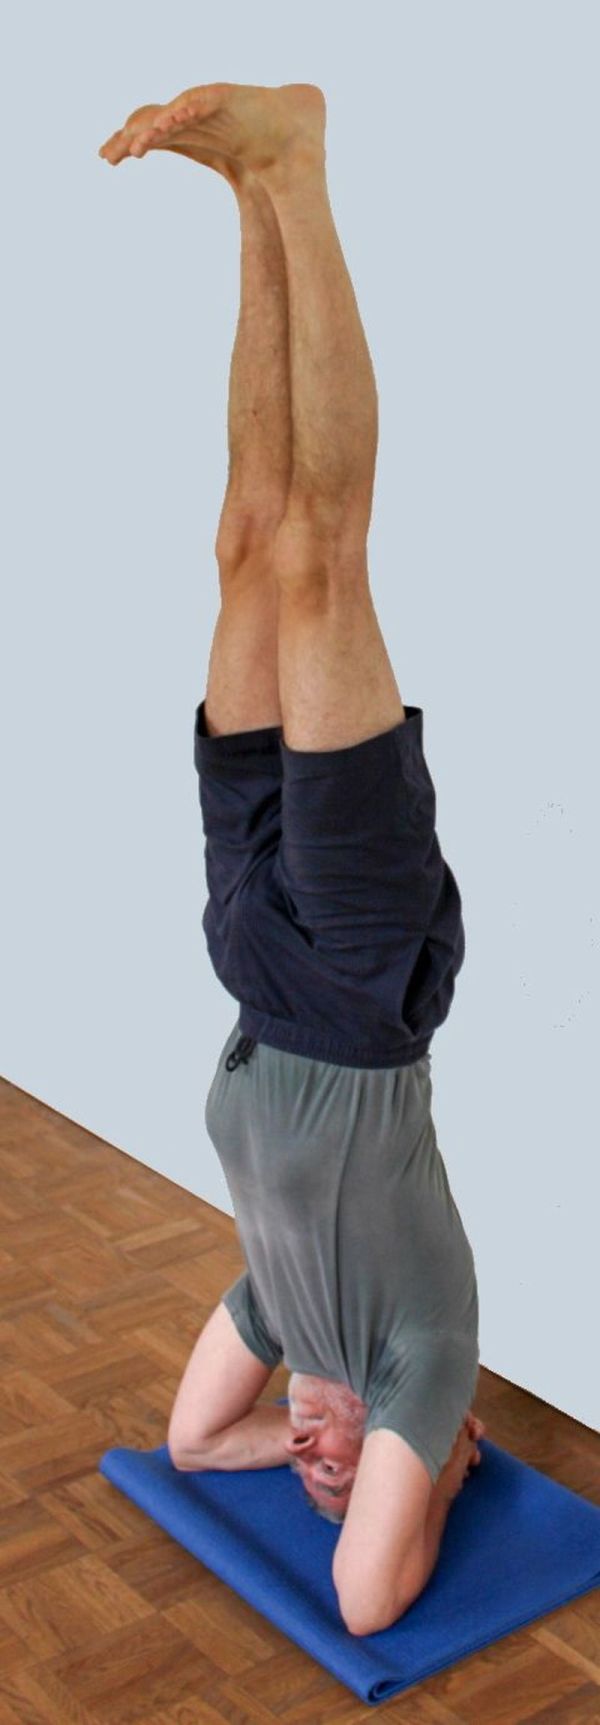
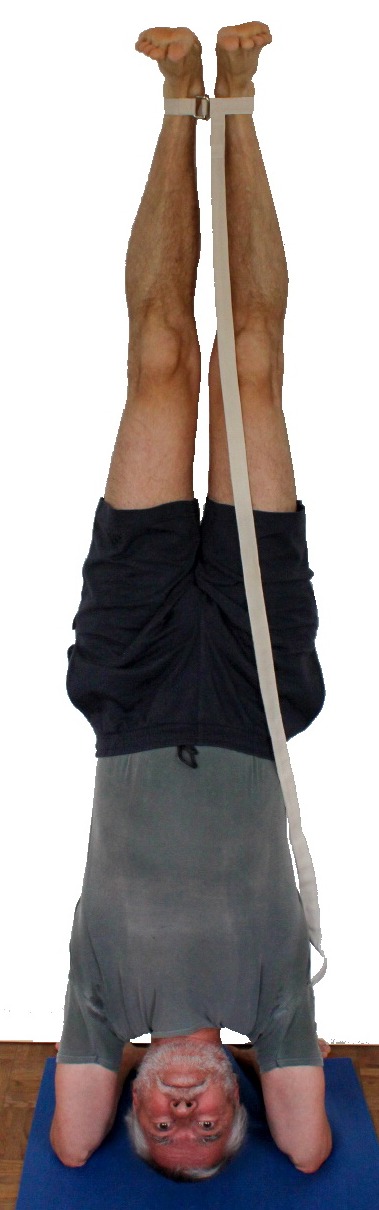
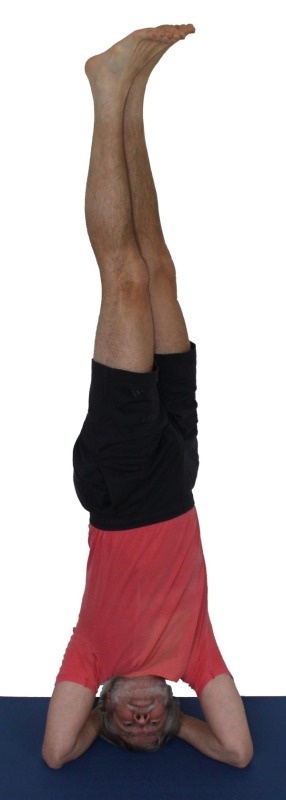
    10. Stretch the knees, turn in the legs slightly and hold the pelvis upright with a little work of the butt muscles.
    1. headstand is the much more advanced exercise compared to handstand The handstand (on the wall) should be mastered to a certain extent before the first headstand is practiced. The focus is on the ability to lift the upper part of the body using the strength of the shoulders and arms, as well as the ability to control the swaying that occurs.
    2. the twice-folded yoga mat is a good measure of the maximum thickness and softness of the mat. Any further layer of mat or any softer material is suitable to make the headstand more shaky and usually costs much more power due to more complex balance work. On soft surfaces such as carpet, two layers of matt may be optimal. Fluffy blankets are not recommended, as the lateral movement of the elbows can hardly be prevented by the beginner.
    3. when positioning the elbows note that they slide about 3 - 5 cm apart over the flesh of the forearms. After that, the elbows should still be shoulder-width. In some cases of very stiff shoulders, this requirement may have to be put into perspective.
    4. for practice purposes, the elbows can also be positioned narrower than the shoulder width for advanced practitioners
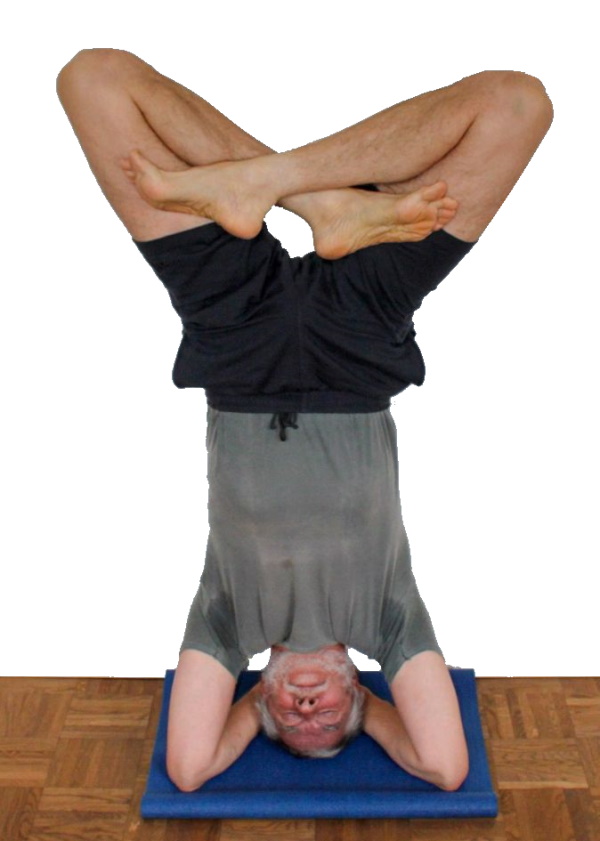
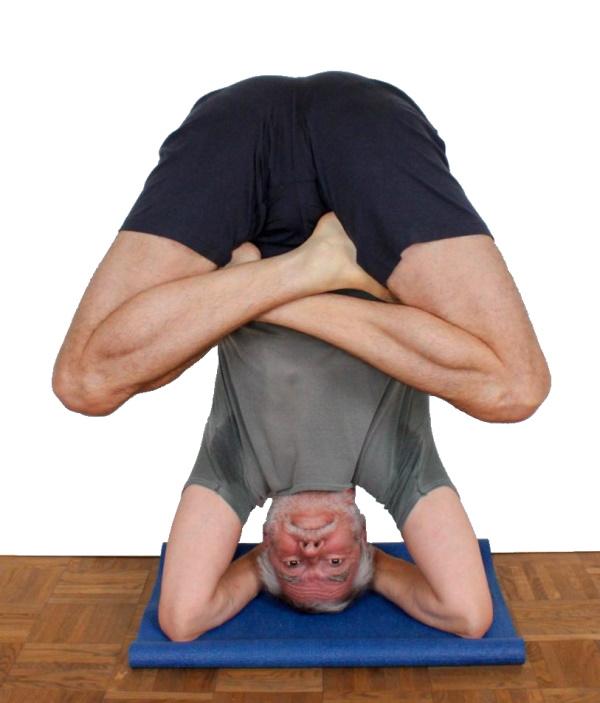
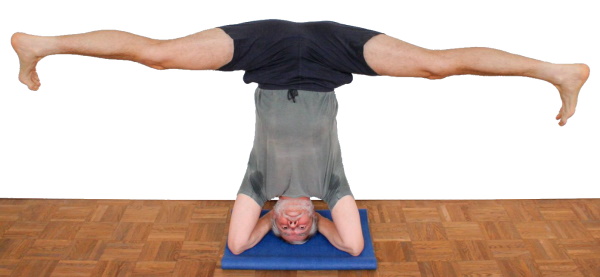
    5. there are two ways to move your arms in the pose:
      1. apart: the simpler version, increased work with the shoulder muscles possible, safe standing
      2. inside: completely different work with the arms, slightly less stable stand
    6. Since the balancing mainly takes place in the direction forward/backward, the safety of standing depends essentially on the trapezium, which is formed from the two wrists and the two elbows. This means that if the elbows are clearly wider than the shoulder width the elbows make the trapezium less high and the standing position less stable.
    7. becoming familiar with headstand takes place in several phases:
      1. Beginning of the head standing exercise: it mostly cannot be done longer than 2-3 minutes, after which the pressure on the skull plate will subjectively be perceived as "too high".
      2. Get used to the pressure on the skull plate, until about 5 minutes, next topic will be the neck muscles.
      3. the problem of the neck is also solved slowly, the area between the shoulder blades becomes interesting: up to about 10 minutes.
      4. the sensation for the area between the shoulder blades gradually fades and the sensation of the tonus of the muscles in the lumbar region becomes apparent, up to 15-20 minutes.
      5. with correct slight turning in the thighs and completely neutral hip position in terms of extension/flexion, the leg adductor area may come into play.
      6. due to stretching the heel up the area of the dorsal flexors of the ankle come into play
      Of course, there are many deviations from the sequence described above based on the respective constitution
    8. after a longer headstand (for beginners even after a shorter headstand) it can be quite relaxing for the neck to drop the forehead on the ground. In the beginning, there may a a clear unpleasant perception of the muscles between the upper part of the shoulder blades, but this should fade after 2 - 3 minutes.
    9. for more therapeutic purposes, the place where you stand on the head can be changed. In case of relocation to the
      1. front: there is a larger cavity in the neck, which makes these muscles work more, but considering the angle range of the affected joints this may also require a more extensive after-treatment of the muscles. Not recommended for necks already strained before the performing the headstand
      2. rear: there is less caving of the neck, which makes the muscles work less in view of the more favourable angle in the vertebral joints. can be recommended with restrictions for neck already strained before execution of headstand. Cave: the pressure on the skullcap increases because the contact area becomes smaller. In addition, the further the contact area is shifted towards the crown of the head, the less stable this design is.
    10. the headstand can in many cases be very effective against headache. Be careful in assessing the phenomenon. It is not about migraine headache. For many people, the term migraine still stands for a stronger headache, but this is a condition based on different causes and mechanisms. In no way should migraine be treated with the usual headache remedies, nor should it be treated with the (positively polar) headstand, but rather with the (negatively polar) shoulderstand. It should not be treated with the usual headache treatment, nor with the (positively polar) headstand, but rather with the (negatively polar) shoulderstand. If not migraine but headache is given, it may have the following causes and manifestations, among others:
      1. Pressure or pounding in the head as a result of colds, hypothermia or draughts felt in immobility but in particular in movement or strain
      2. throbbing after alcohol or drug use, esp. in movement or strain
      3. sensation of tension in the neck with continuation in the lower and middle back of the head (where the affected muscles begin)
      in all of the above-mentioned cases, as a rule headrest provides relief or elimination of the discomfort by significantly increased blood circulation in the head (due to the reversal position) or by prolonged, calm use of the tense musculature. Mostly a significant initial worsening occurs after taking headstand, which usually eases off after about the 3rd to 4th minute and is then outweighed by the onsetting relief.
    11. headstand as a complete reversal pose that can be kept for a long time is naturally an interesting requirement for the cardiovascular system. Thus, in the case of a longer headstand, every beginner and also advanced user (then later on) suffers a bloodless state in the feet and maybe in the lower legs, which may feel like a "falling asleep" of the affected body parts and, due to largely empty vessels, also through paler skin. This poses less of a health hazard than an impairment of well-being. At the end of the headstand the re-circulation of blood in the feet often results in an intensive red-orange-coloured glow of the feet 
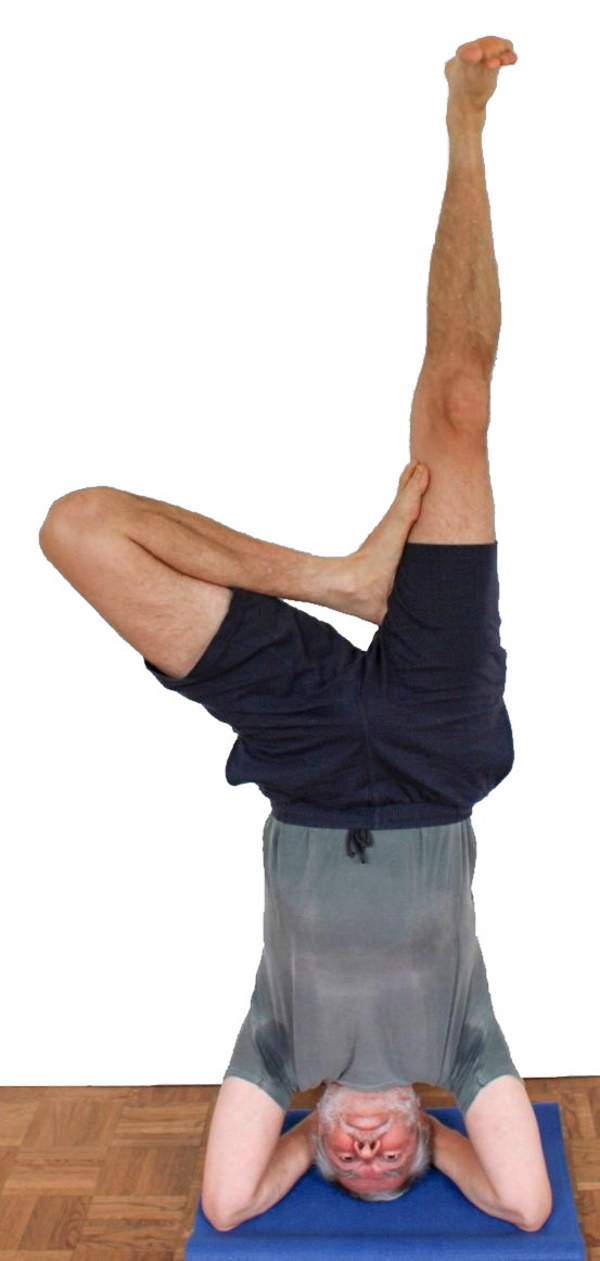
combined with an intensive feeling of warmth. If you want to prevent your feet from falling asleep, you can, for example, bring your feet into the same pose as in baddha konasana when you perceive the beginning of the falling asleep. This is usually enough to prevent the feet from falling asleep and to stand in your headstand for a few more minutes.
    12. The question arises again and again about the weight with which the head is supposed to press on the ground. The answer is simple: for the more advanced, it can be maximized, unless a certain powerful effect should be achieved on the back and shoulder muscles. For beginners, choose the weight according to skill and tolerance up to complete relief of the head.
    13. When swinging up and down a leg before taking headstand, make sure that this leg remains stretched so that you don't immediately push yourself off the wall again.
    14. for more advanced students, the slow, two-legged upswing into the headstand is recommended.
    15. Slightly turning in the legs in an upright pelvis is a similar work as in back bends. Due to this work, fatigue of the adductor muscles may occur after some time.
    16. The stretching away of the heels doesn't mean that the balls of the feet should be pulled with force, which might quickly lead to fatigue of the shin muscles. This movement serves to give better attention to the movement of the whole legs in balancing. If the calf muscles are clearly inflexible, it may be necessary to cut back on stretching away the heel in order to avoid cramps.
    17. The neck and muscles between the shoulder blades can feel quite tense after headstand. There are two ways to turn that off:
      1. sit on the lower legs and put your forehead on the floor (balasana, child's pose)
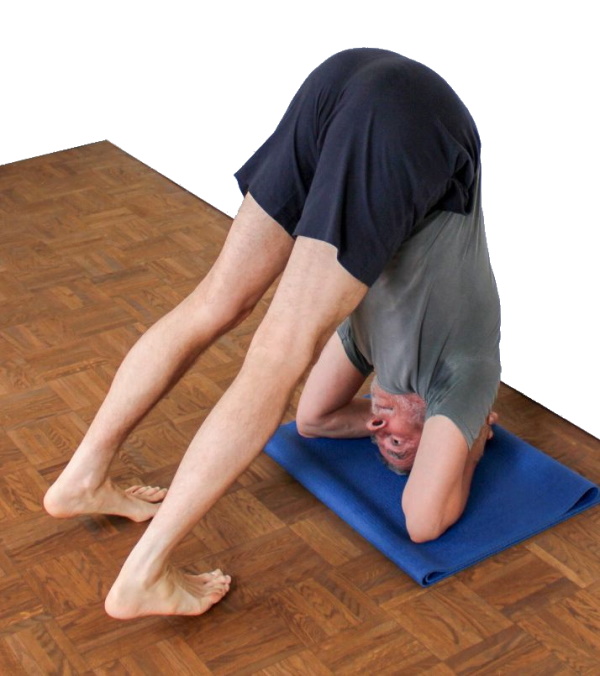
      2. Coming from headstand (best synchronized with stretched legs) in uttanasana
      In both cases, the muscles in the neck and upper back area are more or less clearly perceived, in the latter case also other parts of the back muscles, such as the erector spinae both are harmless and usually disappear within the first 1 to 3 minutes.
     
    known issues that may occur even when practicing correctly
       

      variants

      baddha konasana in headstand

      instructions details
      1. take the pose as described above
      2. bend slightly in the hips, exorotate the thighs in the hip joints, bend the knees, rotate the legs maximum and put the outer edges of the feet on each other as soon as possible
      3. complete the supta baddha konasana kind leg pose and pull the heels towards the pelvis
      1. The initial bending of the knees and flexion in the hips results in a slight change in the centre of gravity towards the elbow. Notice this and react accordingly. In standard headstand this should not be a problem as the physical support base is large enough. If the legs are exorotated, the centre of gravity moves again from the elbows in the direction of the head or wall.
      2. do not pull the heels towards the pelvis so strongly that parts of the hamstrings start to cramp. If a cramp develops, stretch the legs back towards the ceiling, canceling the exorotation is not so important to stop the cramp.
      3. Since the weight of the lower legs and the only moderate tension of the hamstrings (a larger one would most probably lead to their cramp) have a preventive effect on the knee, the probability of a baddha konasana-typical knee stress is significantly lower here.
      4. of course there is no possibility to turn out the thighs with the hands to relieve the inner knees. Usually, however, the effect described above outweighs this. Conditions with pathological changes of the knee joint can be an exception.
      5. In contrast to the standard variants of baddha konasana or supta baddha konasana, where gravity pulls the legs to the ground until the tension of the adductors outweighs this force, no gravity forces pull the knees out of the visual field here. However, this can be done to the limit of flexibility with the extensors of the hip joint, where again the center of gravity changes a little.
      6. In contrast to poses with baddha konasana-foot or feet on the floor, the counter-pressure of the floor is missing here, which reduces the slight endorotation of the lower leg in the knee joint in relation to the thigh which can also have a positive effect on the state of the knee.
      7. as in all headstand variants, pay attention to changes in the centre of gravity when taking the pose and in all corrective movements. Slightly changed pressure of the elbows on the ground is generally sufficient for correction.
      8. The knees move apart, out of the field of vision and towards the floor. The feet move to the pelvis, also out of the visual field and to each other for the best possible contact of the soles of the feet, or at least the outer edges of the feet, depending on flexibility.
      9. For further reduction of inner knee discomfort, the lower legs can be turned out by the biceps femoris, which moves the heels away from the wall and presses the forefoot more strongly against the wall.
      10. this variant can be free or with a wall
       
      known issues that can occur even when running correctly


        two-legged upswing

        instructions details
        1. take the pose as described above
        2. place your hands as described above for headstand and get into the dogheadstand with your head facing the wall and the distance of your hands (for standing against the wall) only 10 cm from the wall. For free standing the wall or the distance from it plays no role of course.
        3. walk with stretched knees with your feet further and further to the head, whereby the pelvis lifts further and further and the upper body straightens and stretches more and more
        4. run so far to the head that the weight of the feet on the ground goes towards zero, whereby the pelvis moves a little over the head in the direction of the wall
        5. once the feet have lost their weight, lift the stretched legs to the vertical using the force of the hamstrings and other hip extensors, keep on stretching the spine
        6. align the body for the precise headstand
        7. The two-legged upswing differs in many parameters from the usual one-legged jumping. In contrast to this, headstand is taken only from strength and flexibility and completely without swing. This has its prerequisites:
          1. very flexible hamstrings: the point at which the mass distribution of the body is so favorable that the feet have no more weight on the ground, the center of gravity in the physical support base from the elbows and hands corresponds to a very good uttanasana or pascimottanasana. However, with these you would normally not demand a stretched back - except with some special variants with the attempt of a thoracic spine back bend while a hip flexion, which can be used very well as preparation for a two-legged upswing. These include among others Table variant of the uttanasana, upavista konasana with pad, and dvi pada-variant of the handstand
          2. Strength in the autochthonous back muscules and the hip extensors (hamstrings and butt muscles). The first one is needed because the large lever of the legs has a tilting effect on the pelvis out of the vertical and thus has a flexion effect on the back. The extensors of the hip joint are those that lift the legs against gravity, thereby both its mass and its lever arm contribute to the fact, that this for some less trained people is perceived as difficult or even impossible at first
          3. Power of the shoulders in direction of frontal abduction: the shoulders press the elbows against the ground and stabilize thus against the leverage effect of the lifted legs, the closer the gravity perpendicular is to the connecting line the elbow is, the more force the shoulders must use. In order to alleviate, one could come up with the idea of moving the center of gravity further in the direction of the hands, which requires even greater flexibility in the hamstrings or bends the back more. The flexibility of the shoulder is not without importance here. The arms are not, as in many other poses, in 180°+ frontal abduction, but strongly exorotated, which increases the flexibility required in the shoulders. In addition, there is a much greater danger of hollowing the neck if, as can often be seen, in cases of lack of strength in the shoulders the pelvis is clearly moved towards the wall.
          4. Power of the triceps: the triceps is needed when the center of gravity moves in the direction of the head or beyond it in the direction of the hands. Then the hands have to be pressed to the ground by power of the triceps to stabilize the upper body above the arms and shoulders.
        8. The difference to the one-legged upswing lies also in the fact that the forces act statically and must be held. The normal upswing is a kinetic process which, when the heels hit the wall, reaches a point where many variables are eliminated. Only the effects of mass inertia still have to be overcome, with which the swinging upper body including the legs (the further away from the feet the more) still swings to the wall, i.e. legs, pelvis and upper body still have to be "intercepted". In contrast to this, kinetic forces hardly occur during the two-legged upswing, since the demand exists, the swing should be executed at any slow speed and even reversibly; although this does not necessarily have to be done in daily practice, but the ability to do so should be developed.
        9. before the upswing the feet must be relieved so far that no more weight rests on them at all, not even a part of the own weight of the legs. The centre of gravity of the body must be shifted into the physical support base, i.e. the trapezium formed by the two elbows and the wrists. This condition is not fulfilled as long as there is still need to push off with the thick toes. The upswing is mastered if it can take place as slowly and reversibly as you like, i.e. you can raise your legs a little further or lower them in between, just as you can remain in a certain position for a while.
        10. the elbows must never be placed lower than the head. Normally a mat would be placed under the head AND elbows so that these three rest sufficiently but not too soft and at the same level. In general, the elbows can also be placed higher than the head, in order to compensate for a piece-wide flexibility restriction of the shoulder in direction of frontal abduction. Note, however, that the softer the elbows lie, the more the applied force evaporates in the underground, in addition then the feedback of the underground i.e. about the pressure exerted worsens
        11. the lifting of the legs creates another great force which wants to bend the back, beyond the tendency of the back to bend already caused by running up with the feet. At the moment the feet are lifted, even more powerfully work in the back and notice if and how far it bends. The load on the elbow and the demand on the shoulder to stabilize by even stronger frontal abduction also increases significantly at the moment the feet are lifted off.
        12. the upswing becomes significantly easier if the pelvis is moved a little behind the head, i.e. the perpendicular of the pelvis lies behind the point or area of the head resting on the floor. In the course of the upswing this shift must be reversed, otherwise the weight of the pelvis would still be behind the head and balancing would not be possible by force of the shoulder; if the pelvis remained too far away from the wall, the triceps would be enormously challenged and could do this work only if the center of gravity was not further away from the wall than the elbows.
        13. the exact gravity perpendicular of the body matters during upswing and, as soon as the upswing is reasonably controlled, it is a free parameter with which to work: if the center of gravity is shifted as far as possible in the direction of the head and possibly even further in the direction of the wall, the upswing becomes relatively easy, however, besides curving the back significantly an unnatural hollow of the neck occurs easily. It is much more interesting and largely free of this side effect, to keep the gravity perpendicular as close as possible to the connecting line of the elbows, so that great strengthening of the muscles involved is possible, this includes larger parts of the back of the body and shoulders
        14. the abdominal muscles should remain as soft as possible during the upswing, the arm biceps is also soft. If the arm flexor group (including the biceps) is used, this is usually the result of an attempt to relieve the load on the forearms to contribute to balancing, which is not in the sense of the pose and usually an expression of a lack of sense for balancing.
        15. stretch the knees and stretch the heels away during the upswing, the upswinging legs are like in tadasana. Through the work of the gluteal muscles a certain inclination of the legs to turn out may occur, compensate this by focussing especially on lifting the inner knees.
        16. hands and fingers are soft. Sometimes the fingers are pressed against each other with force or the hands are closed too tightly as an expression of general tension. Nor is it in the sense of the pose to press the hands against the back of the head by the palmar flexors of the wrist.
        17. of course, the intensive work of the hamstrings to lift the legs produces a certain bending tendency in the knees, even if this may not be too great due to the gravitational effect of the lower legs, which wants to stretch the knees. Nevertheless, stretch the knees with the strength of the quadriceps. If a tendency to cramp in the rectus femoris should occur for a short time at the beginning, this should soon be resolved with the legs swinging up further.
        18. as in normal headstand, it is easier and more stable to push the elbows away from each other than towards each other. Especially at upward-swing without strong kinetic forces, elbows are pressed apart anyway, when upper arms are positioned slightly diagonal outward. Support this movement from the lateral abductors of the shoulder.
        19. of course it is even more important here than in a one-legged upswing by choosing a suitable non-slip base to make sure that the elbows cannot slip sideways
           
          known issues that can occur even when running correctly


            three-point

            instructions details
            1. fold a mat twice in half, so that four layers of the same size are on top of each other
            2. kneel on the floor. Place your head in the middle of the rear longitudinal edge of the mat and push your hands under the front edge on the left and on the right.
            3. put a lot of strength into your arms (triceps) and shoulders (deltoids) to push your hands to the ground and take a kind of dog headstand this way
            4. run with your feet further to the head, if possible until the centre of gravity is in the triangle of the hands and the head, stretch the upper part of the body in the best possible way
            5. swing one-legged as described in standard headstand or bi-legged with both legs synchronously, powerfully and slowly up into the headstand
            1. Here, too, the arms are very important for stabilization and it is necessary to use the triceps and deltoid muscles again, but the upper arms are at a different angle in the shoulder joint, which many people find more pleasant and where the deltoid muscle is less prone to cramps. The exorotation of the upper arms is slightly increased, but the angle in the elbow joint is more favourable for the triceps to exerting force.
            2. the pose becomes more stable when the hands are pushed away from the head in the direction of the visual field rather than in the opposite direction. For this, the triceps will usually have to work noticeably. In contrast to normal headstand, the arms are not pushed outwards significantly. This can optionally be integrated as additional work.
            3. Since here the head, in contrast to the basic pose, does not lie clearly within the physical support base, in addition only three instead of four points carry the load of which also one is the head itself, this pose is a much greater challenge to the cervical spine. If in doubt about their health, this variant should not be practiced until further notice. According to the design, almost 100% of the body weight rests on the head. There is hardly any possibility to relieve the strain with the arms as it is possible in the basic pose with stepless between 0 and 100% relief. For a relief the body with the legs or these alone from the vertical would have to be inclined in the direction of the hands, which would lead to a greater demand on the arms and to a clear additional load on the neck by moments, which push the shoulder area and head away from the hands.
            4. The hands should press flat against the floor with even pressure distribution. Restrictions in the flexibility of the palmar flexors of the wrist or the finger flexors can have a significant disturbing effect here. Spport of the wrist for angle relief in the dorsal wrist, like the one used in handstand or dog head up, must be handled much more carefully here, after all, the welfare of the cervical spine depends on the evenly strong pressure especially of the wrists on the ground ! If the base is too thick and too soft, the balancing becomes less safe with a clearly increased risk for the cervical spine!
            5. Take the pose by slowly changing the application of force so that you can react sensitively and in time to the changing balance of power and do not endanger the cervical spine.
            6. The shoulder blades should remain stable in depression (moving towards the pelvis), which is usually caused by the pressure of the elbows (here accordingly the hands) on the ground. In order to keep this as constant as possible, the shoulder blades should be depressed permanently and with a certain force.
            7. Fatigue symptoms in deltoidus, triceps or palmar flexors of forearms can force you to leave the pose or suggest this. Before the control becomes too bad due to lack of strength and the cervical spine is endangered, the pose should be left orderly. If the pose is left exactly as it was taken, a lot of power is needed in the short term. Alternatively, a leg can also be swung back to the floor, which immideately relieves the arms and shoulders, so that the cervical spine will not be endangered when the feet reach the ground.
            8. In this variant, the greatest possible ease of standing is possible, as far as the upper body is concerned. When standing still, there are hardly any forces and moments coming from both extremities, which influence the upper body, so that one gets along with very little work of the trunk muscles. This looks completely different when standing unstable, because the legs do not only have a large mass, but also represent a long lever arm. With this pose you always have to keep in mind, that the legs and the torso according to mass and length define a lever tens or hundreds as great in relation to the cervical spine, which, if not controlled, acts on the cervical spine! Flexibility restrictions of the hip flexors may prevent the hips from stretching 180°, thus a simultaneous vertical position of legs and upper body would be impossible. If the trunc is vertical and the legs oblique, the pose becomes much more strenuous for arms and shoulders. Furthermore, the load on the cervical spine is greater. If you would try to keep your legs vertical, the upper body must tilt accordingly, resulting in an undesirable hyperlordosis of the cervical spine.
            9. To put it clearly again: this is not a variant for beginners ! If you haven't learned how to handle your body weight in dog positions and simple inversion poses, you should learn this first of all, before you commend your cervical spine to the care of the arms. First learn the downface, upface dog, stick pose, handstand and rectangular handstand, then standard headstand and then the three-point headstand !
             
            known issues that can occur even when running correctly


              single-legged upswing

              instructions details
              1. the one-legged upswing is described in the basic pose. However, this should also be practised and succeed with the other leg as a swinging or jumping leg
              1. in handstand even more pronounced than in headstand the differences between the control of either sides of the body not rarely result in unequal success or ease of the upswing with one of the legs as the swinging one. With handstand this is even more pronounced than with the headstand since the body mass must be accelerated further upwards, i.e. more energy must be used. This should be practiced in both poses until the other, unfamiliar side feels natural as well and without any internal resistance.
               
              known issues that can occur even when running correctly


                eka pada

                instructions details
                1. come one-legged or two-legged in the headstand
                2. begin to move the right leg from the vertical into the field of vision.
                3. to keep the centre of gravity favourable, move the pelvis backwards only as far as necessary while you lower the leg as far as possible
                1. the eka pada variant has a similar effect as taking headstand: the pelvis must be moved a little away from the elbows out of the field of vision, so that the center of gravity remains favorable. This shift must increase, approximately to horizontal legs. Of course, there is a certain amount of room for manoeuvre here and it is rather a question of how strenuous the pose may become, can or is to become. If the leg moves beyond the horizontal in direction of the ground, the need to evade with the pelvis reduces again with each degree
                2. To the extent that the leg continues to sink, the necessary work of the shoulders will increase. The increase depends on the extent to which the pelvis is moved back: the more one, the less the other. If a strong work, i.e. a strengthening effect on the muscles involved, especially in back and shoulder, is desired, the evasion of the pelvis to the rear should be kept as low as possible.
                3. with very good flexibility of the hamstrings, the quadriceps will come to rest on the lower ribs.
                4. The lowered leg has the inclination to bend in the knee due to the pull of the ischiocrural group (the more limited the flexibility, the earlier and more). If the lowered leg is stretched strongly to prevent bending of the knee, there is of course a certain tendency to cramp in the rectus femoris, as the hip is also bent or is actively bent further.
                5. this pose can be carried out in two different ways: by simply letting the leg sink out of its gravity until the state of equilibrium between gravity and tension of the ischiocrural group is reached, and on the other hand as an active flexion in the hip which goes beyond this and may run into the above described more or less clear tendency to cramp in the rectus femoris.
                6. the sinking leg has a tilting effect on the pelvis, which tends to bend the back in direction of kyphosis. However, as long as the heel of the upper stretched leg rests on the wall, the flexibility limitations of the hip flexors will prevent any significant flexion of the lumbar spine, especially if they are still quite pronounced. Nevertheless, an increased amount of work of the back muscles is necessary to keep the back stretched.
                7. for lowering or letting lower the leg there is, strongly depending on the exact position of the pelvis, possibly a point of no return, from which the centre of gravity is no longer in the physical support base of elbows and wrists and the pose is forcibly left in the direction from which it was taken. Thanks to the unequally larger (here: deeper, in the sine of the distance of the connecting line of the wrists to that of the elbows) support base, this effect is much less pronounced than in the eka pada variant of handstand
                8. also in this variant the shoulder musculature can be strengthened excellently, if the pelvis is moved only a little backwards compensatory and thus the center of gravity comes by lowering the leg clearly further in the direction of hands
                 
                known issues that can occur even when running correctly


                  elbows raised

                  Compensation of significant flexibility limitations of the shoulder in the direction of frontal abduction
                  instructions details
                  1. put the elbows on a heightening of a few centimeters corresponding to the limitation of flexibility in the shoulder: the more limited, the more heightening. Make sure that the heightening does not have an edge which would press uncomfortably on the ulna.
                  2. take headstand as described above
                  1. Patches are quite suitable as increases because their thickness is easy to dose and they are not too soft. Depending on the use, an unpleasant edge can also be completely avoided. Flat shoulder plates are also worth a try.
                  2. The increase should not become too large, since with increasing support of the elbows their bending angle becomes increasingly unphysiological for a clear exercise of strength.
                   
                  known issues that can occur even when running correctly


                    pushing the elbows apart

                    instructions details
                    1. take the pose as described above, but additionally press the elbows against the friction of the mat permanently outwards with force
                    1. as already described above, according to the construction of the pose, the elbows are pressed a little apart anyway. This naturally stabilizes the pose additionally. In addition, this can also be forced in order to strengthen the abductors in the shoulder area more.
                    2. of course, the nature of the underlying surface plays an important role here. The usual yoga mats should provide sufficient friction so that the elbows do not slip away. Materials with less friction are not recommended, at least if no belt is used around the forearms near the elbows.
                     
                    known issues that can occur even when running correctly


                      pushing the elbows towards each other

                      instructions details
                      1. take headstand as described above, but push your elbows inwards, i.e. towards each other
                      1. according to the construction of headstand with elbows on the floor and slightly sloping upper arms, the elbows would be pushed apart slightly. Here the opposite is done. This results in a work of the pectoralis and the deltoideus pars clavicularis. The stability of the pose seems to be slightly reduced, which concerns the lateral balancing. So pay even more attention to work with both arms evenly. This variant emphasizes the aspect of stretching upwards.
                       
                      known issues that can occur even when running correctly


                        free

                        instructions details
                        1. here again there are both important possibilities to take headstand: slowly and powerfully on both-legged or with swing one-legged. For the first see the corresponding instructions above, the second one is possible without touching the wall also if you have enough control and sense of balance, or as a leaning headstand later detached from the wall. Again there are two possibilities: either both legs are detached from the wall at the same time or one after the other. The second possibility seems easier because it is less strenuous. But in the end it makes sense to detach both legs fron the wall simultaneously, which is described below. Here now the remaining variant one after the other is to be explained
                        2. take the leaning headstand
                        3. move upper body and pelvis into the vertical and move one leg a bit away from the wall, so that the two legs take about the same angle from the vertical and form a symmetrical Y with the upper body seen from the side.
                        4. when the legs are at the same angle to the vertical, the weight of the heel on the wall will be minimal
                        5. move both legs quickly from their current position to the vertical at the same time
                        1. Leaning headstand requires far less muscles to remain stable. For free standing, it is therefore necessary to be prepared for the necessary work and to excert the necessary strength immediately.
                        2. The free-standing method described here is not the most promising model, as it does not convey any additional sense for balancing and the necessary application of force and the muscles in question are not trained. The procedure described below is much better. It not only gives more awareness for the muscles to be used, especially the front side of the body, which is little used and trained in everyday movements and is therefore less strong and movement conscious, but it is also suitable for strengthening these muscles.
                         
                        known issues that can occur even when running correctly


                          learn to stand free

                          instructions details
                          1. take headstand leaning against the wall as described above
                          2. make sure you strictly stretch your knees during the following, so don't bend either knee even a little; keep your legs completely closed, so don't move one leg without moving the other one at the same time
                          3. move the pelvis until further notice as far away from the wall as possible, in any case further than over the shoulders. Keep an eye on the extension of the knees.
                          4. excert some force of the hip flexors and rectus abdominis to move the legs slowly closed away from the wall without any swing, just by force.
                          5. if the legs are moving towards the vertical, move the pelvis in the other direction to keep the gravity perpendicular in the area of where you stand on the the head
                          1. this variant makes clear which muscles are needed for the more unusual direction of balancing. In countless everyday movements the human being bends forward, but extremely rarely backward. Therefore, the back muscles and the hipextensors (ischiocrural group, gluteal muscles) are usually strong enough for balancing and above all conscious enough in their use, the front of the body is, however, rather badly equipped. This means that the work of balancing, which pulls the legs out of the field of vision usually comes quite naturally, but the counter-movement is rather difficult and heavy. This is what this variant tries to convey. If the corresponding muscles are not well developed, it is or seems to be impossible at first to without swing and with legs closed move the them away from the wall and it is tried instead, to move one leg first or to bend the knees to reduce the load in the front of the body
                          2. If you try this variant for the first time you may have the feeling that the muscles supposed to perform the movement are not to find or not have enough strength to perform the movement. Admittedly, this variation does not primarily serve to and is also only conditionally suitable for developing this kind of strength, but it should show quite clearly, what to find and possibly how hard the movement still is. It is often observed how the attempt to pull the feet from the wall results in leaving the wall for fractions of a second only, which is immediately annihilated by the ruling forces. Then it becomes clear that there is still some more strength of the hip flexors, abdominal muscles or the trunk and arms required
                          3. any deviation from closed, simultaneously and evenly moved legs with knees fully stretched is a form of evasion. If necessary, the feet should be tied at the ankles with a belt, which requires a two-legged upswing into headstand.
                          4. to avoid misperceptions or the build-up of too much tension in the muscles of the lower back, the gluteal muscles must of course ensure the maximum extension in the hips. The gluteal muscles should only be released to the extent that it is necessary to pull the legs away from the wall by the power of the hip flexors.
                          5. to support stretching the knees, stretched the heels away. Physiologically this is illogical according to the function of the gastrocnemius and would be expected exactly the other way round, but subjectively in practice it behaves as described, possibly because the position of the foot is much closer to anatomically zero and thus minimal tension of the relevant muscles, which draws attention away from the foot.
                          6. Arms and shoulders must work hard all the time to ensure stability and protect the neck.
                          7. a pronounced sense of effort in the rectus abdominis is a sign that the work to be done has been found (at least in part), but that the level of training of the muscles is barely sufficient
                          8. with the initial movement of the pelvis away from the wall, the upper body will of course also move away from the vertical.
                           
                          known issues that can occur even when running correctly


                            hanumanasana in headstand

                            instructions details
                            1. take the free headstand as described above with appropriate distance from the wall
                            2. simultaneously lower one leg forward into the field of vision and the other backward out of the field of vision without turning the legs or bending the knees
                            3. once the legs have arrived in the horizontal, hanumanasana in sirsasana is taken
                            1. in contrast to samakonasana in headstand hanumanasana requires a quite large distance from the wall, which requires to free standing anyway. This is a prerequisite for this variant.
                            2. in this variant, the legs sink almost solely out of their own gravity. The hip flexors can also be used to bend the hips of the leg that is moved forward/down, to move it further down beyond the effect of gravity, for the other leg, the hip extensors can't do much. From this follows, that the exact 180° angle is harder to reach as if the large partial body weight of upper body, head and arms presses the legs into the position as in hanumanasana. Even more than for the normal forward splits, intensive preparations are necessary here, on the one hand, for the hamstrings e.g:
                              1. uttanasana with several variants
                              2. downface dog, variant "narrow"
                              3. hip opening 5th
                              4. parsva upavista konasana
                              5. parsvottanasana
                              6. krouncasana
                              7. supta krouncasana
                              8. hasta padangusthasana Vorwärtsbeuge
                              9. tryangamukhaikapada pascimottanasana
                              10. downface dog backward with a raised leg against the wall
                              and on the other hand the hip flexors, among others:
                              1. upface dog
                              2. hip opening 1st
                              3. hip opening 2nd
                              4. urdhva dhanurasana
                              5. setu bandha sarvangasana
                              6. ustrasana
                              7. warrior pose 1st
                              8. quad stretching 2 at the wall
                            3. in the front leg a bending in the knee creeps in easily by the pull of the hamstrings, the rear leg must be stretched against the force of gravity. In the same way, the legs easily rotate, which has to be compensated also
                            4. due to the favourable mass distribution this headstand variant is quite stable
                            5. Since hip extension is available to a much lesser extent than flexion, the pelvis tends to tilt backwards. Stabilize the pelvis accordingly and avoid an unpleasant hollow back.
                            6. In addition to bending the two knees, the exorotation of the thighs and lateral abduction in the hip joint occur as evasive movements that must be limited.
                             
                            known issues that can occur even when running correctly


                              head raised

                              instructions details
                              1. place the head on a not too soft support of only a few centimetres and get into headstand as described above
                              1. contrary to all usual recommendations, the influence of the height of the elbows in relation to the head can be explored, by placing the head higher than the elbows. It becomes more difficult depending on the flexibility restrictions, to press the elbows to the ground and possibly the maximum achievable pressure will decrease. So for same stability, more flexibility is needed at shoulders in direction of frontal abduction resp. this shows the loss of stability due to the given flexibility limitations in the shoulders.This variant is not suitable for beginners.
                               
                              known issues that can occur even when running correctly


                                wagging the legs

                                instructions details
                                1. Execute the variant described above for learn free standing.
                                2. Keep your knees strictly stretched and your feet closed. Move the legs alternately forwards and backwards so that the centre of gravity remains favourable, steer the pelvis in the opposite direction each time to compensate.
                                1. the wagging must be stabilized by good pressure of the elbows on the ground, so that the shoulder area and in consequence cervical spine and head move as little as possible
                                2. If the wagging is mastered, a pronounced wagging motion develops, which keeps the center of gravity in spite of all movement with its distinct kinetic forces approximately unchanged and is therefore very stable. The pelvis does not remain completely rigid but follows the inclination of the legs, changes its position slightly to the opposite side: when the legs go forward, the pelvis must go backwards, when the legs go backwards, the pelvis must move forward. Due to flexibility restrictions of the hip flexors there will be a certain limit for the movement.
                                3. The mastery of the wagging shows that both directions of balancing succeed sovereign (forward and backward), thus also the more difficult one: pulling the legs forward again from a position too far back.
                                 
                                known issues that can occur even when running correctly


                                  with bound feet

                                  instructions details
                                  1. bind the feet tightly together at the ankles and swing as described above above slowly, powerfully on both legs and with stretched back up into the headstand
                                  1. the tied feet help to avoid a popular error and gain understanding for the two-legged upswing: it is not uncommon for the upswings into handstand and headstand to instead of jumping off or swinging up exactly synchronously, to jump off with one leg first and then drag behind the other as quickly as possible, so it might look like a two-legged jump/upswing to the unwary observer. The belt around the ankles takes this possibility and does not only force a synchronous movement but above all to the right action of the musculoskeletal system
                                  2. the initial walking in with the feet is made a little more difficult, because the possible "steps" become smaller, because they can only be taken from the ankle and toes
                                   
                                  known issues that can occur even when running correctly


                                    padmasana in headstand

                                    instructions details
                                    1. padmasana in sirasana can be performed freely as well as in the leaning headstand. The easier variant, analogous to the leaning handstand, is described here:
                                    2. take the leaning headstand as you normally do
                                    3. press one heel more firmly against the wall and lift the other off the wall
                                    4. begin to bend the leg detached from the wall, abduct a little, bend and twist in the hip and aim with the back of the foot at the opposite groin and then take this position with momentum
                                    5. place the bottom on the wall and perform the same movement with the second leg as with the first one, the second lower leg crossing the first one
                                    6. bring both legs to the horizontal
                                    1. most instructions and details are analogous to padmasana in handstand and already described there. Here again:
                                    2. this pose is not quite elementary. One prerequisite is not only that padmasana is possible, but also that it can be taken easily, after all, the two hands are not available, to bring the legs into the appropriate position. Instead, the combination of gravity effect (in this pose gravity benefits taking the pose contrary to normal lotus) and swing movement must do. It is helpful not to perform the swing movement of the two legs in 90° flexion in the hips but at a significantly lower angle of flexion, i.e. when the legs still are a little closer to the wall. Of course, the m. sartorius is the muscle that performs exactly this movement, there its name "Tailor's muscle" comes from, but synergistic muscles are at his side for all movement components, which, however, are partly - when we think of the flexion of the knee, for example - run into active insufficiency and into a cramping tendency thus, which is why the movement should be carried out with momentum.
                                    3. as always with lotus-like poses, pain can occur in the knee. Whether they are largermore or less pronounced than in normal lotus is difficult to predict. On the one hand, the gravitational effect of the leg, which puts strain on the inner knee, is missing here, on the other hand, the hands are not available to turn each out of the legs strongly in the beginning.
                                    4. in most headstand variants with butt dropped on the wall, there is a hollow back inclination. However, this is lower here because the gravity of the legs causes a moment in the hips which counteracts this.
                                    5. The easiest way to leave the pose is to abduct one of the two legs further, which causes the foot to leave the pose, then the legs can be moved freely again. After one leg has been stretched upwards, the corresponding heel is pressed against the wall and the hip is stretched to release the buttocks from the wall. Release the crossed legs absolutely before you leave the posture. A rough landing on the crossed knees would result in their injury !
                                    6. if not enough momentum is taken and therefore attempts are made to bend the knee further with the strength of the hamstrings in order to get the foot into the pose, a tendency to cramp in the back of the leg occurs easily
                                    7. In contrast to the leaning handstand, where the buttocks are first placed on the wall before the padmasana leg pose is built up, it is much easier to build it up freely in headstand. Nevertheless, the swinging movements of the legs must not cause the headstand to become unstable.
                                     
                                    known issues that can occur even when running correctly


                                      supta padmasana in headstand

                                      instructions details
                                      1. take padmasana headstand as above described
                                      2. stretch at the hips and move the legs away from the upper body until they come to rest on the wall as best as possible
                                      3. presses the knees so strongly against the wall that the bottom lifts off from the wall and the hips are stretched as far as possible with the given flexibility.
                                      1. most instructions and details are analogous to supta padmasana in handstand and already described there. Here again:
                                      2. If the pose is held longer and a certain force is applied to press the knees against the wall and keep the pelvis away from the wall, the buss muscles or other parts of the muscular abduction and extension apparatus may become tense.
                                      3. The easiest way to leave the pose is to abduct one of the two legs further, which causes the foot to leave the pose, then the legs can be moved freely again. After one leg has been stretched upwards, the corresponding heel is pressed against the wall and the hip stretched to release the butts from the wall. Release the crossed legs absolutely before you leave the pose. A rough landing on the crossed knees would result in their injury !
                                       
                                      known issues that can occur even when running correctly


                                        padmasana forward bend in headstand

                                        instructions details
                                        1. take padmasana headstand as above described
                                        2. move both thighs as far as possible to the chest
                                        1. most of the instructions and details are analogous to padmasana forward bend in handstand and already described there. Here again:
                                        2. With the forward bend, the buttocks on the wall may slip a little upwards and the lumbar spine begins to become convex. However, this is generally not a problem. .
                                        3. because here the legs move by gravity to the upper body, the cramping tendency, which would occur otherwise above all in the Satorius, is void. The main limitation for the movement of the legs to the upper body is probably the flexibility of the butt muscles.
                                        4. all remarks about knee problems in lotus-like poses also apply here, but possibly the painfulness is somewhat less
                                        5. The easiest way to leave the pose is to abduct one of the two legs further, which causes the foot to leave the pose, then the legs can be moved freely again. After one leg has been stretched upwards, the corresponding heel is pressed against the wall and the hip stretched to release the butts from the wall. Release the crossed legs absolutely before you leave the pose. A rough landing on the crossed knees would result in their injury !
                                         
                                        known issues that can occur even when running correctly


                                          samakonasana in headstand

                                          instructions details
                                          1. This variant can also be executed as a leaning variant or as a free variant. The free variant is described here.
                                          2. take free headstand as described above
                                          3. as far as possible, turn both thighs out in the hips joints.
                                          4. bend your hips to lower your legs next to your body. Pull them back out of your field of vision.
                                          1. in principle, samakonasana can also be taken differently in sirasana, e.g. from the rectangular headstand, by increasing the angle between the legs slowly from 0° to 180°. However, this changes the center of gravity of the body clearly backwards, so that clear adjustments are necessary. In addition, significantly more strength is required in the shoulders and back, to take and hold the rectangular headstand with straight back. In addition, the center of gravity moves sideways, if the legs are not moved outward synchronously. The described variant tries to reduce the requirements.
                                          2. if the legs are moved in the horizontal plane, they will move more or less clearly into the visual field for reasons of restricted flexibility of the adductors, therefore certain adjustments are necessary here as well, mainly a temporary increased pressure of the elbows and then a small movement of the pelvis backwards, out of the visual field
                                          3. the legs should sink to the horizontal. Depending on the flexibility of the hamstrings, the horizontal might not be reached or it might be exceeded. Since the ischiocrural group sets the limit, up to which the legs can sink, also a certain bending tendency of the knees results. If the knees are stretched with the help of the quadriceps, the otherwise so frequent cramp tendency in the rectus femoris with simultaneous flexion in the hips here is not so pronounced since the extension of the knees is supported by the gravity of the lower legs.
                                          4. take care to turn your legs so that the foot centre lines point downwards
                                           
                                          known issues that can occur even when running correctly


                                            twist

                                            instructions details
                                            1. take free headstand as described above
                                            2. keep your legs closed and stretched and especially your hips stretched as well. Turn the upper body with the pelvis and legs as far as possible to the right.
                                            1. The rotational movement often causes flexion in the hips. Keep the extensors of the hip joint (the hamstrings and the butt muscles) in place so that the hips remain stretched.
                                            2. the feet remain closed, so the stretched, closed legs are turned with the whole pelvis, the legs themselves do not move not at all in relation to the pelvis
                                            3. the great part of the rotation comes from the lumbar spine, the rest from the thoracic spine. The shoulders with neck and head should remain still. Nevertheless, a change in the balance of power will still be noticeable, especially in the shoulders.
                                            4. make sure to keep your upper body vertical. There may be a tendency to lower the upper body a little from the vertical, i.e. due to perceived changes in the balance of forces in the shoulders or to reaching the limit of flexibility in a shoulder, to lower the upper body relative to the arms, that is to reduce frontal abduction. Therefore, continue to move the lower ribs up and back (out of the field of vision).
                                            5. the performing muscles are mainly the oblique abdominal muscles Mm. externi/interni obliqui abdomini and rotational parts of the back muscles erector spinae
                                             
                                            known issues that can occur even when running correctly


                                              transition to elbowstand

                                              instructions details
                                              1. take leaning headstand as described above
                                              2. press the heels firmly against the wall
                                              3. take the weight off your hands. Carefully remove the arms from the headstand position without changing the position of the elbows, making sure that the pressure of the elbows on the floor is maintained.
                                              4. place your forearms parallel on the ground and press your palms firmly on the ground
                                              5. press the elbows on the ground with increasing force to lift the head off the ground.
                                              6. move your shoulders away from the wall as far as possible
                                              1. it takes a certain amount of strength in the shoulders to lift the head off the ground. If it becomes clear that the force is not sufficient, stop the attempt so as not to endanger the cervical spine. The reverse transition from the headstand to the elbowstand should only be practiced by experienced people: a very gentle, controlled touchdown is urgently required!
                                              2. the shoulder area does not lift vertically upwards from the ground, but the shoulders describe an arcuate movement with the radius of the upper arms. So the lifting is directly related to the movement of the shoulders away from the wall. While on the first part it is felt more than a lifting, later it is more a movement away from the wall.
                                              3. in elbowstand the forearms should be parallel and shoulder-width, in headstand we build up minimally more than shoulder-width, so the distances fit well to each other
                                              4. in contrast to headstand, in elbowstand the shoulder blades are elevated, that is, they move away from the pelvis. In headstand the work of the shoulders is therefore still quite easy, because the weight rests mainly on the head, in elbowstand on the other hand it requires some strength to lift the body (exactly said: the partial body weight, which covers the whole body minus the arms) relative to the arms fixed on the ground.
                                               
                                              known issues that can occur even when running correctly


                                                transition to uttanasana

                                                instructions details
                                                1. here the elegant powerful two-legged transition from headstand to uttanasana is described:
                                                2. take free headstand as described above
                                                3. stretch your back strongly and bend your hips.
                                                4. move the legs further and further to the floor to the limit given by the flexibility of the hamstrings, moving the pelvis slightly towards the wall so that the centre of gravity remains in the physical support base
                                                5. place your feet on the ground
                                                6. stretch your arms to bring the pelvis into the right position for uttanasana
                                                7. stretch the knees and cross your arms
                                                1. whether the feet can be placed on the floor with the back stretched is of course not only a question of the proportions of the body, but above all the flexibility of the hamstrings. The feet placed on the floor correspond to the a flexion in the hips as in a very good pascimottanasana or uttanasana. Good preparation of the hamstrings with intensive forward bends are therefore very helpful for this variant.
                                                2. the big lever of the legs exerts a strong force, which tilts the pelvis out of the vertical and bends the back. The back muscles need to be used accordingly in order to keep the back straight.
                                                3. as described in the two-legged upswing, with the movement of the stretched legs to the ground, a clear shift in mass takes place, which takes the centre of gravity out of the physical support base. (The trapeze out of elbows and wrists), depending on where the pelvis and trunk are held. So appropriate adjustments are necessary: the elbows must be pressed more firmly on the ground and the pelvis as well as accodingly the trunc must be moved out of the field of vision. Depending on how this is handled, the transition ist eased or can be excellently used to strengthen the back and shoulders in particular. The transition to uttanasana should be just as slow, sovereign, powerful and reversible as described above for the two-legged upswing
                                                4. work intensely and persistently in the shoulders according to the requirements of the transition
                                                 
                                                known issues that can occur even when running correctly


                                                  vrksasana in headstand

                                                  instructions details
                                                  1. vrksasana in sirsasana, like some other variants, can be exercised both freely and leaning. The free variant is described here:
                                                  2. take the free headstand as described above
                                                  3. bend the right hip and right knee to bring the corresponding foot closer to the pelvis, turning the leg (until further notice.as far as possible) out in the hip joint
                                                  4. as soon as she reaches it, move the sole of the foot on the inner thigh towards the pelvis. If it reaches the pelvis or if the flexibility limitations of the quadriceps do not allow further flexion in the knee, move the knee of the bent leg back once more.
                                                  5. check again the erection of the pelvis
                                                  1. the flexion of the knee is usually limited by the tension of the quadriceps. Therefore in most cases, the knee cannot be bent completely. While in the basic position of vrksasana one hand is available, to bring the foot into position, it is not available here. Alternatively, at least gravity works here for the flexion of the knee. If you try to bend the knee with the knee flexing hamstrings beyond the beding effect of gravity, this can lead to their cramping
                                                  2. the movement of the knee backwards out of the visual field is limited by the tension of the adductors. As a rule, it cannot be expected that the bent leg can be brought into the same plane as the upper body. The abductors of the hip, i.e. mainly the butt muscles, are responsible for this movement. In most cases, although they work at the maximum of concentric contraction near active insufficiency, a spasm does not necessarily occur quickly.
                                                  3. bending the knee to the side implies a slight shift of the centre of gravity, but this is not critical for stability as the support base is broad enough.
                                                  4. the manual turning out of the leg typically executed when taking baddha konasana-like poses as well as manual positioning of the foot cannot be performed here. There is no more strength for deliberate exorotation in this angle of rotation, partly due to active insufficiency and further due to the antagonists to exorotation whose tension becomes dominant. As a consequence, exorotation in this pose must fall behind poses where manual intervention is possible. Fortunately, this is not quite so important for the protection of the inner menisci here, because the forces with which the knee is flexed are also smaller than in the respective poses.
                                                   
                                                  known issues that can occur even when running correctly


                                                    krouncasana in headstand

                                                    instructions details
                                                    1. choose the distance from the wall larger than usual for the leaning headstand and take it as described above
                                                    2. take the right heel off the wall, turn in the leg slightly, bend in hip and knee and place the leg as for a supta virasana on the wall
                                                    3. press the knee of this leg onto the wall and work with the hip extensors (especially butt muscles) to avoid falling into a hollow back
                                                    4. detach the other heel from the wall and move the stretched leg as far as possible towards the floor or the upper body
                                                    1. the distance from the wall is an important parameter: if it is too small, a cramp in the hamstrings is likely when trying to bend the leg actively. If the distance is too large, often the hip extension is not sufficient to keep the knee on the wall and at the same time the pelvis in the vertical or if this one's still working, it gets lost soon as the other leg is lowered. The pose would then become unstable.
                                                    2. this variant corresponds to a krouncasana- or supta krouncasana-leg, only with an incomparably more favourable gravity effect of the leg whose hamstrings are stretched. It is well known that this stretching is not the only interesting aspect of the pose but there is also a very intensive stretching in the rectus femoris of the leg remaining on the wall
                                                    3. If the bent knee can be placed on the wall, it tends to move easily away from the wall due to flexibility limitations of the hip flexors and the tension of its quadriceps, as well as to move outwards - especially when it rests on the wall with very little pressure. Finally, since the hip flexors lying in the pelvis are attached to the inner thigh, the same leg tends to evade into exorotation. Therefore, it is important to use the hip extensors (mainly the butt muscles here, the hamstrings would cramp quickly) to press the knee of the bent leg onto the wall in order to limit the evasion by friction.
                                                    4. depending on the distance chosen, there is a point of no return at which you fall out of the pose because the gravity of the lowered leg shifts the centre of gravity, seen from the wall, beyond the elbows. If the stretching effect is still on hamstrings of the lowered leg and rectus femoris of the bent leg too small, it is necessary to practice with a slightly greater distance.
                                                    5. this one is not a beginners variant. Depending on your flexibility, you may not be able to take it yet, especially because the flexion of the knee you want to put in supta virasana is not enough or not easy enough and thus the knee does not reach the wall.
                                                    6. Depending on individual mobility, the stretching is felt more in the back of the lowered leg or in the front of the thigh of the lowered leg, or is maybe present in both legs, as is known from supta krouncasana.
                                                    7. an unpleasant hollow back should not occur. One leg is a supta virasana-leg and therefore tends to cause a hollow back, but the other leg draws the pelvis in the opposite direction with a remarkable force. The farther the lowered leg moves in the direction of the horizontal and beyond, the more the hollow back sensation should disappear, if it was present for a short time when the pose was taken.
                                                    8. the asymmetrical construction naturally creates uneven loads in the upper body, shoulders and arms and tends to twist the shoulders a little in the horizontal, which might mean more effort for one shoulder and more stretching sensation for the other.
                                                    9. the lowered leg tends to lateral abduction as an evasive movement. However, the muscle tensions affect both joint partners (leg and pelvis), so that with the knee firmly pressed against the wall and therefore good friction against the wall a tendency of the pelvis to evade in the frontal plane develops. This means that the hip belonging to the lowered leg is pressed down. The same lowering effect also has the gravity of the lowered leg, so that the two effects add up here. Use the lateral flectors of the lumbar spine in particular here to counteract.
                                                    10. depending on your flexibility, there may be a large inclination of the knee at the wall to detach from the wall, then a supporter may press knee onto the wall, see the corresponding variant below
                                                    11. the lowered leg generates a force over the hip and the back, which pushes the shoulders in the direction of the wall, so that here you have to counteract accordingly. As already discussed above, the load in the shoulders is unequal due to the rotational moment in the trunk. At the same time the forces caused by the lowered leg tilt the pelvis in that direction, where it's harder to keep the knee of the bent leg on the wall. A movement of the shoulders towards the wall would make it even harder due to its effect on the trunk
                                                    12. If the force with which the bent knee presses against the wall is too low, the cramp tendency of the equilateral sole of the foot increases and due to the friction of the foot on the wall and the evasion of the leg into lateral abduction, an unwanted endorotation of the lower leg occurs, which can possibly be painful in a bent knee.
                                                     
                                                    known issues that can occur even when running correctly


                                                      rectangular headstand

                                                      instructions details
                                                      1. take free headstand as described, if possible both-legged
                                                      2. begin to bend in the hips and move the pelvis out of the field of vision to the extent required by the altered mass distribution
                                                      3. when the legs have reached the horizontal, the pose is taken
                                                      1. As already described in the two-legged upswing, the position of the legs has a great influence on the centre of gravity and specifies an interval in which the pelvis must be located. Within this interval the pose is physically stable, but the more the pelvis is away from the wall (i.e. to the front, in the direction of the visual field) the more muscular work is required and in the opposite direction the less. There, however, the tendency increases to hollow the neck unpleasantly.
                                                      2. According to the construction, rectangular headstand is a good pose for strengthening the shoulders and back, especially if the pelvis is held clearly shifted towards the elbows. The work of the back muscles increases to a similar extent: the legs create with large lever and unhindered or without counterpart (as it was given in krouncasana in sirsasana by the bent leg) a clear momentum which tilts the pelvis out of the vertical and tilts the lumbar spine and the following parts of the spine into flexion. To prevent this, powerful work of the autochthonous back muscles is required. Since the headstand is in itself a quite stable and low-stress pose, this variant can be used to work on the strength endurance of the shoulders and back without significant restrictions
                                                      3. the shoulder blades are in elevation (moving towards the pelvis), which should be given by the strong pressure of the elbows on the ground alone
                                                      4. Even during the execution of this variant, the position of the pelvis can be adjusted forwards or backwards to adapt the muscular work. Make sure that the legs remain horizontal. The horizontal position offers the best effect of the gravity of the legs.
                                                      5. Depending on the flexibility of the hamstrings, the horizontal may not yet be reached. A good strengthening of back and shoulder should still be possible, the loss of effectiveness corresponds to the cosine of the missing angle compared to the horizontal and is very low at the first degree due to its flat course close to zero.
                                                      6. stretch the inner feet and heels away as in tadasana and standard headstand
                                                       
                                                      known issues that can occur even when running correctly


                                                        rectangular headstand at the wall

                                                        instructions details
                                                        1. take the dog headstand with the head pointing away from the wall and a distance of the head from the wall that is roughly equal to the length of your own leg
                                                        2. presses the elbows strongly to the ground by force of the shoulders
                                                        3. put your feet one by one on the wall so that the backs of your legs are horizontal
                                                        4. stretch your back and legs and press your heels against the wall by the force of your shoulders and upper back
                                                        1. this variant makes you a little familiar with rectangular headstand, but lacks the strengthening effect on the back muscles and therefore does not replace them. From the pressure of the elbows on the floor the pressure of the heels on the wall can be increased here.
                                                        2. if the distance is too small, an undue hollow will appear in the neck, but if it is too small, the back or cervical spine will be rounded convexly, which should also be avoided
                                                        3. In contrast to the rectangular handstand, the force with which the feet can be pressed against the wall is quite limited. Neither the palmar flexors of the wrist can work for this, nor can the shoulder muscles move the body significantly without the cervical spine getting into an undesirable inclination.
                                                         
                                                        known issues that can occur even when running correctly


                                                          lower bent legs

                                                          instructions details
                                                          1. take headstand as described above
                                                          2. bend the knees far and bend in the hips far to drop the thighs (with good mobility in the hips) on the belly
                                                          3. let the legs sink further by bending the spine by gravity and thus bend the back in order to stretch the spine again maximum after maximum bending of the spine and repeat this bending and stretching of the spine as long as power is given.
                                                          1. this variant enables a good strengthening of the autochthonous back musculature, especially the middle and lower areas.
                                                          2. support strongly with your arms. Changing the position of the upper body could otherwise impose an uncomfortable amount of strain on the neck. In addition, it is possible that the bending and stretching of the upper body changes the position of the neck and in between it becomes a little too concave or too steep.
                                                          3. How far the knees can be bent depends on the flexibility of the monoarticular parts of the quadriceps. The extent to which the thighs can be attached to the body depends mainly on the monoarticular hip extensors outside (that is not the hamstrings), especially the butt muscles, since the hamstrings do not set any limits here due to the complete flexion in the knee.
                                                          4. the further the legs can be lowered and the spine can be bent, and in the case of quadriceps with limited mobility the larger the remaining angle in the knee joints, the more the center of gravity of the body changes in the direction of the elbows and the more force the shoulders have to excert to be keep the pose stable through powerful pressing down the elbows. If the achievable strengthening in the back does not appear sufficient, the knees can consciously be bent a little less
                                                          5. since in this position bending the back is much easier than stretching, exhale with stretching the back.
                                                           
                                                          known issues that can occur even when running correctly


                                                            (P) support on upswing

                                                            instructions details
                                                            1. the support for the upswing is exactly the same as support for the upswing of the handstand only that a little less swing and support is required
                                                            1. the possible evasive movement of the shoulder towards the wall is here naturally much smaller with the head placed on the ground than in handstand. Since the cervical spine is involved, however, it must be prevented just as carefully, since it could result in a lifting of the head with a possibly ungentle placing it on the ground again or in a wrong area that would be placed. The cervical spine could get into unwanted flexion or extension. Compared to handstand, however, the energy used to accelerate the body upwards and towards the wall is much lower and the lever arm between the expected gravity perpendicular and the part of the body closest to the wall, which can still exert considerable pressure (here: the hands), is much more favourable. Therefore, controlling the movement of the shoulder is usually not a problem.
                                                             
                                                            known issues that can occur even when running correctly


                                                              (P) learn to stand free

                                                              instructions details
                                                              1. practice the above-described variant for learning free headstand, in addition a supporter holds an arm horizontally as a barrier a little further away from the wall than the distance of the head at the height of the lower legs, so that the performer does not fall back to the ground directly from the pose in case of inadvertent use of force
                                                              1. the arm must of course be parallel to the wall and should offer a only slightly springy barrier
                                                               
                                                              known issues that can occur even when running correctly


                                                                (P) krouncasana in headstand

                                                                instructions details
                                                                1. take krouncasana in sirsasana as described above
                                                                2. the supporter tries to straighten the pelvis and pushes the knee of the bent leg back onto the wall so that the performer can lower the other leg without the knee detaching from the wall. The supporter can also gently push the lowered leg towards the floor.
                                                                1. it will be difficult to manually compensate for all the powerful evasive movements in the hip of the leg bent with the knee on the wall; however, when the knee is pressed against the wall, this gives a clear additional safety in the pose and the stretched leg can possibly be lowered further, actively or passively, which should lead to a clearly improved stretching effect in one or both legs
                                                                 
                                                                known issues that can occur even when running correctly