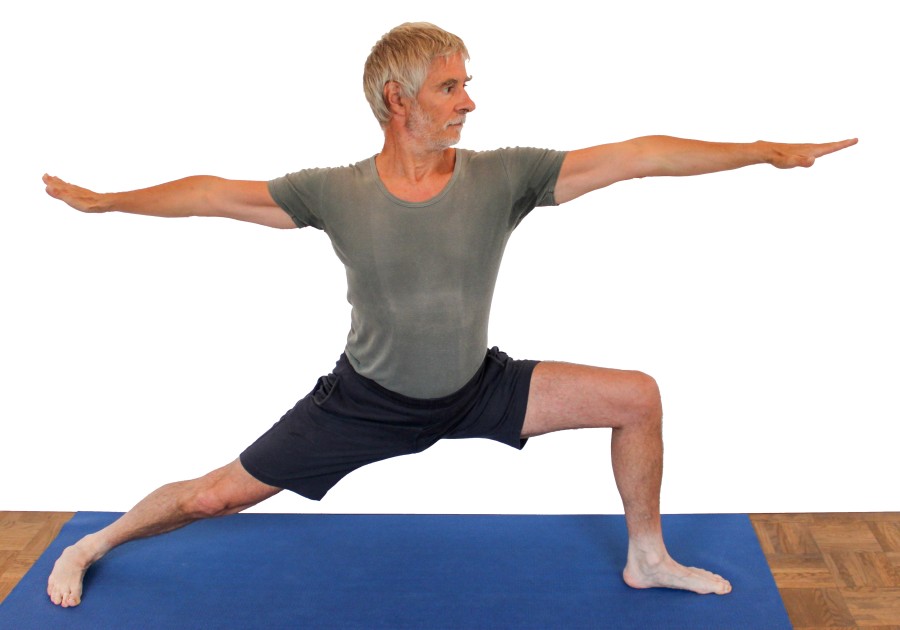
virabhadrasana II
"warrior pose 2nd"

Feedback to: postmeister@yogabuch.de
last updated: 5.8.2017
name: virabhadrasana II
trivial name: warrior pose 2nd
level: B
classification .
classically: standing pose
psychomentally: . stabilizing
physiologically: . sideways hip opening (adduktor stretching), quads strengthening
effects:
preparations:
  • the butt muscles and other exorotators and extensors are among the most intense working muscles groups in this pose, their intensive work can be prepared with:
    1. caturkonasana
    2. parsvakonasana
    3. bar pose
    4. purvottanasana
    5. urdhva dhanurasana
    6. eka pada variant of urdhva dhanurasana
    7. setu_bandha_sarvangasana
    8. eka pada variant of setu_bandha_sarvangasana
    9. warrior pose 3rd
    10. backward against the wall variant of qarrior pose 3rd
    and other backbands
  • In this position, the adductors pull the pelvis together with the hip flexors into the hollow back or tilt it forward respectively. To reduce this, practice:
    1. hip opening 1st
    2. hip opening 2nd
    3. warrior pose 1st
    With given back health - i. e. if there is no damage to the spinal column and the intervertebral discs - additionally:
    1. upface dog
    2. urdhva dhanurasana (Brücke)
    3. ustrasana (camel)
    4. setu bandha sarvangasana
    as well as several other back bends with hip extension
  • since the bent leg has to do powerful work, some preparatory exercises are also given for this:
    1. utkatasana
    2. ustrasana
    3. caturkonasana
    4. setu bandha sarvangasana
  • The pose is usually greatly restricted by the flexibility of the adductors, who tilt the pelvis forward and prevent the pelvis from turning away from the bent leg and straight forward, and also prevent the flexed leg from moving backward sufficiently. The adductors of the stretched leg also impede the lowering of the pelvis. Prepare this well with :
    1. baddha_konasana
    2. parsvakonasana
    3. bar pose
    4. caturkonasana
    and also with the poses that involve the m. gracilis:
    1. upavista konasana
    2. trikonasana
    3. ardha chandrasana
    4. hip opening 4
    5. hasta padangusthasana sideways
    6. supta padangusthasana sideways
  • As the bent leg has to be turned out far, this should also be prepared:
    1. baddha konasana
    2. supta baddha konasana
    3. half lotus forwardbend
    4. hip opening at the edge of the mat
    5. hip opening 3rd
    6. warrior pose 2nd
    7. caturkonasana
    8. parsvakonasana
    9. bar pose
  • The supination of the foot can also be prepared so that the outer foot of the stretched leg remains on the ground:
    1. parsvakonasana
    2. bar pose
    3. prasarita padottanasana - with large distance between the feet
  • post practice poses:
    similar asanas:
    diagnostic hints (Nos.):
  • (711) hip flexors If the pelvis tilts forward clearly, it must be determined whether the hip flexors or adductors are responsible for this. Possibly the hip flexors are shortened, which causes a hollow back inclination in the everyday life. Concerning the risks of a hollow back see FAQ
  • (880) Overstretching the knee in the stretched leg : Due to the tension of the hip flexors in this pose, the stretched leg should hardly be able to overstretch, but if this does happen, it should be found out whether the overstretching tendency is that great or whether the hip flexors are that flexible. See also FAQ
  • (650) lumbar spine lordosis and kyphosis: Apart from the inclination of the pelvis to tilt forwards and create a hollow back, the deviations from the physiological double-S-form of the human spine are quite clearly visible in this pose. A certain amount of lordosis should be present in the lumbar spine and cervical spine and a certain amount of kyphosis should be present in the lumbar spine and cervical spine. The lumbar spine, however, often hyperlordoses in this pose due to mobility restrictions of the hip flexors and adductors. See also the FAQ
  • (651) uneven shoulder height/scoliosis of the spine: Although the hip of the stretched leg tends to stand clearly higher than the other one, so that a pelvic obliquity cannot be assessed, its usual consequences such as scoliosis are clearly visible. Scoliosis is defined as lateral deviations of the spine from the median plane. See also the FAQ
  • (812) quadriceps: In this posture, the quadriceps are clearly required to keep the stretched leg straight against the flexural inclination of the knee caused by the restricted mobility of the hip flexors. Moreover, the quadriceps of the bent leg is very active in order to counteract the gravity of the pelvis and the partial body weight resting on it. This can lead to cramping tendencies, which can have various causes, such as the supply situation of the muscles with blood, lack of electrolytes, neurological causes. If you are standing in the pose for a longer period of time, you will inevitably reach the limits of strength endurance of the muscles, then a burning feeling should start, but after leaving the posture, it will give way again. A certain amount of trembling in the muscles is physiological during strenuous exercise. This can be a symptom if it already occurs with little or no effort.
  • (751) adductors: in this position, the adductors are stretched. Among other things, damage can be recognized here:
    1. contractions
    2. Irritating states of the tendons of the origins and insertions, which can be felt in pulling pain with a certain extension in length along the tendons.
    3. Tensions that cause a tormenting sensation in the musculature that goes far beyond normal stretching sensation
    4. partial or total ruptures of adductors which, in the event of a total rupture, will impress with a loud noise, followed by haematoma and maybe swelling
    5. lateral differences in flexibility that can cause pelvic obliquity and consecutive scoliosis
  • (704) hip joint: especially the widely exorotated, abducted poses and movements cause pain with existing hip damage.
    1. Arthrotic change of the joint (degenerative with cartilage loss)
    2. arthritis (articular inflammations) of various types
    3. Perthes' disease would respond in a classic way to this posture
    4. Dyslocation / subluxation, which would cause a significantly increased sensation of tension in various muscles spanning the hip joint.
    5. Suffered joint trauma, which may also cause pain in the joint after many weeks or months.
  • (885) knee: In this pose, knee problems associated with extensive flexion under load become very obvious. For example, traumatic or degenerative damage to the meniscus, arthrosis, arthritis, subluxations, ligament damage, plica syndromes and others, see the FAQ
  • (511) pectoralis: Shortening of the pectoralis and other muscles moving form lateral to frontal abductions (transversal flexion) as well as endorotators can prevent the arms from being stretched or held exactly sideways at 90° to the spine.
  • variants::
    ball of foot against the wall
    hands on the hips
    outer foot against the wall
    outer foot oblique against the wall
    (P) back at the wall
    (P) pull on the lower leg
    (P) exorotation the stretched leg with a belt
    (P) pulling the knees backward
    (P) pressure against the fingertips
    (P) pressing down the arms
    (P) pressing up the arms
    knee against the wall
    not turning the head
    arms folded behind the back
    (2P)
    (P) errecting the pelvis
    pushing a brick against the wall
    transition to pasvakonasana and back
    (P) transition to pasvakonasana and back
    back at the wall

    instruction details/hints
    1. stand in tadasana. Put your hands together in front of your chest such that the fingertips touch each other and your elbows move apart, so that your arms are almost horizontal.
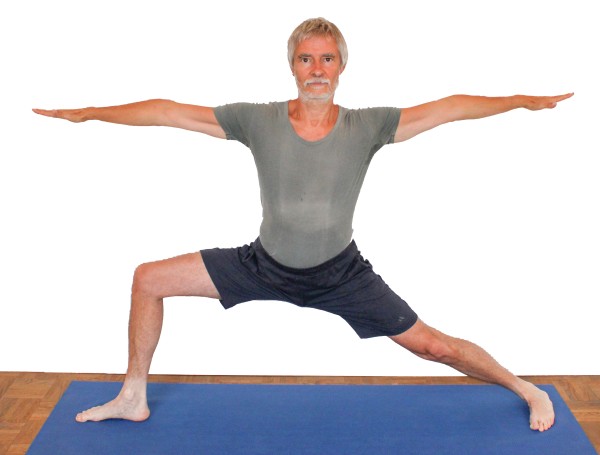
    2. Jump with your feet a little more than one own leg length apart and stretch your arms apart. Taking the straddle can be done without jumping.
    3. from parallel middle lines of the feet turn the left leg about 20° inwards, the entire right leg (from the hip) 90°. Hold the pelvis in the (virtual) plane both legs span or - as far as possible - bring it back there
    4. make sure that you stand well on both feet with equal pressure distribution on the parts of the sole of the foot (even between the heel and the 5 balls of the foot and among the 5 balls of the foot).
      1. stretch the left leg completely
      2. pull it backward to the maximum
      3. exorotate the left leg (unless otherwise indicated) to the maximum
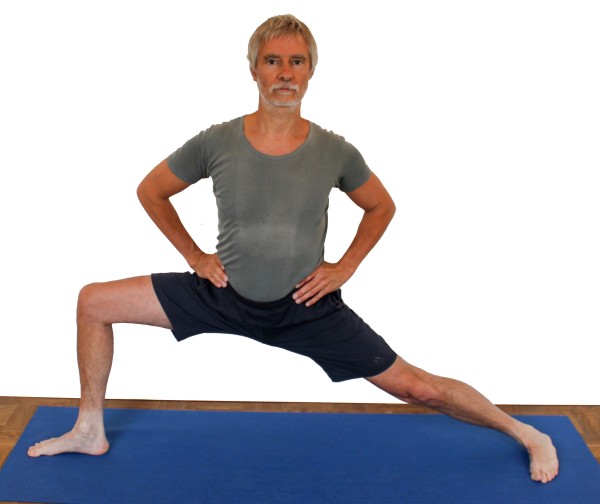
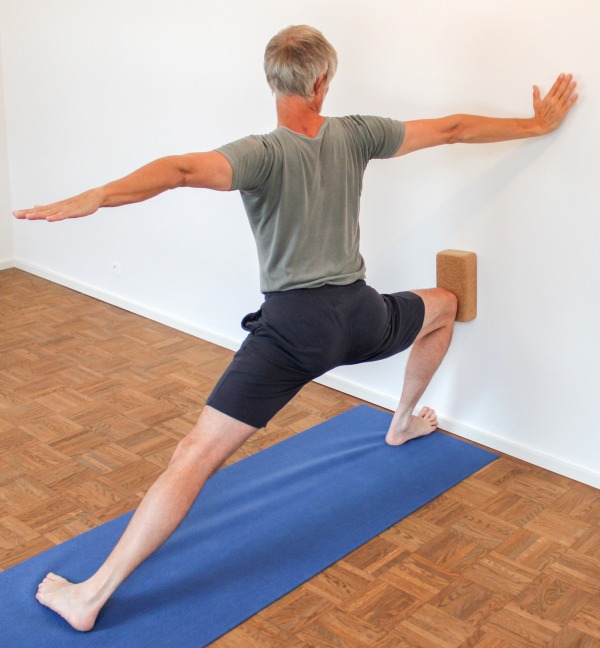
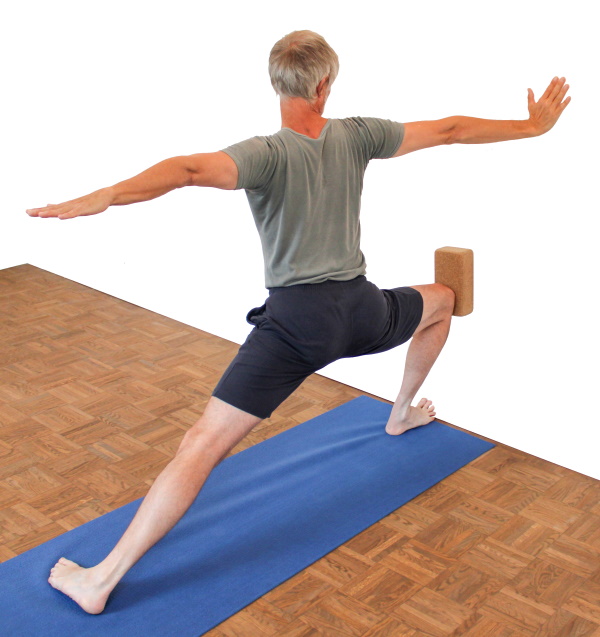
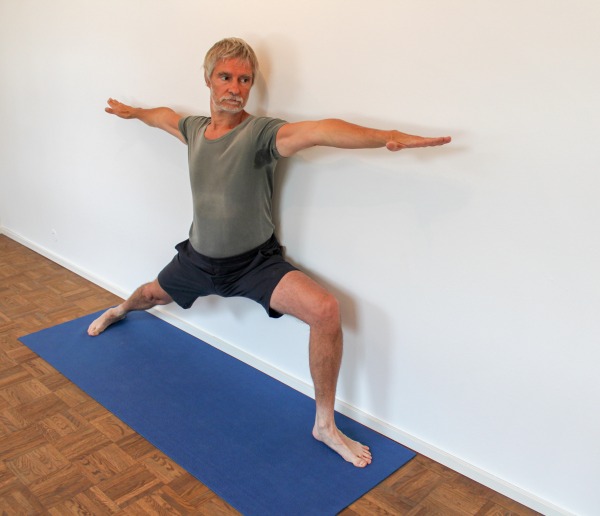
      Press the left outer foot onto the floor. Erect the pelvis to the vertical
    5. bend the right leg at a moderate speed so that the pelvis remains upright and does not tilt forward. On the left side the pelvis should not move further to the front than on the right, nor should it stand higher on the left side than on the right
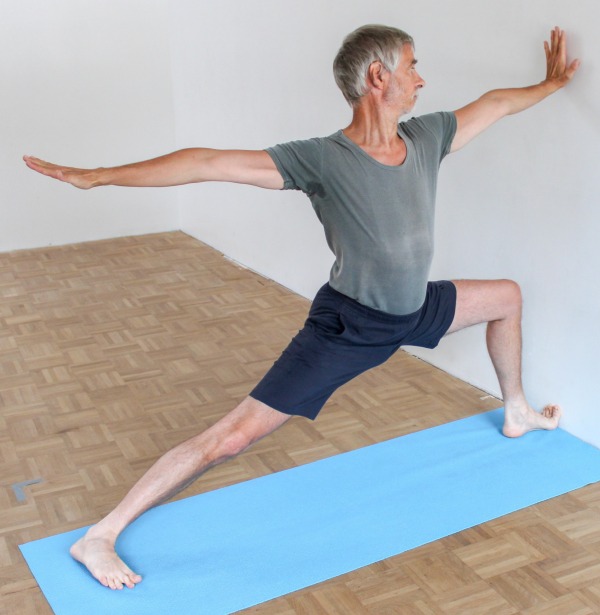
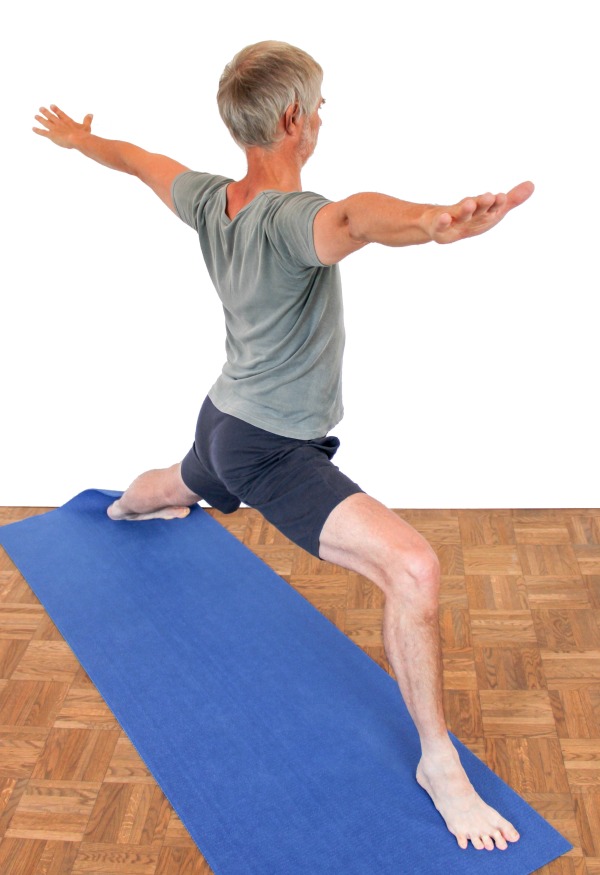
    6. Stretch your upper body vertically from the pelvis upwards and your arms horizontally to the side, the shoulder blades are down (in depression).
    1. because the hip joints are three-dimensionally movable, here usually you find a combination of three evasive movements in the pelvis:
      1. the left hip moves forward
      2. the left hip moves up
      3. the pelvis tilts forward, so the buttocks come up and the hip bones tilt down
      To avoid or at least reduce this combined evasive movement:
      1. push the feet away from each other with force, this becomes all the more possible the more the right thigh approaches the horizontal. This works a bit against 1) and 2)
      2. turn out the left thigh to the maximum. press the left outer foot down as hard as the inner foot. The exorotation eases pressing down the left outer foot and vice versa. Both promote the uplifting of the pelvis. These three factors are related and ease the straightening of the upper body as well as keeping it upright. These movements only find their limit where the left inner foot starts to lift off or the outer ankle area feels like being overstretched. However, a more or less pronounced sensation of stretching in the muscles of the outer lower leg is physiological in this posture. This detail also works against 1) and 2) too
      3. use a lot of the butt muscles' strength to raise the pelvis. Effective against 3)
    2. measure the distance of the feet from each other in such a way that, when the right thigh is horizontal, the right knee stands over the right heel (the lower leg is vertical). Due to the lack of strength of the quadriceps of the bent leg or flexibility of the adductors (esp. of the stretched leg) not everyone can bend the knee that far, therefore a smaller distance may be advisable in some cases, because too large distances destroy the muscular work to a large extent. The quadriceps should work:
      1. that the pelvis does not sink down
      2. to push the feet away from each other
      Since the above mentioned flexibility of the adductors in fact limits the angle between the two legs (or between pelvis and bent or stretched leg) and not the bending of the knee itself, the distance can be chosen slightly smaller for maximum muscular activity, so that with the maximum bearable stretching sensation of the adductors the knee stands just above the heel (instead of with flat thigh). Note: if the distance between the feet is too big, the feeling for the ability to push the feet away from each other also gets lost.
    3. when trying to keep the pelvis in the plane of the legs (i. e. the left hip is at the same amount backward as the right hip) the right knee will inevitably come forward a little bit, at least as long as you don't reach samakonasana (Lateral split) - and even then, most of the time it does. Do not completely prevent the knee from evading forward if the pelvis would otherwise become slanted. Straightness of the pelvis is the more important topic. The knee of the bent leg that evades inwards/forwards also moves slightly downwards in an arc. These movements tend to put strain on the inner knee, but this is rarely associated with subjectively felt strain if the associated butt muscles pull the leg back as much as possible. Objectively, this reduces the forces that can cause pain in the inner knee. In the rare case that pain nevertheless occurs in the inner knee, the pelvis can be allowed a little evasive movement in the horizontal plane towards the bent leg and above all the position of the foot can be adapted to the angle of the thigh of the bent leg, i.e. the requirement is waived that the foot with its midline be parallel to the pelvis and to the long edge of the mat and therefore be pointing to the opposite heel.
    4. turn the right leg out also, even if this is only marginally possible; this makes it easier to move the right knee backwards and protects the inner knee, in which otherwise unpleasant pressure could occur.
    5. push the feet apart against the friction of the floor without lifting the pelvis, which usually would be the case. This movement represents a more complete work of the Quadrizeps in the bent leg and is essential for correcting the position of the pelvis. Leave the right heel as heavy as the right ball of the foot, so especially do not lift it off. The frequently observed lifting of the heel is a consequence of the tendency to relieve the thigh by increasing the use of calf muscles and leads to a decrease in pushing the feet apart, as a result, the position of the pelvis may deteriorate. In that case, the force exerted in the knee on the completely placed foot to turn out the lower leg is also missing. This is a work of the biceps of the leg, and it slightly supports the movement of the knee backwards.
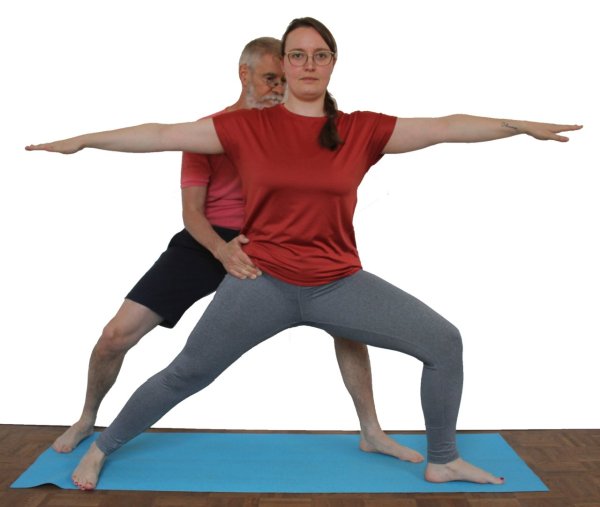
    6. Use the power of the butt muscles in two ways:
      1. right butt muscles: to move the right knee further backward, keeping the pelvis in the plane of the legs
      2. both sides: to align the pelvis in the sense of not tilting it forward
    7. It is well known that maximum lateral abduction in the hip joint is a function of exorotation in the sense that it is possible to move the leg outwards into the abduction the further it is turned out. An exorotation of the leg from neutral zero can improve the range of possible lateral abduction by more than 90° in persons with a well-mobile ischiocrural group. In the second warrior pose, this causes the inclination of the pelvis to tilt in the frontal plane to the side of the bent leg, since lateral abduction - depending on the distance of the feet and the degree of bending of the bent knee - is very limited, also due to the endorotated position of the stretched leg. Note: the stretched leg IS in endorotated position, but MAKES an exorotation movement. Furthermore, the very limited lateral abduction ability without exorotation causes the inclination of the foot of the stretched leg to turn out compared to the initial 20° turned in position resp. that of the entire thigh to turn out in the hip joint.
    8. for people with shortened hip flexors (m. iliopsoas) as well as with shortened adductors erecting the pelvis may be very heavy. Their pelvis will tilt forward the more the right knee bends. In extreme cases, it is advisable not to bend to the horizontal of the thigh, in order to avoid overexertion of the lower autochthonous back muscles due to heavy erection work for the upper part of the body in a hyperlordosed lumbar spine, but to focus on raising the pelvis.
    9. The arms should be horizontal. But to do so, lift your arms less than to move them apart, i.e. away from the spine. This has the advantage that, firstly, the lateral clearance in the shoulder allows for active relaxation of the trapezius, on the other hand, the mere raising of the arms sometimes leads to the arm being moved towards the body, which increases causes the cramping tendency of the trapezius
    10. Stretch your arms and hands to your fingertips. In order to do so:
      1. stretch the metacarpal joints (finger base joints) and the finger joint to the point where you feel even tension in palmar and plantar side of the fingers
      2. do not allow your forearms to hang in the elbows, but instead create an even work in the and triceps through muscular activity, so that the joint gap on the back side of the elbow joint is relieved. This activity causes visible work of the the triceps instead of drooping asleep. This is especially important for people with overstretching ability in the elbow joints.
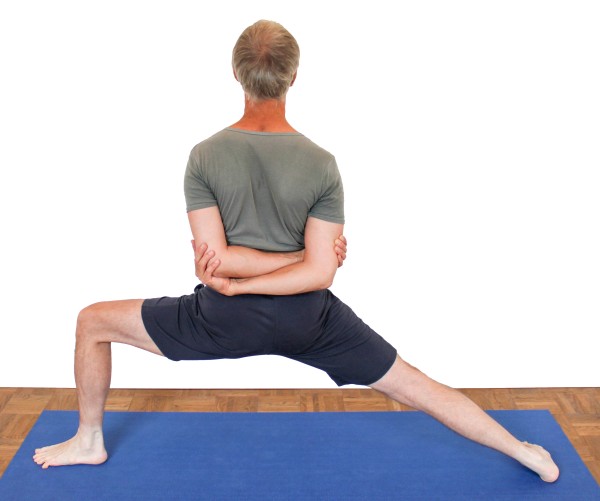
    11. With the evasive movements of the pelvis (tilting forward, tilting sideways to the bending leg, turning horizontally to the bending leg) the upper part of the body above the pelvis is inevitably misaligned. It makes no sense to suppress them with all your strength, for example by bringing the upper body into a sideways curve or back bend. Use the necessary energy for this better on corrections of the position of the pelvis
    12. when the outer foot of the stretched leg comes up, this is almost always a sign that the feet are pushed away from each other with insufficient strength or that the stretched leg is not sufficiently turned out.
    13. The frequently observed tendency to bend the knee of the stretched leg reflects the strong pull of the hip flexors., mainly of the m. iliopsoas , when trying to errect the pelvis Therefore, pay close attention to the complete stretching of the "stretched" leg, as
      1. it is essential for the statics of posture
      2. otherwise possibly incorrect loads in the knee cause pain
      3. the stretching of the hip flexors of this side of the body in this pose depends on the stretching of the leg
    14. Note that the evading movements in the pelvis increase considerably as the bending knee is bent further (in the direction of the horizontal thigh). Some occur only when the knee is bent far. As a result, little more than indicated postures referred to bending the knee are largely ineffective
    15. in some cases, this pose leads to cramp in the area of the abductors on the side of the stretching leg. This is completely harmless until further notice and can be reduced by a quicker sequence of side changes if necessary. It can also be helpful to have one or two inserted trikonasana after the onset of cramping or if a tendency to cramp shows where the upper part of the body is lowered rather than being precisely stretched sideways, as this results in stretching and relaxation of the adductors
     
    known issues that may occur even when practicing correctly
       

      variants

      ball of foot against the wall

      gives more sense for bending the leg
      instructions details
      1. practise the posture in such a way that the front toes point upwards on a wall, i. e. the foot stands at a right angle to the wall, so that the balls of feet are directly on the wall in an edge of the room.
      2. bend the right leg slowly to the horizontal of the thigh
      1. a common evasive movement is prevented by this construction: the tendency to increase the distance between the feet beyond the extent to which the knee of the bending leg is above the heel or would be with further bending
       
      known issues that can occur even when running correctly


        hands on the hips

        Concentration on work in the pelvis
        instructions details
        1. don't take your arms in the position described above, but place your fingertips on the hip bones (SIAS)
        1. Use the power of your hands and arms to align the pelvis better:
          1. turn the pelvis horizontally in the direction of the stretching leg, i. e. away from the flexing leg whereto it likes to evade.
          2. press the hip that belongs to the stretching leg back and down
          3. With the fingertips as described and the thumb at the upper outer edge of the butt muscles, raise the pelvis so that the bottom and coccyx move more downwards and lift the hip bones (SIAS) . Make sure that the stretching leg does not start to bend.
         
        known issues that can occur even when running correctly


          outer foot against the wall

          more control over the stretching leg
          instructions details
          1. put the mat against the wall in 90° angle so that in the pose you can press the outer foot against the wall
          1. if you have to choose between the contact of the forefoot and the heel with the wall due to the shape of the outer foot, choose the heel.
          2. this variant gives you more sense
            1. whether the outer foot is pressed against the floor with sufficient pressure and
            2. if the feet are pushed away from each other by the power of the quadriceps of the bending leg
            When both have been implemented, a more stable sense of pose is created, allowing the practitioner to concentrate more on the work in the pelvis.
           
          known issues that can occur even when running correctly


            outer foot oblique against the wall

            more control over the stretching leg
            instructions details
            1. put the mat obliquely to the wall at an angle of approx. 70° (20° before right-angled position) and press the outer foot against the wall.
            2. To change sides, place the mat exactly the other way round 20° against rectangular to the wall: clockwise for left bending leg, counterclockwise for right bending leg
            1. if you have to choose between the contact of the forefoot and the heel with the wall due to the shape of the outer foot, choose the heel.
            2. this variant even more than the a.g. variant with the outer feet against the wall arises the question of turning out the thigh. Here you can see more clearly if and how this movement is executed
             
            known issues that can occur even when running correctly


              (P) back at the wall

              allows significantly stronger hip opening by pressure of the partner
              instructions details
              1. the performer is standing in the pose as described above, leaning against the wall with his butts and back, his mat lying lengthwise against the wall, heels equidistant from the wall..
              2. The supporter places his mat in the middle of the performer's mat at right angles to the mat and lays down on the back on his mat.
              3. The supporter first places a foot to the middle of the thigh of the stretching leg of the performer and begins to build up more and more pressure there, pushing his foot slightly upwards so that the thigh of the performer turns more out.
              4. After the signal of the performer not to build up any further pressure, the supporter places his second foot to the middle of the other thigh (bending leg) and starts to press there.
              1. The pressure on the second (bending) leg must not be more than half as strong as the pressure on the other leg. It is already too strong if it causes a noticeable lateral rotation of the pelvis
              2. The order in which the pressure is applied must be strictly adhered to. If the order is reversed (first pressure on the flexing leg) the pelvis would be turned sideways, which presumably cannot be compensated by the pressure on the other leg.
              3. The assistant would do well not to lie down too close to the performer, because the less he can stretch his legs, the smaller the angle in his knees, the harder it will be for him to apply the pressure. On the other hand, he should have a certain reserve to stretch his legs further:
                1. in order to meet the needs of the performer
                2. because close to almost complete stretching of his knees, it is no longer possible to exert mich strength with his thigh muscles.
              4. It is to be ensured that the stretching leg is turned out (until further notice possible) as vigorously as possible. The assistant adds an upward pushing component to the pressure against the leg
              5. for people whose pelvis tends to tilt forward, use the same trick as in caturkonasana at the wall (single) or as in caturkonasana as a partner pose : lower the pelvis a little too deeply by bending the knee further than to flat thighs, then let the assistant build up the pressure against the thighs and push the pelvis a little upwards again by slightly stretching the knee of the bending leg, whereby due to friction on the wall the pelvis tends to be raised or even is noticeably straightened up. It is usually sufficient to lift the pelvis by 3-5 cm.
               
              known issues that can occur even when running correctly


                (P) pull on the lower leg

                rectangular bending
                instructions details
                1. take the pose as described above. The assistant sits in front of (looking along) the bent leg and places one of his feet on the foot of the bent leg and fixes it with it.
                2. the supporter reaches with his interlaced hands frombehind around the calf muscles of the performer and starts to pull the knee towards him until the lower leg is vertical. If the thigh does not become horizontal, the distance between the two feet has to be increased until this is possible.
                1. Make sure that the performer does not walk in with the foot of the stretching leg and decreaes the distance between the feet.
                2. Make sure that the performer does not let the outer foot of the stretching leg come up but pushes it down along with maximum exorotation of the related leg.
                3. fixating the foot is necessary so that the performer does not increase the distance between the two feet, which would make it all the less possible to reach a right angle in the knee
                4. the assistant reaches as far up as possible, directly below the knee around the lower leg,
                  1. in order to be able to put its strength to better use
                  2. in order to be able to dose the applied force better
                5. Make sure in the pose that the work in the pelvis is not lost due to concentration on the flexing knee.
                6. Depending on the power of the quadriceps and the flexibility of the adductors of the stretched leg, it may not be possible to achieve alignment of the lower leg and thigh parallel to the spatial axis.
                 
                known issues that can occur even when running correctly


                  (P) exorotation the stretched leg with a belt

                  improved exorotation of the stretching leg
                  instructions details
                  1. attach a belt around the thigh of the stretching leg so that its free end lies in the middle on top of the thigh and points dorsal and downward (and not upward). The buckle of the belt should be at least half way up the thigh, preferably close to its highest point
                  2. the assistant sits on the floor on the outside of the bent leg and supports the thigh of the bent leg near the knee with the foot as he pulls the loose end of the belt towards himself as far as tolerable.
                  1. Orientation of the belt is important so that the belt does not go loose by pulling on its free end.
                  2. the point at which the buckle of the belt is located is important to achieve an optimal rotation motion.
                  3. The point of support at the thigh should be chosen as far as possible in the direction of the knee, because the lever is more favourable (larger) there. This reduces the required force and secondly the force used can be better dosed
                  4. if the buckle or belt creates unpleasant pressure, a little fabric, e. g. a sock, can be placed between the belt and the skin
                  5. the pull on the free end of the belt and the pressure against the knee must be equal and built up in the same way at the same time so that the user is not tilted sideways.
                  6. with this variant it is sometimes possible to alleviate discomfort in the inner knee with far bending
                   
                  known issues that can occur even when running correctly


                    (P) pulling the knees backward

                    imparts a better feeling for the movement of the legs
                    instructions details
                    1. take the pose as described above
                    2. the supporter stands behind the performer and places one hand on the stretched leg, approximately in the middle of the thigh and the other hand on the other, slightly further towards the knee. With the thigh, the assistant supports the pelvis in the sacrum region
                    3. the supporter begins to pull more and more on the thighs with his hands and to support the pelvis with the same amount of pressure with the thigh, until the performer instructs not to increase the tension further.
                    1. as a supporter, make sure that the support on the sacrum does not push the pelvis upwards, which means in particular that the supporting thigh must not be too flat, but rather as steep as possible.
                    2. also here, pulling of stretched leg should be much stronger than pulling on the bent leg, so the pelvis is not forced to evasive turning in horizontal plane
                     
                    known issues that can occur even when running correctly


                      (P) pressure against the fingertips

                      provides a feeling for the lateral stretching of the arms
                      instructions details
                      1. as an assistant, select someone whose arm span is slightly larger than that of the performer
                      2. the assistant stands behind the performer and presses with the palms against his fingertips from the outside, so that he/she can stretch sidewards against this resistance more consciously
                      1. If necessary, shorten the fingernails of the performer
                      2. the performer has to make sure that the finger joints and the hand remain in a controlled position and do not bend under pressure.
                      3. this variant should give a good feeling for lateralizing the shoulder blades, but they are not fully protracted!
                      4. with a focus on lateralization of the shoulder blades instead of lifting the arms, the trapezius feels less tense.
                       
                      known issues that can occur even when running correctly


                        (P) pressing down the arms

                        gives more sense of lifting arms
                        instructions details
                        1. As an assistant, push both arms of the performer downwards just before the elbow joint with slowly increasing force.
                        1. as an assistant, take care to slowly increase the pressure and not abruptly remove it. The pressure increase is best achieved in such a way that the performer - within his or her strength - has the possibility to meet the increasing demand and to constantly adjust his or her use of force
                        2. make sure the arms exorotate completely
                        3. the shoulder musculature of the performer and - depending on his ability to exorotate his arms (the more the more) - the biceps should become noticeably and visibly active.
                         
                        known issues that can occur even when running correctly


                          (P) pressing up the arms

                          instructions details
                          1. Proceed exactly as in the last variant, except that the arms are pushed up here
                          1. here the triceps and the latissimus dorsi are activated. The tension of the latissimus does not belong to the basic pose, the work of the triceps and its elbow antagonistic flexor group of biceps and brachialis does, whereby the balance of the muscles involved must be such that the elbow is not bent further into overstretching by the force of the triceps.
                          2. make sure the arms exorotate completely
                           
                          known issues that can occur even when running correctly


                            knee against the wall

                            gives the flexing leg a great deal of rest in order to enable concentration on the pelvis
                            instructions details
                            1. similar to 1. Kriegerstellung here the knee is pressed against the wall to take the effort from the bending leg, so that concentration on the details of the pelvis position is eased.
                            1. since the knee is fixed to the wall, the pelvis may not be able to move as far in the direction of the stretching leg as is possible in the free variant, where the knee if necessary can move a little forward for the pelvis to turn towards the stretching leg easier and to avoid miss sensations in the inner knee.
                            2. in this variant you can also practice pushing the feet apart very well.
                             
                            known issues that can occur even when running correctly


                              not turning the head

                              This variant is very useful for beginners, as there is often not enough concentration and body awareness to turn the head without turning the pelvis and upper body consequently.
                              instructions details
                              1. look straight ahead instead of turning your head to the side
                              1. when turning the head ti the side of the bent lag, the pelvis and chest are often turned there a little bit also; this risk does not exist here. One can go beyond this and turn the head to the side of the stretching leg, which tends to further improve the pose of the upper body and pelvis.
                               
                              known issues that can occur even when running correctly


                                arms folded behind the back

                                gives a better sense of stretching the chest
                                instructions details
                                1. take the pose as described above, but without the described arm position
                                2. interlock your hands behind your back and move your wrists apart.
                                3. Turn out your arms: biceps forward. Lower the shoulder blades and stretch the sternum upwards and lower the arms backwards and down along the back, the hands rest on the sacrum or butts.
                                1. do not allow yourself to be tempted by the extension of the upper body by lifting the sternum to a back bend in the upper body
                                2. Make sure that the coccyx stays down, so do not put the pelvis further into the flexion when you stretch your chest.
                                3. this variant helps against pronounced cramping tendency in the trapezius
                                 
                                known issues that can occur even when running correctly


                                  (2P)

                                  instructions details
                                       
                                      known issues that can occur even when running correctly


                                        (P) errecting the pelvis

                                        instructions details
                                             
                                            known issues that can occur even when running correctly


                                              pushing a brick against the wall

                                              instructions details
                                              1. This is an attenuation of variant "knee against the wall"
                                              2. as in warrior pose 1st Here, a block is pressed against the wall with the knee to take the effort out of the flexing leg in order to ease concentration on the details of the pelvis posture.
                                              1. Take care not to let the block fall, which can occur especially with adjustments of the foot of the stretching leg and with corrections of the position of the pelvis
                                              2. Cork blocks are generally found to be much more pleasant than wooden blocks.
                                              3. once the block is attached and has full pressure, concentrate on the details of the work with the pelvis:
                                                1. turn the pelvis away from the bending leg
                                                2. raise the pelvis: bottom down, raise the hip bone
                                                3. Bring the hip of the stretching leg further down until it is equal to that of the bending leg.
                                               
                                              known issues that can occur even when running correctly


                                                transition to pasvakonasana and back

                                                instructions details
                                                1. stand in warrior pose 2nd
                                                2. bring more strength to the bending leg and tilt the pelvis to the side of the bending leg
                                                3. slowly put your right hand in the right outer foot area.
                                                4. put the left arm in the extension of the left flank of the body and exorotate it to the maximum.
                                                5. implement the further details of the parsvakonasana:
                                                  1. twist the chest to maximum. the upper half to the back
                                                  2. move the upper arm maximum backwards and stretch it out parallel to the body axis.
                                                  3. press the flexing knee strongly against the upper arm behind it
                                                  4. stretch your neck and turn your head up around its longitudinal axis
                                                  and stand in the pose for some time
                                                6. put more pressure on the ball of the right foot and more force into the right quadriceps
                                                7. with the knee bent at right angle, lift your right hand from the ground to the ceiling and errect the pelvis with your upper body to the vertical.
                                                8. align the pelvis as for the warrior pose 2nd and put your arms in the appropriate position
                                                9. repeat this up and down as long as the leg has strength.
                                                10. stretch the right leg and come out of the pose
                                                1. both in the transition to parsvakonasana as well as back to second warrior pose keep pressure on the outer foot of the stretching leg and keep the feet pushed away from each other.
                                                2. these transitions, like most others, should be carried out in a completely reversible way, i. e. at any given time it should be possible to return to the original pose and not to complete a transition.
                                                3. from the point in time at which the pelvis is tilted to one side during the transition to parsvakonasana, an increased use of force is required in this leg due to the shift of the centre of gravity to the side of the bending leg.
                                                4. during the transition to the second warrior pose, a large amount of force is needed for a few seconds in the lower leg muscles and the thigh of the bent leg, be mentally prepared for it.
                                                5. don't use momentum at any time, but practise calm and sovereign power development, even if it may not yet be available to the desired extent
                                                6. when the pelvis is aligned after the transition back to the second war position, a lot of strength and stability in the bending leg is required once again.
                                                7. separate the movements, especially during the transition back to the second warrior pose:
                                                  1. errecting of the upper body and alignment of the pelvis (in all 3 dimensions in which evasive movements occur)
                                                  2. stretching the bent leg, possibly unintentionally occurring
                                                8. This variant can be used excellently to build up power in the quadriceps and the monoarticular adductors as the butt muscles, in particular if it is executed several times in a row without the bending leg being stretched in between.
                                                9. there are three phases in which the bent knee is often stretched a little to relieve the quadriceps:
                                                10. the pressure of the feet away from each other and the pressure of the outer foot against the ground shall be maintained without interruption
                                                 
                                                known issues that can occur even when running correctly


                                                  (P) transition to pasvakonasana and back

                                                  Restriction of an evasive movement that often occurs in the last variant
                                                  instructions details
                                                  1. the assistant sits in front of the flexing leg (looking along the middle line of that foot) and as in this variant holds the lower leg with his interlaced hands by grabbing around the calf muscles from behind in order to prevent the knee from being stretched.
                                                  1. the moment when the performer starts to lift the upper part of the body is the moment when the tendency to stretch the knee occurs most strongly as described above there are two more situation in wich the knee often ist streched.
                                                   
                                                  known issues that can occur even when running correctly


                                                    back at the wall

                                                    more control over the evasive rotation movements
                                                    instructions details
                                                    1. Carry out the pose as described above, with the buttocks and the back against the wall where the hip of the stretching leg has to be pushed against the wall further.
                                                    1. by the fact that the back is on the wall, it becomes clearer whether a rotating movement of the upper body starting from the pelvis takes place in the horizontal
                                                     
                                                    known issues that can occur even when running correctly