virabhadrasana I
"warrior pose 1st"

Feedback We are looking forward to hear what you think about this description, give us feedback via email to: postmeister@yogabuch.de
last updated: 30.12.2018
name: virabhadrasana I
trivial name: warrior pose 1st
level: A
classification .
classically: standing pose
psychomentally: . bracing
physiologically: . strengthening of the quads, slight backbend, Sstretching of the Iliopsoas and rectus femoris
effects:
preparations:
  • The first warrior pose is presumably - apart from some difficult backbends - the one with the greatest requirement in flexibility for extension in the hips among all supposedly "simple" poses. If the pose is to come closer to its ideal (horizontal front thigh and vertical pelvis turned forward), this corresponds to an extensionin the hips that most anatomists consider impossible. Accordingly, the preparation should be intensive in this topic
    1. hip opening 1
    2. hip opening 2
    With given back health - i. e. if there is no damage to the spinal column and the intervertebral discs - this is added:
    1. upface dog
    2. urdhva dhanurasana (Brücke)
    3. ustrasana (camel)
    4. setu bandha sarvangasana
    as well as several other back bends with hip extension
  • Since the arms are in maximum frontal abduction, this can also be prepared:
    1. downface dog, esp. variante "wide"
    2. Rückenausstreckung, insbes. Variante "erhöht" as a general stretching for the shoulder in the sense of frontal abduction
    3. rechtwinkliger Handstand as a related pose
    4. Handstand
    5. Ellbogenstand
    6. rechtwinkliger Ellbogenstand
    7. Hundeellbogenstand
    8. Hyperbel as one of the most effective and efficient stretches in the direction of frontal abduction without exorotation of the arms
    9. Schulteröffnung am Stuhl as one of the most effective and efficient stretches towards frontal abduction with exorotation of the arms
  • The hip extensors (especially the butt muscles) have to work extremely hard against the high resistance of the hip flexors in this position to keep the pelvis upright. Other poses with similarly high demands on the extensors prepare for this work:
    1. caturkonasana
    2. parsvakonasana
    3. bar pose
    4. warrior pose 2nd
    5. purvottanasana
    6. urdhva dhanurasana
    7. eka pada-variant of urdhva dhanurasana
    8. setu bandha sarvangasana
    9. eka pada-variant of setu bandha sarvangasana
    10. warrior pose 3rd
    11. backward against the wall"-variant" of warrior pose 3rd
    as well as several other back bends with hip extension
  • If a high tension of the lumbar spine muscles is known, it can be relaxed beforehand:
    1. parsva uttanasana
    2. balasana (virasana forward bend, childs pose)
    3. parsva upavista konasana
    4. parivrtta trikonasana
    5. parsvottanasana
    6. half lotus forward bend
    7. karnapidasana
  • In order for the rear heel to rest on the ground, which is important for the stability of the pose, the calf muscles should be stretched beforehand:
    1. Hund Kopf nach unten esp. variants with on leg raised
    2. parsvottanasana
    3. parivrtta trikonasana
    4. hockenii
    5. uttanasana with balls of the feet on a brick
  • As the back leg must be stretched against the flexural inclination produced by the hip flexors, the quadriceps can be prepared for intensive work:
    1. warrior pose 2nd esp. the transition to parsvakonasana and back again
    2. utkatasana
    3. ustrasana esp. against the wall
    4. caturkonasana
    5. setu bandha sarvangasana
  • post practice poses:
  • it is not uncommon to feel an increased tension in the muscles of the lumbar spine after the first warrior pose, relax them with:
    1. parsva uttanasana
    2. virasana forward bend (childs pose)
    3. parsva upavista konasana
    4. parivrtta trikonasana
    5. parsvottanasana
    6. half lotus forward bend
    7. karnapidasana
  • If the butt muscles feels tense or strained after the pose, this is balanced with:
    1. half lotus forward bend
    2. hip opening at the edge of the mat
    3. hip opening 3rd
    4. parivrtta trikonasana
    5. parivrtta ardha chandrasana
  • similar asanas:
    diagnostic hints (Nos.):
  • (711) hip flexors: As always, an excessive hollow back in this position indicates shortened hip flexors. However, this statement must be put into perspective in terms of the requirements of this pose. Concerning the risks of an overly hollow back see FAQ
  • (231) (234) shoulder: The flexibility of the shoulder can be seen here, including lateral differences, and there may be hints of shoulder disorders:
    1. Irritating hypertonus of the deltoid: especially ambitious beginners in yoga tend to develop irritable states in the deltoidus, which are localized in the area of the muscle origins, presumably due to an overstrain of the structures due to repeated demands in full frontal abduction which are noticeable under the same strain, see FAQ
    2. various pathological changes of the shoulder joint, e. g. impingement syndrome (highlight: pain between 70° and 130° frontal abduction), frozen shoulder, calcification of the biceps tendon, which cannot all be discussed here and which require clarification. Until further notice, the related specialist is the orthopaedist. .
    3. side differences in flexibility
    The flexibility of the shoulder can be recognized by the degree of evasion in the three movement dimensions:
    1. Outward evasion of the upper arms with consecutive bending of the elbows
    2. Loss of exorotation of arms
    3. missing frontal abduction that does not reach 180° or does not reach 180° permanently
  • (650) lordosis and kyphosis of the spine: Apart from the tendency to hyperlordosis, which results from the construction of the pose and the given flexibility of the hip flexors, the spine should be able to become quite straight and, beyond the physiological thoracic kyphosis, to be straight or slightly extended. Depending on the variant, the cervical spine should be in the physiological lordosis or maximally extended. For the hollow back inclination see FAQ
  • (651) pelvic obliquity/uneven shoulder height/scoliosis of the spine: The lateral deviations of the spine from the median plane, referred to as scoliosis, are also quite clearly visible in this posture. See the FAQ
  • (812) quadriceps: In this pose, the quadriceps are clearly challenged to stretch the posterior leg against the flexural inclination produced by the hip flexors, which demands a lot of strength and the ability to still perform well in the area of maximum concentric contraction (applies to the monoarticular hip flexors). Since rectus femoris is not yet so close to the maximum of its concentric contraction due to the extension of the hip, it will probably perform the most powerful work of stretching the knee. This can lead to cramping tendencies, which could have various causes, such as the supply situation of the muscles with blood, lack of electrolytes, seldom neurological causes. If you are standing in the pose for a longer period of time, you will inevitably reach the limits of endurance of the muscles, then a burning feeling should start, but after leaving the pose, it should give way again. A certain amount of trembling in the muscles is physiological during strenuous exercise. If it already occurs at low or no effort, this can be a symptom. Accordingly, the certain poses are recommended for improving flexibility
  • variants::
    hands at the hips
    moving hands apart
    knee against a brick
    front foot against the wall
    back foot against the wall
    back foot oblique against the wall
    heel up
    hands upon the back leg
    brick in the hands
    balls of the foot on a brick
    back outer foot on a supporting mat
    grasping the ellbows
    (P) turning the back leg in
    (P) bending the chest
    head not reclinating
    arms interlocked on the back
    (P) errecting the pelvis
    transition to warrior pose 3rd
    transition to parsvottanasana

    instruction details/hints
    1. from a more than just a leg-wide straddle turn in the left foot by 45 to 60° and turn the right foot out by 90°.
    2. turn the pelvis with the upper body 90° in the direction of the right leg, whereby the "right" leg becomes the "front" leg and the "left" leg becomes the "rear"one.
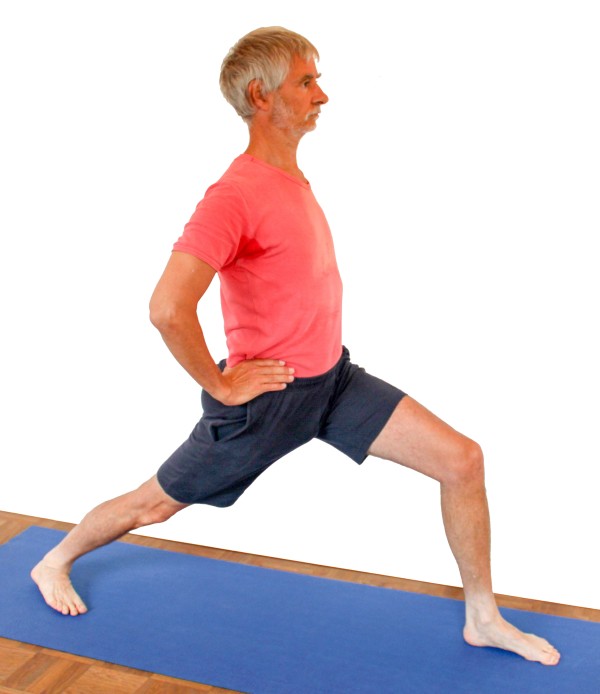
    3. If the pelvis should have tilted forward and downward, the pelvis should be raised back into the upright position with the force of the butt muscles. Keep the position of the pelvis stable by the pressure of the legs. Turn the left leg in to the maximum. Push the feet apart against the resistance of the floor. Press the left heel to the ground and the right ball of the foot (without making the heel too light) also. Both hips are and are to remain equally high and equally turned to the front
    4. Bend the right knee in a controlled manner, whereby increasing bending also allows increasing pressure of the feet away from each other
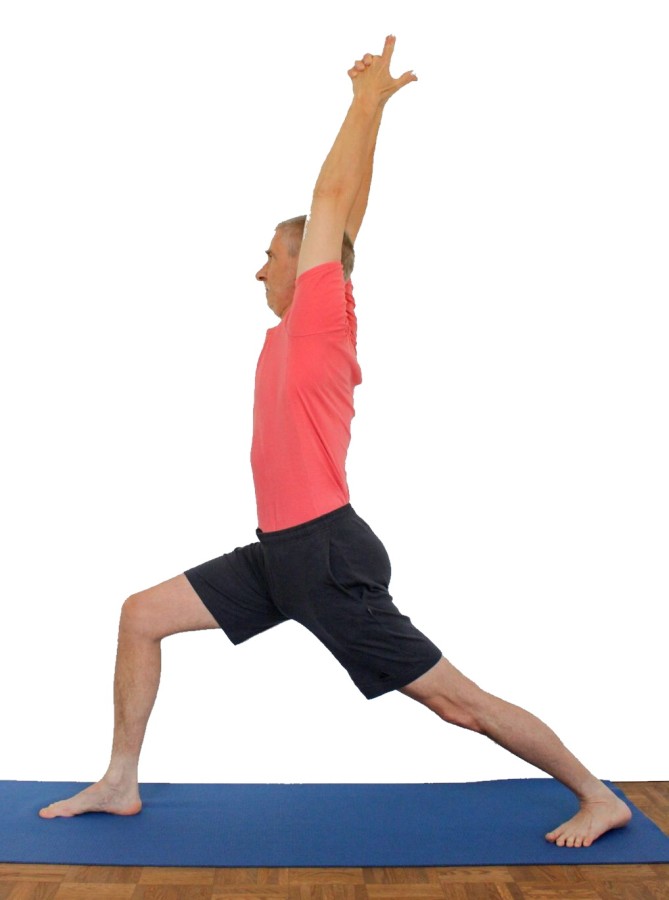
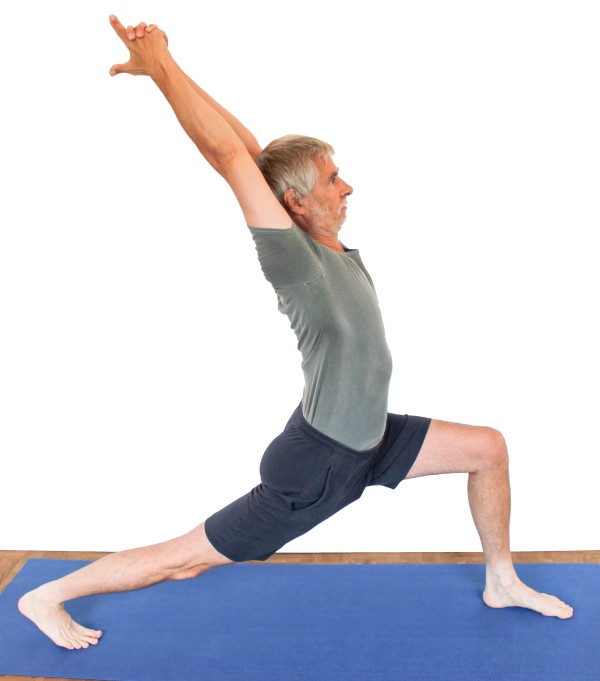
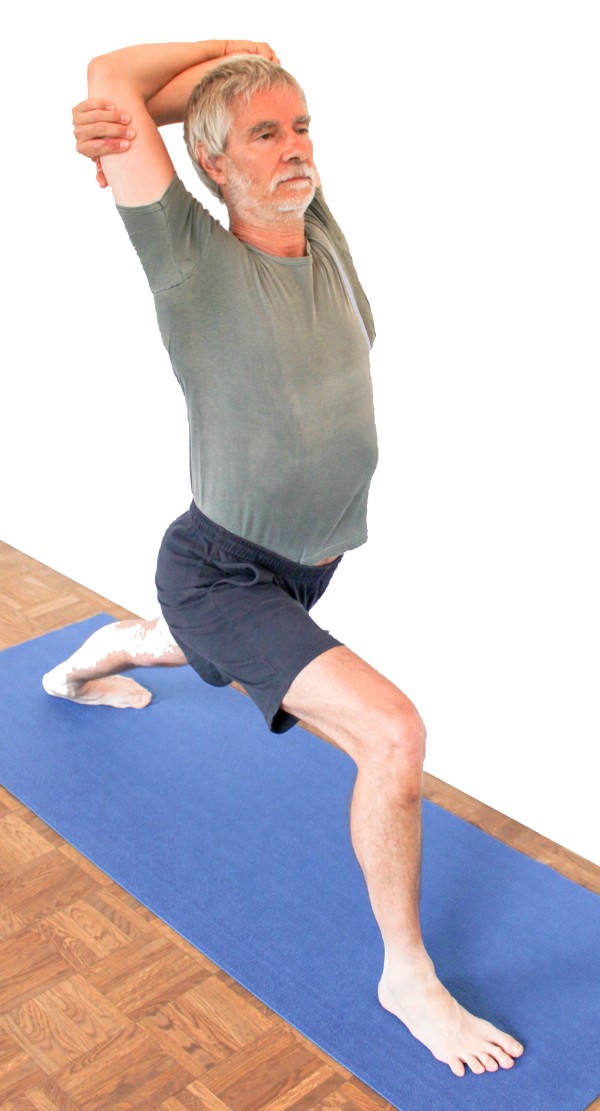
    5. turn the arms next to the body as far as possible, keeping the palms of your hands facing outwards. Then bring your arms up over the outside and put your hands together above your head, palms on top of each other, your thumbs crossed. Stretch your arms out of the shoulder upwards (elevating the shoulder blades).
    6. If necessary, straighten the pelvis again with the force of the butt muscles and bring the upper body and arms into a slight back bend.
    7. As long as the pelvis can be kept upright and turned forward, the front knee can be bent further. If the knee should come forward beyond the heel, the distance between the feet must be increased so that the knee stands above the heel with maximum possible flexion (so that the pelvis can remain upright).
    1. By bending the right knee it is possible to use the quadriceps. m.quadriceps for:
      1. pushing the feet apart (a kind of stretching movement in the knee, which does not push the pelvis up, because the ischiocrural group prevents this)
      2. pressing down the back heel
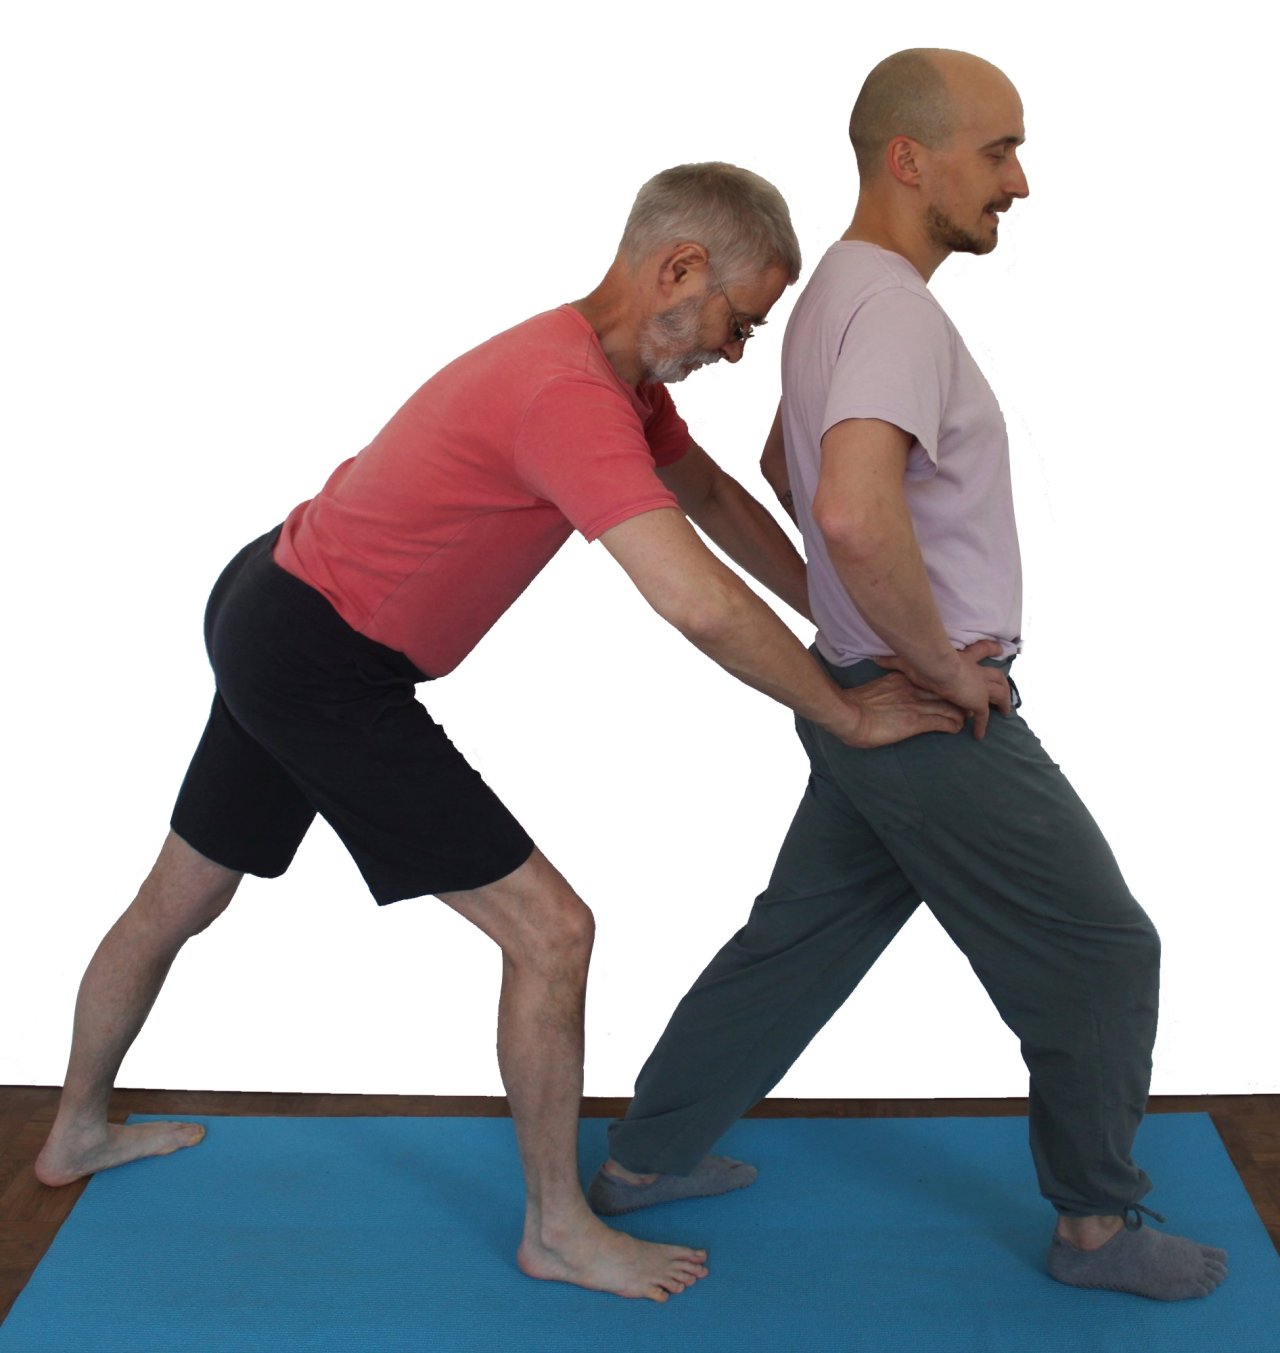
      3. pushing the pelvis into the correct position. The legs push the corresponding hip in the right direction, the back leg pushes the corresponding hip forwards and the front leg pushes the corresponding hip backwards.
      4. the maintenance of the height of the pelvis as it is pushed downwards by its own weight and that of the partial body weight above it
    2. the pelvis should be straight, i. e. the hip bones are turned evenly to the front. This is important for:
      1. healthy pressure conditions in the sacroiliac joint
      2. the condition of the (especially lower) back: the straighter the pelvis, the less one-sided strain occurs in the back muscles
      3. the possibility of stretching the m. iliopsoas (back leg) and the m. rectus femoris (back leg).
      4. the possibility of stretching the calf and foot muscles
    3. the pelvis has to be erected as much as possible because of:
      1. also the possibility of stretching the m. iliopsoas (back leg) and, clearly subordinate the m.rectus femoris (back leg).
      2. the condition of the lower back (see above)
      3. enabling for an even upper body back bend. A person whose lower back hurts will hardly want to lean back in the middle back
      4. the (especially one-sided: on the side of the bent leg) strengthening of the m.glutaeus max.to be performed.
    4. turn in the rear leg (not the foot!) in the hip in the 30°-45° rotated position of the leg, which helps to keep the corresponding hip forward which helps to hold the corresponding hip in front, i.e. to move the inner knee backwards in relation to the outer knee.
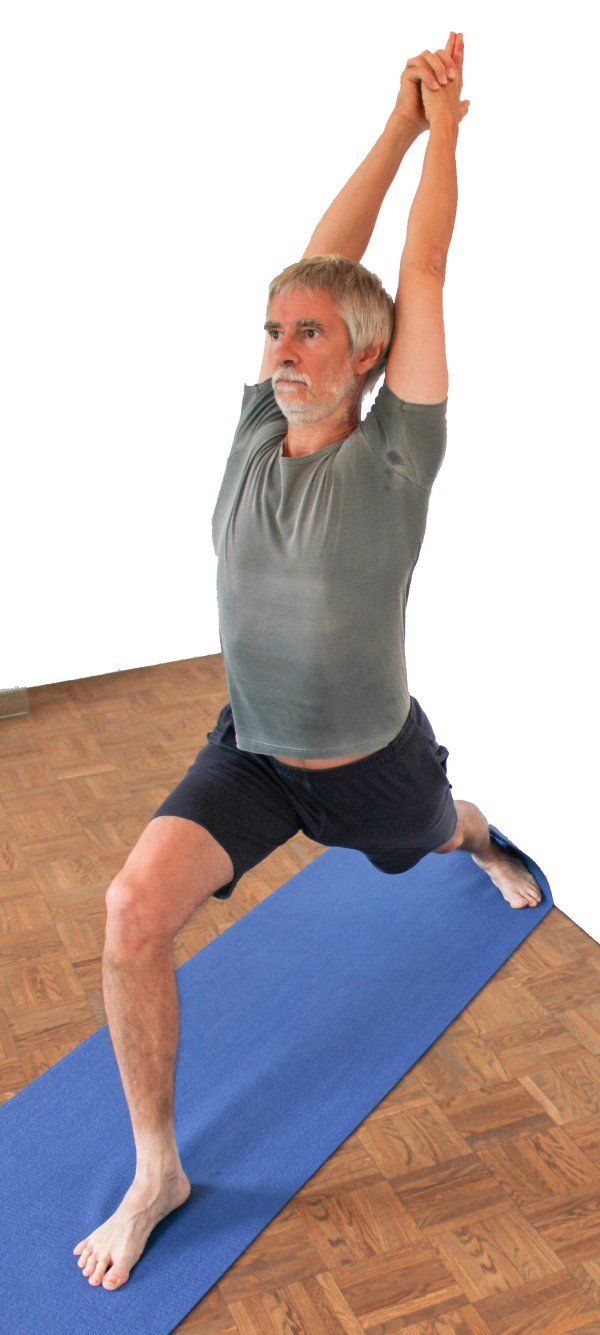
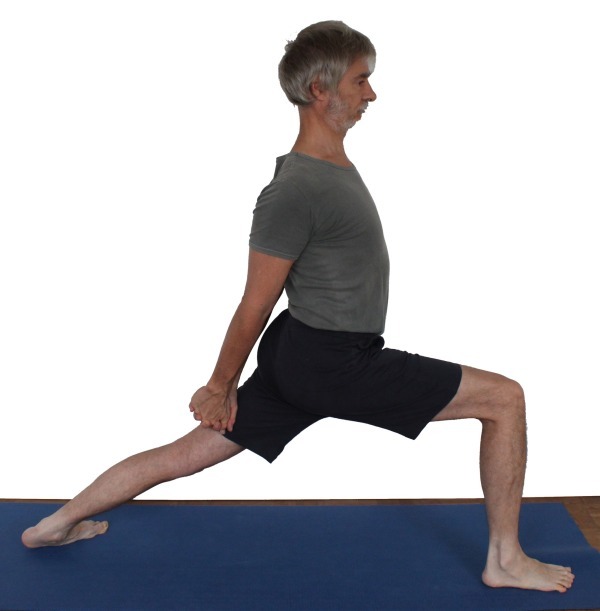
    5. Keep the right leg straight in the sense that the knee, heel and hip are in a vertical plane. The front foot and the entire front leg stand in a plane parallel to it, i. e. the knee does not tilt inwards or outwards and the foot does not stand obliquely. It is ideal if the knee is vertical above the heel and at the same time the thigh is horizontal.
    6. take your head only in the back of your neck, if this does not significantly affect the stability of your pose.
    7. in hypertension, don't lift your arms nor take your head in your neck.
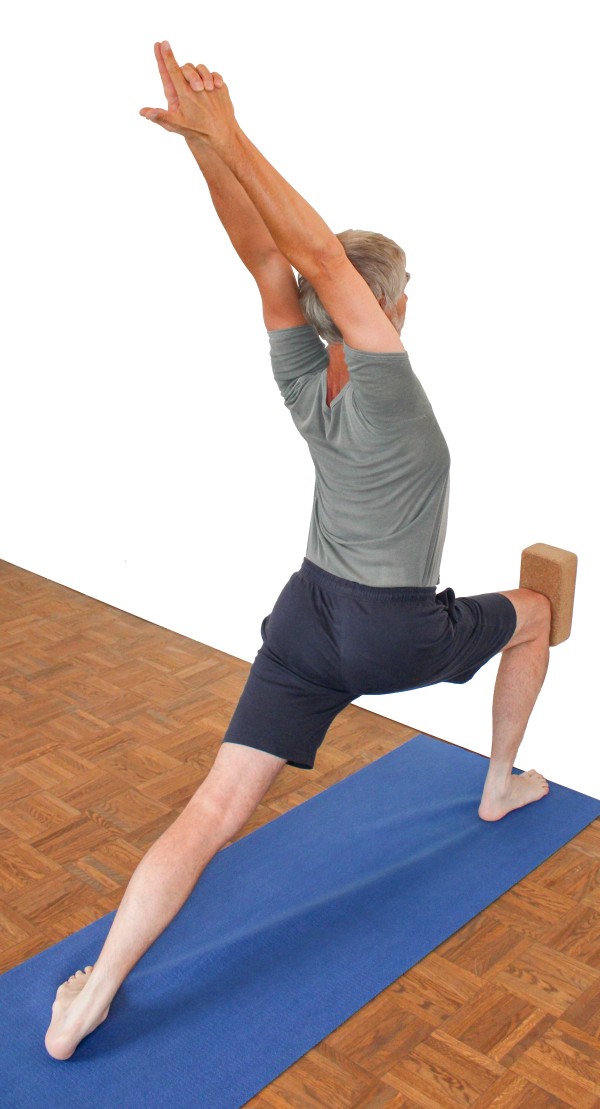
    8. only let the back heel come up if:
      1. you want to use the posture primarily for coarse strengthening of the legs or
      2. if otherwise the pelvis is not to be held straight or if the front knee could not be bent when the pelvis is held straight.
      Keep in mind that raising the rear heel significantly destabilises the pose, as the base of support then is much smaller
    9. Prevent the swinging movement around the longitudinal axis of the front foot by using the calf muscles vigorously to force the ball of the foot fully and calmly onto the ground. As in many other postures, where the safe standing in the pose clearly depends on the work of the front leg due to a narrow support base , the moment you think you are standing safely and could therefore reduce the activity in the front lower leg a little, is the moment you start wiggling or even tipping over!
    10. the front foot points in its elongation to the back heel, in the case of experienced persons possibly to the rear centre of the foot. Both correspond to a varying degree of light adduction of the posterior leg.
    11. Stretch your arms out of your shoulders backwards and up. Turn out the arms as far as possible. Hold the palms of your hands together and cross your thumbs. Change with the side of the asana also the entanglement of the thumbs.
    12. the angle of the rear foot to the front should be between 30° and 45°. Note that everyone has an individual optimum. This is a compromise between the restrictions on the flexibility of the foot and pelvis. The following two rules of thumb apply: ´
      1. if the heel cannot come to the ground at an angle of 30° or remains too light, an enlargement of the angle up to 45 degree is necessary
      2. if the hip, which belongs to the stretched rear leg is not able to come forward sufficiently far or only if the front knee does not bend fully (90°), a reduction of the angle down to minimum 30 degree is necessary. If the pelvis cannot be turned forwards and the rear heel cannot be held on the floor at the same time, the distance between the feet is too great. If the front knee cannot be bent with the back leg turned 30° and the pelvis upright without the pelvis swerving, the hip flexors are too inflexible to fulfil all the conditions at the same time and some compromises must be made which obey the maxim "maximum effectiveness with ideally zero side effects"!
      In fact, often both conditions 1) und 2) often apply at the same time, so practice one time with the focus on wide bending of the front knee and a straight pelvis but lifted heel and the other time with the heel on the floor and the pelvis straight but insufficient bending of the front knee. The first of the two options serves more to strengthen the front thigh and the back m. rectus femoris and the muscles of the front lower leg, since the base of support is much narrower and therefore the front foot has to carry out more compensatory movements by the strength of the lower leg muscles, the other one is more about improvement of the flexibility of the foot and the hip flexors. It is therefore important to find the personal optimum by experimenting and to observe over time whether and how it changes.
    13. the posterior leg should be stretched with force, not only in order to ensure the stretching of the hip flexors but also to reduce the effect of occurring torsion momentums in the knee joint. Especially, if there is pain in the inner knee of the back leg, increase the use of force of the quadriceps of the back leg and additionally turn in the back leg more vigurously. Except in the case of pathologically altered knees, such pain almost always turns out to be a consequence of the knee not having been stretched thouroughly or the leg not having been turned out enough
    14. Note: if the pose is taken from a straddle by turning in one leg 45° to 60° and turning out the other leg 90°, at the beginning of the process when the first leg is turned in 45-60°, this leg is in a strong endorotation that lies at the edge of the range of movement or even beyond it, so the pelvis is forced to evade (in the sense of rotation in the plane). After the second leg has been turned out 90° and the pelvis turned 90° in the same direction, the second leg is therefore in 0° rotation, but the first leg is no longer in endorotation but 30° exorotation! When the pelvis is turned, the posterior leg changes from endorotation to exorotation. Nevertheless, the movement that this leg has to make in the pose is as strong an endorotation as possible.
     
    known issues that may occur even when practicing correctly
       

      variants

      hands at the hips

      better control over the position of the pelvis
      instructions details
      1. take the pose as described above, but put the fingertips of the index and middle finger on the hip bones (SIAS)
      1. the elbows thereby are moving backwards
      2. Do not lift the shoulder blades, but push them towards the lower back.
      3. with the fingers it is possible to assess whether both hip bones are equally far forward; at the same time it is possible to push the pelvis further in the right direction by force of the arms.
       
      known issues that can occur even when running correctly


        moving hands apart

        changed work of the arms causes activity of the latissimus dorsi
        instructions details
        1. place the palms of your hands on top of each other as described above and interlock your thumbs. Pull your hands apart (exactly seen: the whole arms) against the hold given by the overlap of your thumbs by force of the m. latissimus dorsi
        1. also in this variant pay attention to the turning of the arms (biceps is turned backward)
        2. with strong work and some flexibility in the m. latissimus dorsi this moves clearly outside (lateral) including the shoulerblades
        3. stretch the elbows despite the applied pull and pay attention to maximum elevation of the shoulder blades
         
        known issues that can occur even when running correctly


          knee against a brick

          Konzentration auf die Beckenhaltung
          instructions details
          1. practice this pose in such a way that you press a block against a wall with your front knee.
          1. make sure, of course, that the block doesn't fall on your foot by carelessness. This danger exists mainly when leaving the pose, but also when correcting the back foot or pelvis.
          2. this pose relieves the load on the front thigh, so that there is more space for the other parameters.
          3. the front foot can be positioned so that the toes on the wall point upwards - this allows the front knee to be held at a more favourable (less acute) angle as if the toes had some distance to the wall.
          4. because the knee is bent relatively far in this position, the hip belonging to the rear leg will in many cases only be able to come forward at the same distance if the rear foot stands at a smaller angle to the front foot than it should (min. 30°), in particular the rear heel can no longer be held on the ground at such an angle.
           
          known issues that can occur even when running correctly


            front foot against the wall

            Modification of the variant "brick variant against the wall"
            instructions details
            1. press the front knee directly against the wall without using a brick
            1. Depending on the nature of the wall and the block, this may be a more or less pleasant option than the one with the block.
            2. here the angle in the front knee is a little bit sharper than when using the block. So let the toes on the wall point upwards in any case
             
            known issues that can occur even when running correctly


              back foot against the wall

              instructions details
                   
                  known issues that can occur even when running correctly


                    back foot oblique against the wall

                    prevents the back foot from evading and the heels from coming up
                    instructions details
                    1. build up the pose as described above, but place the mat at an angle of approx. 45° to the wall so that the rear outer foot can be pressed against the wall.
                    1. if, due to the shape of the outer foot, the question arises as to whether the forefoot or the heel should be on the wall, as both are not accessible at the same time, then choose the heel.
                    2. Don't by irritated by the mat lying obliquely to the wall, but build up also here the pose in such a way that the front foot stands parallel to the long edge of the mat and points in its extension to the rear heel. Both heels are equally far away from the long edge of the mat
                     
                    known issues that can occur even when running correctly


                      heel up

                      Intensified strengthening of the front quadriceps and more intensive stretching of the hip flexors
                      instructions details
                      1. take the pose as described above, but let the rear heel come up, keep the back foot parallel to the front foot
                      1. the rear heel moves backwards and down mostly without being able to reach the ground
                      2. in this variant, the front knee bends at a right angle so that the thigh is horizontal and the lower leg is vertical. For this purpose, the distance between the feet must be chosen adequately
                      3. also use the power of the front thigh to push the body backwards. For some people, this is not only noticeable but also visible as an additional activity of the front thigh, as some parts of the quadriceps become visible more clearly
                      4. due to the much narrower base of support (its width is only the width of a foot) Therefore, more attention and muscular work in the front lower leg is necessary than in the normal pose. Press the balls of the front foot by the calf muscles permanently calmly and powerfully onto the floor
                      5. this variant has a very strong effect on the hip flexorson the side of the back leg, incl. its m. rectus femoris and the quadriceps of the front leg. This should also be perceived as such.
                       
                      known issues that can occur even when running correctly


                        hands upon the back leg

                        gives more sense for the upper body back bend
                        instructions details
                        1. build up the pose as described above, but don't take the arms upwards but hold the arms behind the upper body stretched backward-down with interlocked your fingers
                        2. stretch your arms and turn them out (biceps forward)
                        3. put the interlocked hands on the back thigh and move them backwards-downside on it. Continue to lean back with your upper body
                        1. Make sure that the back bend, which allows you to push your hands further backwards and downwards, comes from the middle/upper back and not from the lower back.
                        2. the shoulder blades move inwards and downwards
                        3. reclinate the head
                         
                        known issues that can occur even when running correctly


                          brick in the hands

                          gives more sense for the movement of the arms
                          instructions details
                          1. take the pose as described above, but keep a block between your hands
                          1. because of the long lever arm the block is noticeable despite the low weight. If with halfway shoulders the arms move backwards beyond the vertical, the block pulls the arms a little further in the desired direction.
                          2. instead of the block a small dumbbell can be used, of course
                           
                          known issues that can occur even when running correctly


                            balls of the foot on a brick

                            instructions details
                                 
                                known issues that can occur even when running correctly


                                  back outer foot on a supporting mat

                                  gives more support, when supination of the back foot is quite limited
                                  instructions details
                                  1. take the pose as described above, but support the outer foot with 2-6 layers of mat that is parallel to the midline of the foot and supports the entire outer edge of the foot from the heel to the ball area.
                                  1. press the outer edge of the foot onto the supporting mat and simultaneously turn in the back thigh.
                                   
                                  known issues that can occur even when running correctly


                                    grasping the ellbows

                                    simplification for the shoulders
                                    instructions details
                                    1. take the pose as described above, but do not stretch your arms, but grip the elbows with your hands and move them backwards
                                    1. stretch from the shoulders to the ceiling and turn out (biceps backward)
                                    2. This pose can be much more comfortable if there is a tendency to cramp in the trapezius. In addition, the opposite upper arm can be grasped and turned out alternately with one hand each.
                                     
                                    known issues that can occur even when running correctly


                                      (P) turning the back leg in

                                      Support of the endorotation of the rear leg in order to be able to bring the hips equally far forward
                                      instructions details
                                      1. Build the pose as above; the assistant grasps the back thigh of the performer with both hands and turns it in, until further notice as much as possible (inner knee to the front)
                                      1. This variant can help to carry out the pose without pain in the inner knee. As always, start slowly and cautiously to apply the support and continue to increase until the performer expresses the limit
                                      2. due to the position of the assistant he can also monitor the stretching of the back leg very well. Sometimes it is also the lack of extension of the knee or its combination with insufficient endorotation that leads to pain in the knee.
                                       
                                      known issues that can occur even when running correctly


                                        (P) bending the chest

                                        instructions details
                                        1. During normal execution of the pose, the supporter stands to the side of the performer, placing one supporting hand on the back at the level of the sternum, with the other arm horizontally pushing the upper trunk backward from the front just at shoulder level. The force applied from the front must not be greater than the force applied from behind.
                                        1. This variant serves to straighten the thoracic spine and to bend it further in the direction of extension, i.e. to increase the upper body back bend of the pose. It must be ensured that the arm pressing against the body at the front does not press more strongly than is supported at the back, otherwise a hollow back would develop in the lumbar spine beyond the thoracic spine extension or an existing one would be enlarged.
                                        2. The performer must ensure that the thoracic spine extension does not lead to an intolerable lumbar spine hyperlordosis.
                                        3. the position of the supporter must be accurately chosen so that he can press with horizontal arm against the chest just under the shoulders, so that for good effectiveness and minimum fatigue of the supporter there is a maximum lever arm opposite the supported point in the back. Consider to the height of the performer and supporter.
                                         
                                        known issues that can occur even when running correctly


                                          head not reclinating

                                          better stability
                                          instructions details
                                          1. take the pose as described above, but leave the head in extension of the thoracic spine
                                          1. The position of the head in the maximum back bend makes many practitioners quite unsteady. This may be due to the largely lost 3D positioning, which normally evaluates fluctuations and movements of the body via visual impressions in the form of, for example, observation of the floor in front of us. If the head is in a back bend position, this is no longer possible in the usual way, some parameters might even have to be interpreted the other way round. For this reason, for stable standing it is often recommended to look at a fixed point on the ground at a distance of 3-4 m. Although balancing is mainly done by the force of the front calf, the required information is partly obtained visually.
                                           
                                          known issues that can occur even when running correctly


                                            arms interlocked on the back

                                            instructions details
                                            1. take the pose as described above, but cross your arms on your back without leading your hands to the back of your thighs as in the "hands on your back leg" variant, thus bringing your upper body into a wide back bend.
                                            1. this variant relieves the shoulders and arms. It is therefore suitable for high blood pressure as well as for cramps in the trapezius.
                                             
                                            known issues that can occur even when running correctly


                                              (P) errecting the pelvis

                                              instructions details
                                              1. take the pose as described above. The supporter stands behind the performer and turns and presses the pelvis into the correct position with both hands.
                                              1. as already described in the basic pose, the pelvis evades as expected in three movement dimensions and this in a very sustainable, hardly controllable way - not least because in most cases hip flexors with more or less limited flexibility are opposed to a very pronounced extension requirement in the hip. Since the correction with the upper extemity takes place against the forces of the lower extremity (or the muscles that move it), it is generally expected to be very exhausting for the supporter.
                                              2. the corrections to be made in detail:
                                              3. of course, the total measure of evasion at given power input (summed up by the performer and supporter) must always be the same, it can only be distributed differently among the different movement dimensions. The first requirement is usually the condition of the lumbar spine area, so that the erection of the pelvis generally should be given the most attention. If the lumbar spine area becomes unilaterally noticeable with mal sensations, the correction of the pelvis in the sense of rotation in the horizontal is most important, whereby also the elimination of the the different height of the two hips can have an influence here, because the performer still strives with the rest of the body into the vertical, thus a lateral flexion in the lumbar spine results due to different heights of the hips and consequently different states of the musculature on both sides of the lumbar spine causing the mal sensation
                                               
                                              known issues that can occur even when running correctly


                                                transition to warrior pose 3rd

                                                instructions details
                                                1. from the first warrior pose bend your upper body forward in the hips and keep your arms stretched in the elongation of the trunc.
                                                2. shift more and more body weight forward to the bent leg
                                                3. pull the rear foot approx. 20-30 cm forward and set it down on the ground again
                                                4. slowly lift the rear leg without swing and bring it up as far as possible.
                                                5. slowly stretch the standing leg further and further and finally reaching its full stretching
                                                6. make any necessary corrections so that the back is in a horizontal line with the upper leg and arms and warrior post 3rd is taken completely.
                                                1. When bending the upper body forward, make sure that the centre of gravity is moved forward exactly along the foot's midline. This will allow the foot to be kept as still as possible - in combination with the equally heavy inner and outer foot - and thus create the prerequisite for a safe transition
                                                2. when shifting the weight, the front leg stretches as little as possible. In particular, when or before the back leg is lifted, there is a tendency to stretch the front knee to reduce the strain in the thigh.
                                                3. first lift the rear leg up as much as possible before stretching the standing leg (the front one). When lifting the rear leg, many muscles work quite vigorously for a short time:
                                                  1. the butt muscles of the front leg for stability of the pose
                                                  2. the butt muscles and the hamstrings of the back (lifted) leg for its lifting as well as
                                                  3. the front quadriceps, which support a great part of the body weight (namely the entire weight except that of the standing leg itself)
                                                  4. The lower leg muscles of the front leg - depending on the phase, not only the calves but also the tibial muscles,
                                                  5. the back muscles that stretch the upper body and in which its weight acts, including the weight of the arms and head, which create an even greater moment Moment at a particularly long lever.
                                                 
                                                known issues that can occur even when running correctly


                                                  transition to parsvottanasana

                                                  instructions details
                                                  1. from warrior pose 1st bend the upper body forward in the hips joints with arms held in the elongation of the trunc
                                                  2. drop the upper body completely on the front thigh as far as possible without giving up the stretching of the upper body
                                                  3. slowly stretch the front leg , whereby the contact between the upper body and the thigh is maintained as far as possible, either completely or otherwise
                                                  4. when the front leg is fully stretched, put your hands on your back and put them in the same position as in namaste. Alternatively, the hands can grasp the elbows alternately and the forearms can be placed on the lower back.
                                                  1. Make sure to press the balls of the front leg firmly onto the floor during the entire transition so that you stand stable. To achieve this, the calf muscles have to work hard and steady
                                                  2. during the transition move the centre of gravity exactly on the center line of the front foot
                                                  3. while you are stretching the front leg, make sure that the corresponding hip moves backwards-up, so that the pelvis stays straight and does not end up one hip further forward than the other.
                                                  4. By stretching the front leg, it tends to turn out, whereby the inner foot often becomes lighter, which costs stability.
                                                   
                                                  known issues that can occur even when running correctly