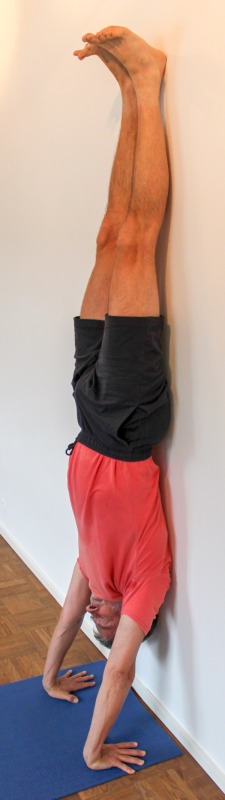
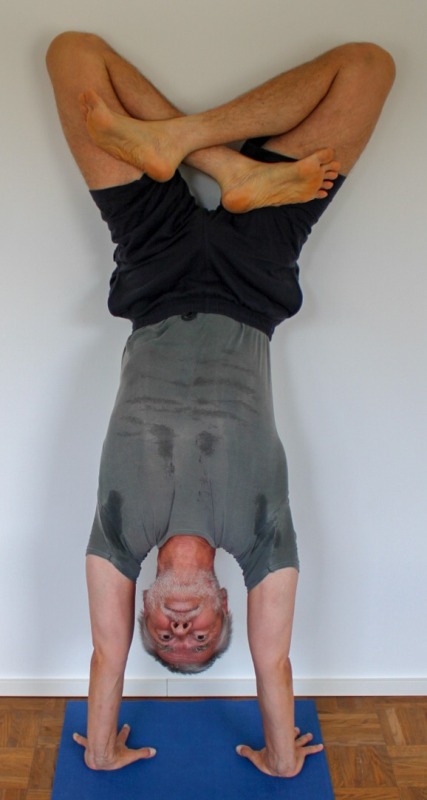
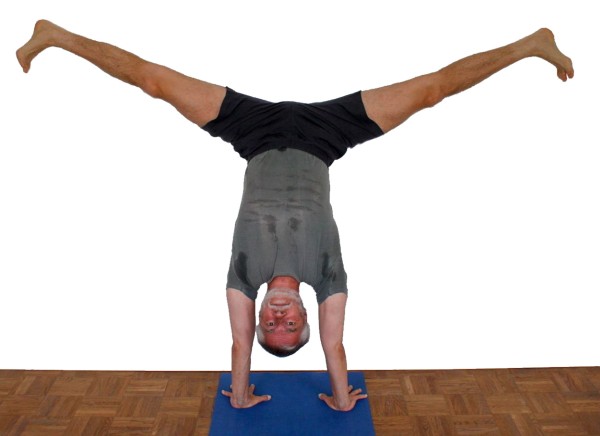
adho mukha vrksasana
"handstand"

Feedback to: postmeister@yogabuch.de
last updated: 30.8.2017
name: adho mukha vrksasana
trivial name: handstand
level: A
classification .
classically: inversion pose
psychomentally: . energising
physiologically: . strengthening arm- und shoulder
effects:
  • (232) Strengthening of the anterior abductors of the shoulder (deltoideus) : Maintaining the anterior abduction angle against existing flexibility restrictions strengthens the deltoideus
  • (292) Strengthening: of the trapezius. : The elevation of the shoulder blades against the body's gravity strengthens the trapezius
  • (352) Strengthening: of the palmar flexors of the wrist : pressing down the finger joints strengthens the palmar flexors
  • (302) Strengthening: of the triceps : stretching the arms against the flexibility restrictions of the arms strengthens the triceps, the less flexible the shoulders are in the sense of frontal abduction the more
  • (231) Stretching: frontal abduction of the shoulder. The overhead movement of the arms stretches the shoulders in the sense of maximum (frontal and lateral) abduction
  • (351) Stretching of the palmar flexors of the wrist. The angle of the dorsal flexion of approx. 90° stretches the palmar flexors
  • preparations:
  • an important preparation for all those who don't jump into the handstand with ease is warming up the ischiocrural group, so that no distortion occurs during the vehement swinging movement:
    1. uttanasana THE standard to warm and stretch the ischiocrural group
    2. prasarita padottanasana similar to uttanasana
    3. downface dog with strong tilting of the pelvis this is a good preparation
    4. parsvottanasana preparation exceeding uttanasana
    5. hip opening V hip opening V also clearly exceedes the preparation of the uttanasana
  • depending on the flexibility and resilience of the shoulder, it is also necessary to warm it up well:
    1. downface dog as a general opening of the shoulder and ischiocrural group
    2. upface dog as an pose which prepares the shoulders for powerful work by its correctly and strongly executed transitions from and to the downface dog
    3. rectangular handstand as a very related and strongly synergistic pose
    4. back stretching, in particular back extension variant "increased" as a general extension of the shoulder
    5. dog elbow stand as a related pose, which is generally similar to handstand. only in the rotation of the arms differs
    6. hyperbola as one of the most effective and efficient stretches in frontal abduction without distinct exorotation of the arms
    7. Shoulder opening at the chair is one of the most effective and efficient strains in the direction of frontal abduction with exorotation of the arms
    8. purvottanasana if the tone in the deltoid is too high or has become too high through preparation
  • to prepare for work in the shoulders with a similar movement without hands fixed:
    1. upavista konasana with block upavista konasana increases awareness of the nature and intensity of the work in the shoulders
    2. dandasana with block between lifted arms like upavista konasana with block
  • "energetic" preparation for all those whose upswing fails because of unconscious or partially conscious inner factors, not based on the musculoskeletal system:
    1. surya namaskar (sun salutation) stimulates the flow of energy and makes the head a little freer
    2. rectangular handstand makes you familiar with loosing the floor under your feet
  • post practice poses:
  • In cases of significantly reduced flexibility in the shoulders, a more or less distinct hollow back can occur. In order to eliminate the resulting discomfort, the following postures can be performed:
    1. uttanasana, in particular the "parsva" variant
    2. parsva upavista konasana
    3. parsvottanasana
    4. downface dog
    5. hip opening V
  • if, after the handstand, there are still some discomfort left in the dorsal wrist due to the limited ability to flexion of the wrists, it may be necessary to use the postures, which can also be used as a preparatory treatment:
    1. Forearm extension for the palmar flexors to stretch the performing muscles in the wrist
    2. Forearm extension for the dorsal flexors to prevent the antagonists of the performing muscles from cramping in the wrist
    3. Forearm extension in upavista konasana for the palmar flexors for further stretching of the performing muscles in the wrist
  • similar asanas:
  • as an inversion pose:
    1. elbow stand
    2. headstand
    3. shoulder stand
  • in general:
    1. rectangular elbow stand
    2. rectangular handstand
  • Geometry:
    1. urdhva hastasana
    2. tadasana
    3. savasana
    4. vrksasana
  • Effect to the shoulder:
    1. downface dog
    2. back stretchign
    3. rectangular handstand
  • diagnostic hints (Nos.):
  • (401) wrists: Wrist joints: Weaknesses of the wrists can become evident in the handstand
    1. ganglion in the dorsal wrist area: the ganglion is a proliferation of tissue that can cause pressure pain
    2. shortening of the palmar flexors: these cause pressure in the dorsal wrist area. Stretching then improves!
    3. the dorsal flexors of the wrist are prone to cramping: they develop a tendency to cramp in the tendon area of the wrist and in the distal forearm. Stretching improved!
  • (354) forearm: Forearm: A golf elbow can stand out in the handstand
    1. Pain in the inner elbow (more precisely in the region of the epicondylus medialis humeri) in the region of the tendons of the palmar flexors usually indicates a more or less distinct epicondylitis humeri ulnaris ("golf elbow"). Don't apply greater forces then, especially shock-like kind. regular rather gentle and longer lasting stretching are indicated as well as additional light regenerative training for blood circulation and gentle strengthening, whereby many repetitions (even with three-digit repetition numbers) are carried out with very light weight without pain occurring..
  • (724) leg back: Hamstrings: In handstand, irritation of the origin of the ischiocrural group may be noticeable.
    1. The origin of the ischiocrural group at the sitting bone is stressed during the upswing in the stretched leg. Irritants are particularly noticeable even if they are completely inapparent in everyday life (see FAQ)
  • (231) (232) (233) (234) shoulder: In handstand different conditions and pathologies of the shoulder can be noticeable
    1. Irritating hypertonus of the deltoid: especially ambitious beginners in yoga tend to develop irritable states in the deltoidus, which are located in the region of the muscle origins, presumably due to an overstrain of the structures due to repeated demands in full frontal abduction and which are also noticeable in the same load, see FAQ.
    2. pathologically increased tone of the trapezoid, see FAQ.
    3. various pathological changes of the shoulder joint, such as impingement syndrome (highlight: pain between approx. 70° and 130° frontal abduction), freezing shoulder, calcification of the biceps tendon, which cannot all be discussed here and are afraid of clarification. Specialist is b. a. w. the orthopaedist.
    4. Side differences in flexibility
    Furthermore, the handstand provides relatively good information about the mobility of the shoulder in the form of the degree of evasion into the three movement dimensions, recognizable as:
    1. Outward evasion of the upper arms with consequent bending of the elbows
    2. Loss of exorotation of the arms
    3. Frontal abduction mismatch that does not reach 180° or does not reach 180° permanently
  • (101) head: Pain in the head can increase significantly in handstand
    1. latent headache can be significantly intensified under increased pressure. Because the differential diagnosis of headache is a very wide field and because migraine headache must be delimited from migraine headache it is not possible to go into all the details of migraine. Sometimes a longer headstand helps against headache of different genesis and intensity, while the pain gets a little worse in the first 3-4 minutes, it often fades or diminishes afterwards. Often running helps.
    2. pressure on the eyes: increased intraocular pressure is in need of clarification. Specialist is the ophthalmologist until further notice
    3. latent or manifest colds can cause increased sensation of pressure in the head
    4. pressure in the head due to a not (yet) adapted vascular system. Here it is recommended to practice headstand with just this focus.
  • (680) oesophagus/gastrointestinal tract: a disturbed closing function of the stomach or oesophagus can be easily noticed here as well as an overfilled stomach or intestine, that can put pressure on the heart and lungs.
  • (302) arms: a low power endurance of the triceps will be clearly evident when the shoulder is less flexible, since it must limit the outward movement of the arms and the resulting bending of the arms
  • (711) pelvis (hip flexors, adductors): a low mobility of the hip flexors in the handstand may lead to the possibility that a stretched angle in the hips cannot be achieved, even if the extensors of the hip joint (i. e. the pomusculature) give their best. The consequence is that the upper body is inclined towards the legs, especially in the area of the lumbar spine, and mal sensations often occur in the area of the lumbar spine. Shortened adductors with hypertonus would develop a tendency to cramp when the pomusculature tries to eliminate flexion in the hips, because they have to absorb the exorotation moments of the pomusculature, as can be observed even more clearly in the shoulder position.
  • (650) kyphoses and lumbar spine lordosis: The deviations from the physiological double-S-form of the human spine are visible mainly from the wall in this pose. There should be a certain amount of lordosis in the lumbar spine and cervical spine and a certain amount of kyphosis (rear convex spine) in the thoracic spine. The kyphosis in the cervical spine can and should be eliminated in handstand and this area of the spine can be extended up to a straight position. See also the FAQ
  • (651) pelvic obliquity/uneven shoulder height/scoliosis of the spine: The lateral deviations of the spine from the sagittal plane, referred to as scoliosis, are also visible in this pose, mainly from the wall. Maybe both heels on the wall are unevenly high. If this is not a consequence of unevenly flexible shoulders, the spine and pelvis can be considered as origin. See also the FAQ
  • variants::
    shrugging
    bending arms
    reverse rotation of the arms
    on fists
    on fingertips
    on bricks
    upswing without turning leg
    baddha konasana
    supta baddha konasana
    two-legged upswing
    two-legged upswing with brick between thighs
    two-legged upswing with bound feet
    not moving arms
    two-legged upswing as Jumping
    dips
    eka pada
    free
    hands turned inward
    hands turned outward
    hands turned backward (away from the wall)
    hands pushing toward each other
    head and back on the wall
    feet standing on the wall
    with back bend
    upswing with unfamiliar leg
    only head on the wall
    free (P)
    padmasana
    Padmasana forward bend
    supta padmasana
    butts on the wall
    butts on the wall, legs towards trunk
    shoulders to and away from the wall
    shoulders towards the wall
    support with upswing (P)
    twist
    transition to uttanasana
    virasana in handstand
    handstand with krouncasana
    looking to the feet
    looking to the hands
    samakonasana (sideway split)
    wrists on patches

    instruction details/hints
    1. take downface dog
    2. put one foot (the corresponding leg becomes the "ankle bone") with bent knee around approx. thirty centimeters forward and put most of the weight on this foot.
    3. Lift the other leg (flybone) off the ground, keep it stretched and swing it up and down several times in succession.
    4. On a strong upswing of this leg, decide to jump off with the other leg as well
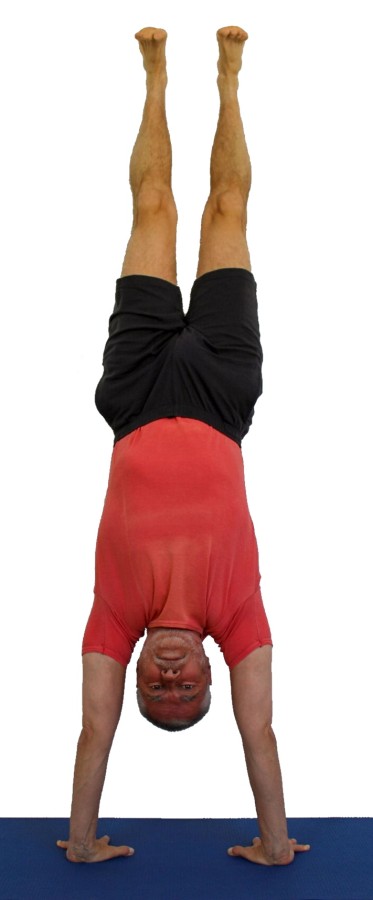
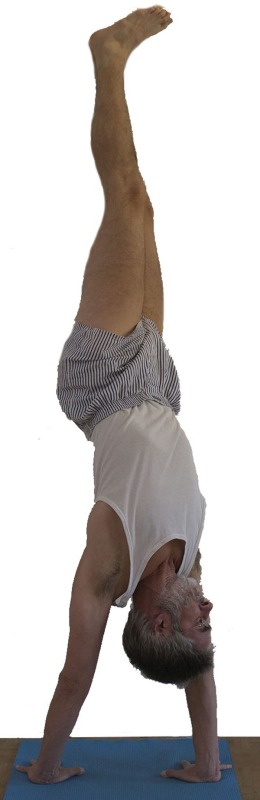
    5. Stretch from the strength of the arms maximum upwards with a maximum elevation of the shoulder blades (move away from the pelvis)
    6. keep your shoulders moved away from the wall in every phase, even if this makes it difficult to take the pose, especially it will aggravate the upswing
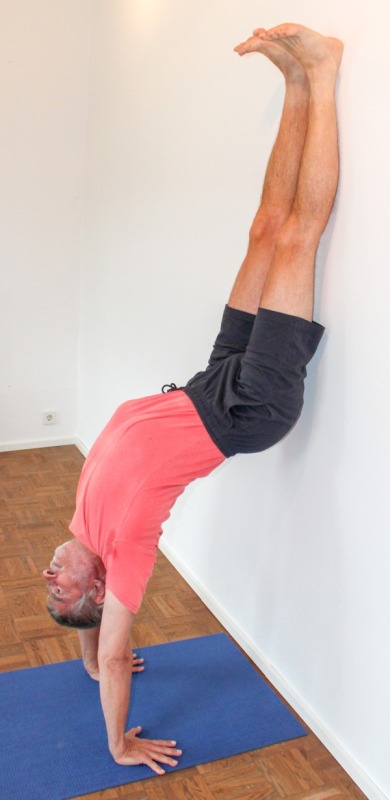
    1. For people who are stiff in the back of the leg (ischiocrural group) it is necessary to warm up these muscles, e. g. with downface dog or forward bends like uttanasana, in order to keep the risk of straining as low as possible when the leg swings up strongly.
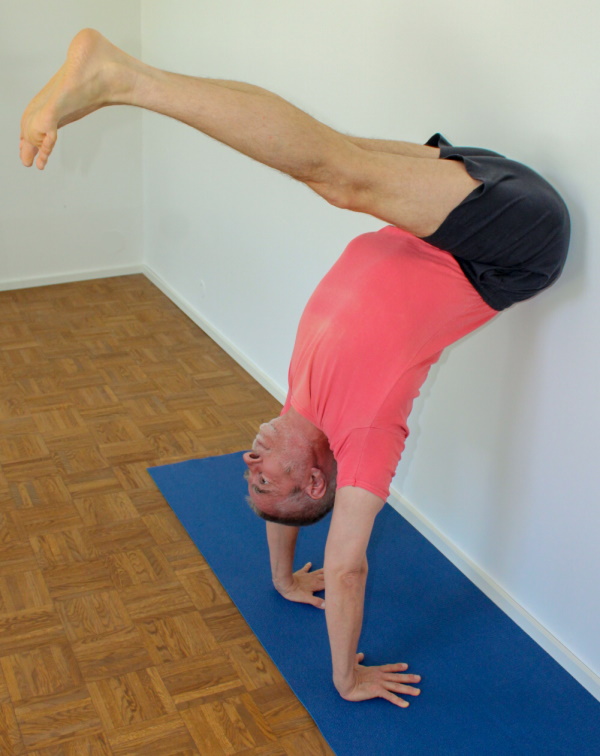
    2. Avoid bending the swinging leg when swinging up, which has two drawbacks:
      1. the momentum that can be achieved with this leg is reduced by bending the leg due to a smaller lever arm
      2. with bending of the leg, there is a tendency to repel from the wall when the foot reaches the wall, as with bent legs the foot usually reaches the wall before the centre of gravity lies over the hands or between hands and wall
    3. For beginners, it may be difficult to control the momentum of the pelvis, legs and body which is transmitted to the shoulder area when jumping up towards the wall, i. e. it is difficult to keep the distance of the shoulders from the wall large enough to prevent the head from hitting the wall. Most people have a point of no return: once the shoulders have crossed a certain point, they are no longer able to return them and are forced to leave the pose uncontrolled, often frightened and collapsing with a corresponding risk for the neck and head. Another difficulty that results from this movement is the decrease of the outer angles in the wrists: sometimes resulting from the uncontrolled movement of the shoulders angles of dorsal flexion in the wrists occur that exceed the available degree of flexibility or the amount of bearable force.
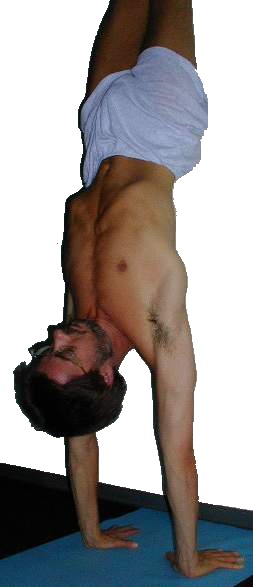
    4. a challenge for many people is the constant, maybe, significant effort in the arms, especially with fairly inflexible shoulders: the more inflexible the shoulders are, the greater the tendency to bend the arms, the more force is therefore required. Stiff shoulders force
      1. either bending in the arms or
      2. an insufficient angle between upper arms and upper body.
      3. endo- insteed of exorotation of the arms
      the first two of them cost a multiple of the force required to stand in the handstand.
    5. A major problem for many people is overcoming the problem of getting their feet off the ground to stand upside down on their hands. This clearly shows the influence of psychomental factors on the physical body's performance. In some cases it may take years for a practitioner to reach handstand for the first time without assistance, although physiological factors such as sufficient flexibility and strength have long been given. Even after one or more times the handstand has been successfully taken alone, there may still be discontinuities in between, before it gets almost certain to get into handstand at the first attempt.
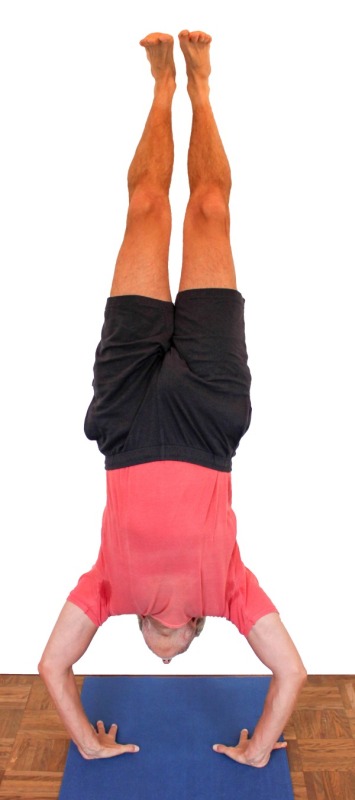
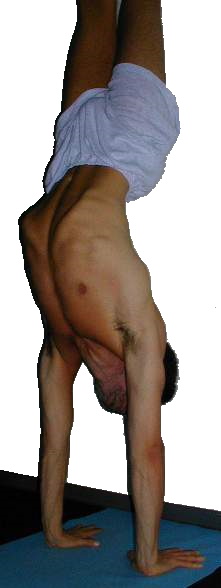
    6. handstand is easier to take and hold by turning your hands outwards. Note, however, that the stretching and strengthening effect on the shoulder is less and the necessary balancing changes, in the sense that it takes a little more attention to balance backwards and forwards, among other things, because the support base becomes smaller. More serious, however, is the fact that with the increasing outward rotation of the hands, there is fading capability to keep the shoulder and thus the rest of the body away from the wall by pressing down the palm of the hand by force of the palmar flexors in the forearm! Especially beginners must not underestimate this effect but learn by slowly turning their hands further and further how the pose and especially the taking changes and can still be taken safely.
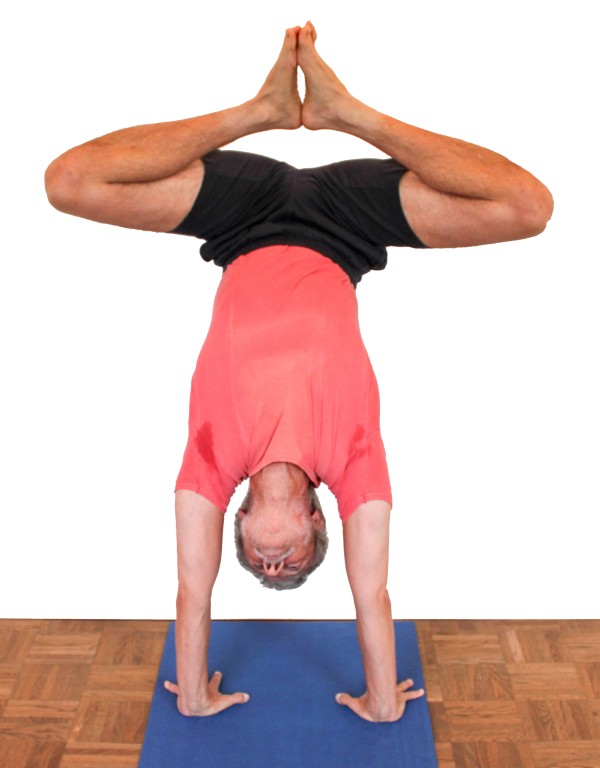
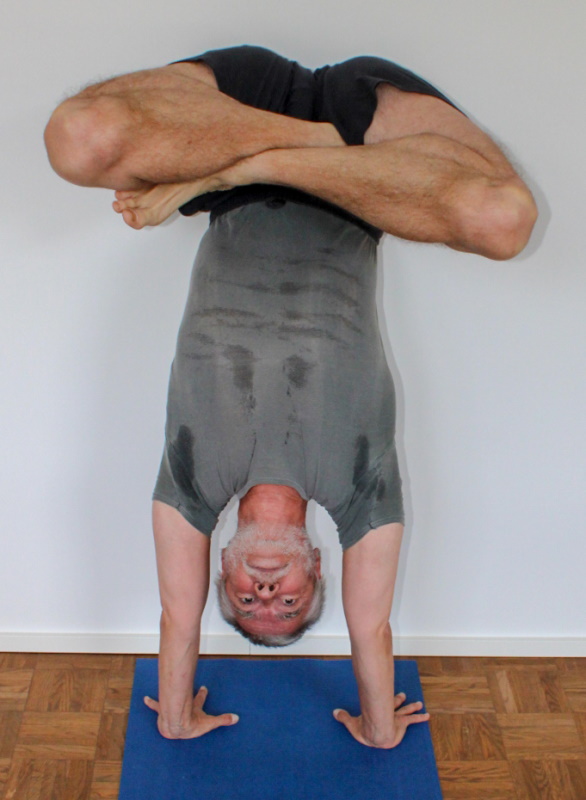
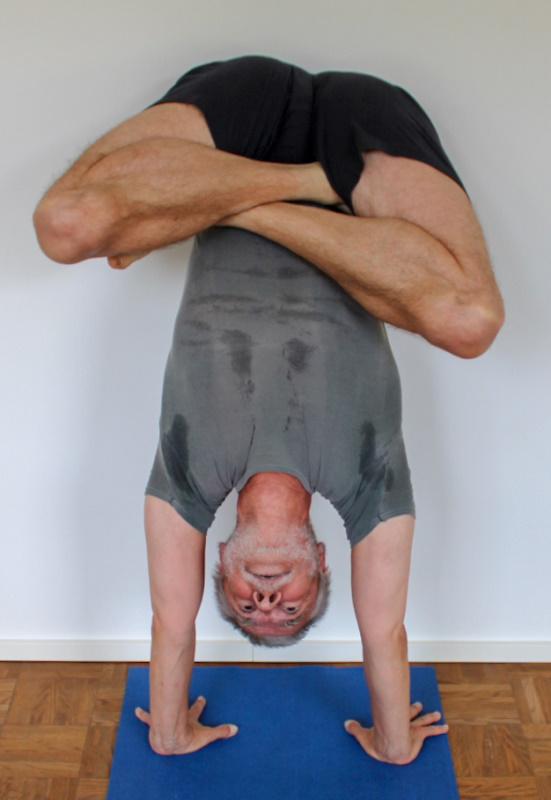
    7. an important movement is stretching from the shoulder (elevation of the shoulder blades), i. e. the exploitation or expansion of the space in the shoulders, which (if the arms are not in an over-head position, but next to the body, e. g. in anatomical zero ) corresponds to the shrugging of the arms, which means the movement of the shoulder blades in cranial direction (or as a repeated action changing between caudal an cranial movement). In order to achieve this, one tries, without changing the angles between legs and pelvis as well as between upper arms and upper body, to force the muscles needed for the "shrug of the armpit", mainly the trapezius and levator scapulae, to push the heels up against the wall, i.e. to translate every effort of the aforementioned muscles directly into a movement of the heels on the wall
    8. When a supporter assists you in lifting your legs, note the following:
      1. the upswinging leg poses a potential hazard to the assistant. Contact of the swaying foot with the head of the person providing assistance may cause serious injuries including unconsciousness.
      2. If the practitioner is helped only on the leg, there is a danger that the applied force will transfer to the shoulder area of the practitioner and push the practitioner towards the wall. If the practitioner does not have the necessary flexibility in the shoulder, or does not have sufficient orientation as to which movements are necessary, he or she will turn the applied force into evading the shoulder to the wall (instead of legs and pelvis further to the wall by increasing the angle in the shoulders and reducing the angle in the hips) and lose the support to continue holding on the arms. Therefore, it is necessary for a long time to limit the range of movement of the shoulder towards the wall, e. g. by use of a hand or knee. Furthermore, one of the legs that is pulled up passively causes torsion and rotation into the upper body and shoulders, stressing work of the shoulder or the related arm.
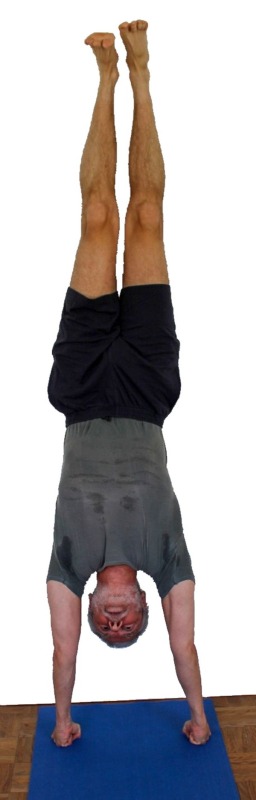
      3. In the case of people inflexible in the shoulder, there is a tendency to stand in lumbar hyperlordosis in handstand. This is the result of a significantly smaller angle in the shoulders than 180°, which prevents the upper body from becoming vertical (and certainly also from further inclination to the wall). Since the heels are on the wall, a back arch must be made somewhere between shoulders and feet. This usually occurs in the lower back area, since the flexibility of the lumbar spine is unequally greater than that of the thoracic spine, secondly in most such cases the thoracic spine (which could also be bent back) will not necessarily be flexible and thirdly the capability of extension (of at least reduction of flexion) in the hips will usually also not be sufficient. Often the affected practitioners then leave the handstand with a tense feeling in the muscles of the lower back, which is however in most cases harmless and with poses such as downface dog or, better yet, 1. hip opening can be removed again quickly. The person providing the support should therefore also try to increase the angle between upper body and upper arms, not by simply pressing the upper body towards the wall, but by applying the same pressure simultaneously holding the shoulder area, e. g. by holding the shoulders with the hands and pressing the upper body against the wall via the head in the area of the upper abdominal muscles.
      4. These factors must be taken into account when practicing with or without assistance.
    9. The straightening of the upper body, i. e. increasing the angle in the shoulders, is one of the essential efforts in handstand, at least until a high degree of shoulder flexibility is achieved. After that, the focus would be more on stretching from the shoulder or exorotating the arms. See above for further remarks on how to raise the upper body.
    10. free handstand is a variant that, correctly executed, in the sense of even pressure distribution between all metacarpal joints and between these and the wrist area, will take years of preparation. Here we find extreme relationship between the external momentum occurring during balancing, resulting from the maximum length of the lever (here the length from the heel to the wrists) and the available weight (exactly the total body weight minus only the weight of the hands) and the means available to cope with it, namely the power multiplied with the lever arm of the forearm muscles for palmar or dorsal flexion (this is in the order of 10 cm only). In addition, many people who are not particularly flexible in the wrists will find themselves close to the limit of flexibility in the wrists, which is one of the reasons why they have a markedly reduced strength and performance of the forearm muscles. As with headstand, it is advisable to try to release slowly and synchronously from the wall with stretched legs, here - in comparison to the headstand - not only from the strength of the skeletal muscles and the pressure of the elbows against the ground from the strength of the shoulder muscles, but also from the strength of the forearm muscles. Therefore, it is strongly advised to plan intensive forearm strengthening exercises as preparation for free standing, as well as to ensure sufficient flexibility of the wrists and to warm them up sufficiently.
    11. Even more often than in headstand, it is observed in handstand that the stretched, swinging leg is bent shortly before reaching the wall, whereby it is guaranteed that a certain distance of the pelvis from the wall is not deceeded and the centre of gravity is not shifted sufficiently into the trapezoid of elbows and wrists (in headstand, or between wrists and wall in handstand), so that the pose is not reached. This should generally be be an unconscious mechanism designed to prevent control from being withdrawn from the legs and transferred to the arms, i. e. an expression of fear of the pose and its imponderabilities.
     
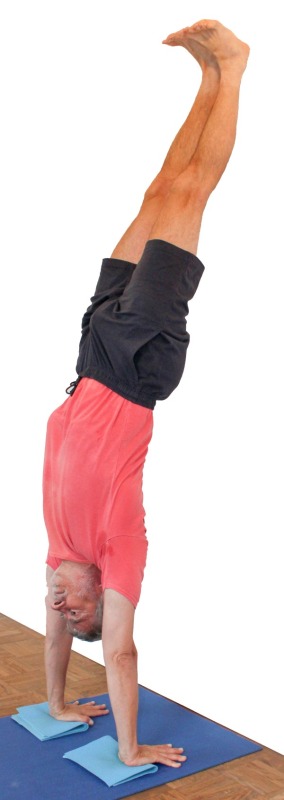
    known issues that may occur even when practicing correctly
    1. pain in the wrists
      occur in many poses in which the wrist is at an angle of about 90°, e. g. upface dog. In addition to pressing the palm down more forcefully, palmar forearm stretching helps, it may be possible to place the wrist on a few patches so that the palm of the hand tilts slightly and the angle of the necessary dosral flexion is smaller.
    2. Cramping tendency in the trapezius
      As with other over-head postures of the arms, there may also be a tendency to cramp in the trapezius. This is almost always the result of a combination of several factors:
      1. insufficient flexibility in the shoulder, i. e. the ability to increase the angle between upper arm and upper body and to stretch from the shoulder in the sense of shrugging the shoulders.
      2. a high basic (tonus) of this part of the trapezius, possibly combined with low power of this muscle
      3. insufficient exorotation of the arms or lack of ability to turn outwards
    3. hollow back pain
      if the shoulders are not very flexible, the upper part of the body may stand significantly tilted against the arms, resulting in a hollow back. This is, felt and in real terms, the greater the less the attempt is made to counteract this with the pomusculature.
    4. Cramping tendency in deltoids
      Depending on the tension in the trapezius, a tendency to cramp could occur in rare cases. This would be increased by insufficient exorotation of the arms and improved by turning them out more vigorously
    5. dizziness
      Dizziness usually occurs when leaving handstand, mostly as a result of problems in the cervical spine or due to circulatory problems as a result of the change in the circulatory system when leaving handstand: this leads to a deterioration of the good supply situation of the brain in handstand, which requires a counter-regulation until the end of which dizziness can occur. However, this should not last longer than one minute. If the dizziness lasts longer, the cause is usually more likely to be found in the cervical spine
     

    variants

    shrugging

    Creates awareness for the movement of the shoulder blades on the back and strengthens the related muscules
    instructions details
    1. take the posture as described above
    2. after you have stretched out of your shoulders as required in handstand, slowly lower your upper body with your arms still strechted and lift it again. Establish a sovereign mastery of the movement and find out and try to expand the range of this movement successively.
    1. With less mobility in the shoulders, the scope for shrugging is low to barely noticeable. The first step is to work out a differentiation between the attempt to stretch out and the pure hanging in the shoulders, so that both can be clearly and purposefully evoked and changed between the states.
    2. The exact stretching movement in the shoulders is often, and especially in the case of less mobile shoulders, not to separate from the tilting of the upper body relative to the arms or the stretching of the arms or possibly a rotation movement of the arms. Then it often takes a partner to correct it
    3. make sure that the upper body is not moved in itself but stretched so that stretching out of the shoulders is 1:1 results in an upward movement of the heels on the wall.
    4. depending on the nature of the wall, in particular the slipping of the heels on the wall resulting from stretching from the shoulders will cause a perceptible noise combined with a sensation of vibration at the heel. This is a good indication for the right work.
     
    known issues that can occur even when running correctly
    1. Cramping tendency of the trapezius
      The trapezius involved in the movement could noticeable feel like cramping in the case of strong and repeated stretching out of the shoulder.


    bending arms

    This variant brings a lot of work to the m. triceps and the m. deltoidus and can be used not only to strengthen the shoulders and arms, but also to relieve tension in mobile people who are prone to cramp in the m. deltoidei which may sometimes occur after more frequent practice of the the downface dog.
    instructions details
    1. take the handstand in a normal way. The hands should not be narrower than shoulder width, rather (for beginners) a little further apart.
    2. begin to bend your arms carefully. At the beginning, depending on the preliminary exercises that have already been carried out, give the m. triceps some time to warm up to protect the elbow joint
    3. if the triceps are warm and the elbow joint can no longer be perceived unpleasantly, start to bend further and to keep the flexion longer.
    1. In extreme cases you can move from the handstand to the headstand and vice versa. Beginners are urgently warned against this! Even advanced pratcioneers should practice the transition from headstand to handstand for a longer period of time until it has become a matter of course before practicing the inverse transition. The danger of damage to the cervical spine resulting from trauma and prolonged dizziness or even worse damage is out of all proportion to the benefit of the transition from handstand to headstand!
    2. take care not to perform a movement in the upper part of the body but to leave it stretched out and to let the hips stretch all the time, so that the stretching out of the shoulders 1:1 results in a movement of the heels on the wall upwards.
    3. bending and stretching in the elbows is not always easy to do without tilting the upper body
    4. wide bending may cause the ulnar side of the wrist to be noticeable (see below).
     
    known issues that can occur even when running correctly
    1. pain in the wrists
      especially if the elbows are bent further, pain could occur in the ulnar-dorsal area of the wrist due to compression of the structures. Apart from less bending, a larger distance between the hands helps
    2. Pain in the shoulder
      Depending on the training condition and tonus of the shoulder muscles, it could quickly show to be overtaxed, possibly also with a crampy note. Then gomukhasana and the powerfully executed transition between downface dog and upface dog could help.


    reverse rotation of the arms

    Makes clear why the arms should be exorotated
    instructions details
    1. take the posture as described above.
    2. Now carefully endorotate the upper arms from the shoulders to the maximum until further notice. When the maximum endorotation is reached or when the expected cramping tendency in the trapezius becomes too great, slowly turn the arms back to the correct position (exorotation)
    1. This variant clearly shows why the arms are to be exorotated and not exdorotated, at the same time the difference between both states shows the range of motion
     
    known issues that can occur even when running correctly
    1. Cramping tendency in the trapezius
      Depending on the extent to which the upper arms are endorotated into the shoulders, it is not only possible but likely that the trapezius may have a tendency to cramp. This variant serves exactly this purpose, among other things: to show why it is so important to


    on fists

    This variant can be practised in case of various injuries to the hand or wrist as a substitute for the then possibly not feasible normal handstand. Furthermore, there is no possibility to keep the shoulders away from the wall by the strength of the palmar flexors of the wrist, which is important during the upswing. This requires a clean technique, where the torso swings up around arms held calmly.
    instructions details
    1. put on the fists instead of the palms, with the palms pointing towards each other
    2. Keep your arms as steady as possible during upswing
    1. In contrast to the normal handstand upswing, body weight does not rest on the palms of the hands but on the fists, i. e. on the finger joints and the proximal finger joints. At the same time, rather strong pressure is felt especially on the finger joints. The more important difference, however, is that in the normal handstand upswing, the palmar flexors of the wrist in the forearm keep the shoulder area away from the wall - and must do so. These are no longer available in this variant. Therefore, it is important to learn the handstand upswing so well that the arms remain very calm, i. e. the whole body swings upwards in the shoulder joint without the arms moving a lot and especially without moving the shoulder area to the wall. It is not a bad idea to have a partner at your side for the first attempts to catch the shoulder in case of doubt.
    2. keep your thumbs outside of your fist, not inside! All finger joints bend at maximum with a certain amount of force, the fists must be compact and resilient. !
    3. The handstand on fists is due to the stretched wrist with some injuries of the hand the only variant, which is still executable, maybe apart from the somewhat more advanced handstand on fingertips.
    4. In this variant, the forearm muscles must keep the wrist stable and immobile. Not only push the fists offensively on the ground, but also tighten the lower arm muscles responsible for flexing the wrist towards the dorsal and palmar in order to keep the wrist stable and motionless.
    5. Due to a slightly different rotation of the upper arm in the shoulder compared to the ordinary handstand and due to the stretched wrist and the palmar flexors in the forearm, which do not - mostly - work at the edge of strength and mobility, this variant can feel lighter regarding the arms and shoulder.
    6. While in the normal handstand it is possible to play and experiment with pushing the hands towards or away from each other, this would probably lead to a loss of stability in the wrist and in extreme cases to wrist buckling, with serious consequences. Leave such experiments here!
     
    known issues that can occur even when running correctly
    1. pressure on the knuckles
      The pressure on the "knuckles", i. e. in particular on the joints of the finger's metacarpophalangeal base, but less significant also on the proximal finger joints, is subjectively perceived in very different ways, sometimes as hardly bearable. In this case, a significantly softer base is helpful, but it must not shift in itself. A mat or patches on a mat with multiple folds should be ideal.


    on fingertips

    Strengthening of the finger flexors
    instructions details
    1. put on the fingertips with stretched fingers, fingers form a semicircle with the thumb
    2. hold your fingers powerfully stretched, put maximum weight on your fingers and come into the handstand without moving your arms significantly.
    1. Before this variant can be practised, the fingers must be strong enough and have proven themselves in comparable, but simpler poses. In the sense of increasing difficulty, one can estimate in the following increasing order and pratice accordingly:
      1. downface dog. is possible for many, because only about half of the body weight rests on the fingers.
      2. upface dog: should strictly be executed from upface dog. During the transition, slowly shift the weight to the fingers and check if upface dog will be able. Often the doubt is greater than the lack of strength. The muscles in the fingers are often felt intensively also shortly after the posture
      3. stick pose: the centre of gravity is here even further forward than with the downface dog
      4. rectangular handstand, tolasana: in both poses the whole body weight already rests on both hands, the tolasana also requires a little bit of balancing, so in addition to the static forces there are also a dynamic ones. Rectangular handstand is less difficult because it can be taken slowly and attentively. Taking handstand by jumping is of course more demanding.
      5. ardha vasisthasasna, vasisthasana: in these poses slightly more than half of the body weight rests on one hand
      6. Handstand: just like the rectangular handstand, only half the body weight rests on each hand, but the dynamic forces occurring during the upswing may require a little more strength and resilience.
    2. the finger joints are pushed into overstretching by the body weight, press the fingertips against each other with force, which is an exercise of force in all finger joints in the direction of flexion in order to minimize the forces that want to overstretch the fingers.
    3. the upswing necessary for this resembles an exclusive rotation of the body in the shoulder joints by about 180°.
    4. The steeper the fingers and palm, the lower the bending moments in the finger joints in the direction of overstretching. Use the power of the finger flexors to defend yourself against overstretching.
     
    known issues that can occur even when running correctly
    1. Intense sensation in the fingers after leaving the pose
      This posture is a very unusual and strenuous effort for the fingers. Accordingly, not only in the posture but also shortly afterwards an intense sensation can be falt in the fingers.
    2. passenger restriction of fine motor skills
      musicians in particular, but perhaps also precision mechanics such as watchmakers could feel a temporary reduction in their fine motor skills.


    on bricks

    Stronger demand on the swing or bounce force
    instructions details
    1. placed two blocks with their largest surfaces on the floor, the longest side perpendicular to the wall
    2. put your hands on the blocks. the tendons of the middle fingers pointing 90° to the wall
    3. swing stronger than usual in handstand
    1. The elevation by the thickness of the block may be very noticeable, depending on experience. Whoever comes into handstand just as borderline as you are, will probably fail here for the time being, or will have to gather all momentum.
    2. Instead of one block, two blocks can also be used on top of each other. Putting the block on the second largest side is a less good idea because of the risk of overturning!
    3. The distance of the blocks from the wall is, like the distance of the hands from the wall in the normal handstand, also a matter of experience: the more experienced you are, the further the distance can be reduced without tipping from the wall again..
    4. the thumb can rest completely or partly on the inside of the block, next to the horizontal surface of the block, which, depending on the flexibility of the hand and forearm, can be a further relief.
    5. Achieving sufficient momentum is what avoids the danger of lateral overturning during an upswing with the greatest certainty: the smaller the momentum, the lower the gyroscopic forces, the more likely it is to overturn sideways during an upswing.
     
    known issues that can occur even when running correctly


      upswing without turning leg

      instructions details
      1. swing into the handstand without exorotating the swinging leg or turning the pelvis away from the jumping leg.
      1. This variant can of course also be practiced well with partners who closely observe the leg and pelvis.
      2. The swinging leg tends, due to its inertia of mass and limited mobility of the hip flexors, to twist the pelvis away from the jumping leg. This applies all the more, the more limited the flexibility of the hip flexors are and the more momentum must be used, because there is not enough jumping power available. This effect should always be reduced, not least because the swinging power of the leg propagates from the upper body to the shoulders and arms and causes uneven strain and demands on shoulders and arms.
       
      known issues that can occur even when running correctly


        baddha konasana

        instructions details
        1. take the posture as described above
        2. Place your buttocks on the wall, keep the pomusculature working to avoid falling into the hollow back.
        3. bend the knees, pull the feet to the pelvis and fold the legs from the hip towards horizontal, that means into the exorotated abduction, and bend the thighs in the hips until the outer edges of the feet are horizontal and the legs in the baddha konasana pose.
        1. Move your feet on the wall towards the pelvis and knees towards the wall so that the centre of gravity remains sufficiently favourable and you do not fall out of the pose towards the floor.
        2. if the knees are flexed too long actively with force to pull the feet in the direction of the pelvis, a cramp could occur in the back of the thigh.
        3. work against the hollow back inclination with the abdominal muscles; the buttocks move upwards in this position, away from the lower back.
         
        known issues that can occur even when running correctly
        1. baddha konasana-typical knee problems, which can occur with not fully intact knees
          As usual in baddha konasana, pain in the knee can also occur here if the knee is not completely intact. A smaller bending angle often solves this problem.
        2. cramp in the back of the thigh
          In the ischiocrural group, if the heels are tightly drawn to the pelvis, there may be a tendency to cramp in the ischiocrural group, especially if this is attempted for a longer period of time. Mainly let the gravitational force of the lower legs bend the knees and only briefly give an impulse to further bend the knees


        supta baddha konasana

        instructions details
        1. take the posture as described above
        2. put the buttocks on the wall, keep the pomuscles and if necessary also the abdominal muscles in work slightly to avoid falling into the hollow back.
        3. exorotate the thighs in the hip, put the outer edges of the feet on the wall with the soles of the feet laid on top of each other, bend the knees and pull the feet to the pelvis until the legs are in supta baddha konasana position. The feet remain on the wall
        1. Move your knees towards the wall so that the centre of gravity remains sufficiently favourable and you don't fall out of the posture towards the floor.
        2. Move your buttocks upwards on the wall by means of abdominal muscles so that you don't fall into the hollow back. If the outer edges of the foot are pressed onto the wall with moderate force, the pomusculature can also be used, which is the superior method, as this does not affect inhalation.
         
        known issues that can occur even when running correctly
        1. baddha konasana-typical knee problems, which can occur with not fully intact knees
          As usual in baddha konasana, pain in the knee can also occur here if the knee is not completely intact. A smaller bending angle often solves this problem.
        2. cramp in the pomusculature
          If the knees are pulled against the wall for a longer period of time, the pomusculature may become cramped, which may persist even after posture. It can then be tried to solve this issue with postures like half lotus forward bend, hip opening with mat edge, 3. hip opening.


        two-legged upswing

        instructions details
        1. place your hands shoulder wide with your fingertips about 20 cm from the wall, the tendons of your middle fingers pointing parallel to the wall.
        2. Put your hands with your fingertips about 20 cm from the wall, pointing the tendons of your middle fingers parallel to the wall. with bent knees, place the feet at a much smaller distance than in the dog's position head down, also facing parallel to the wall with regard to the centre lines of the feet.
        3. presses the palms of the hands firmly on the floor, giving them maximum weight, stretching the arms well, keeping the shoulders away from the wall and jump off from all the necessary bounce of the legs.
        4. in the flight of the legs upwards in the direction of the wall stretch the legs through, in order to land gently with the heels with the legs stretched out on the wall.
        5. check all parameters of the handstand
        1. The optimum distance of the feet from the wall depends not least on the flexibility of the ischiocrural group and the pomusculature as well as on the jumping power available: the greater the jumping power, the greater the distance can be, the smaller the flexibility, the greater the distance must be.
        2. More so than with the normal upswing in the handstand it depends on the large explosive use of the bounce, which requires a completely clear inner state. When not just a few people have a "head problem" when swaying up to the normal handstand, this is no less so here. In contrast to the normal upswing, in which the swinging leg can gain momentum several times before it can be supplemented with the jumping leg for sufficient energy development, these times and processes coincide here, which requires a complete concentration of energy and will. It is completely normal if this variant does not work for a long time. A repeated light feathering in the knees can be helpful, which however is far away from the swinging movement of the swinging leg in the normal upswing. In order to facilitate the upswing, the elbows are often bent a few degrees so that the potential energy, which must be obtained from the jumping power of the legs, is achievable and only afterwards the rest of potential energy is added by stretching in the elbows from shoulder and triceps. As long as this bending remains controlled in the elbows and the bending angle does not become so large that stretching after that is only possible borderline, there is nothing against this aid. As another procedure, it has proven to be a good idea to take the handstand with normal single-leggedness and then to land it again with both feet at the same time with both knees flexing wide and then to jump off again with full force without delay and without delaying thought processes, whereby the bending knees absorb a lot of the potential energy from the landing and bend far enough so that they can cover a large angular range during the following stretching. The longer the power of the thighs has time to accelerate the body mass, the greater the energy used and the attainable height! This is all the more important as the available jumping power is usually quite limited.
        3. In all cases, controlling the movement of the shoulder area is an essential requirement: it must not move uncontrolledly towards the wall! The movement of the shoulders during the upswing is rather that of: away from the wall - which aggravates and complicates the upswing. For your safety, never violate this requirement. It can be helpful to practice normal handstand upswing without moving your arms as described above, i. e. turning the whole body in the shoulder joint that remains at the same position.
        4. A meaningful support by a partner like in the normal upswing is much more difficult here, as both legs have to be gripped. This means that the arm that grips the legs must be held more forward by the partner (from his perspective) and the head is more likely to collide with one of the swaying legs.
        5. It takes some experience to find the right point at which to start stretching your legs and the right speed of stretching. If the legs are stretched too early or too fast, it may choke off the upswing, if they are stretched too late or too little, the heels slam hard on the wall or even the buttocks come into contact with the wall.
        6. It can be helpful to internalize the differentiation that although the pelvis jumps towards the wall and upwards, the shoulder area jumps much less, its movement towards the wall is an unequally smaller one.
        7. In contrast to the normal upswing, this variant can be better practised in case of injuries to the ischiocrural group (especially strains, irritations of the origin at the ischial tuberosity) as the jumping power hardly comes from the back of the leg, which is not stretched at the beginning as with the swinging leg in normal upswing. This variant places far higher demands on quadriceps performance and knee health, but less on the ischiocrural group.
         
        known issues that can occur even when running correctly


          two-legged upswing with brick between thighs

          Learn to keep your legs closed and get rid of asynchronousness
          instructions details
          1. Jump into the handstand with both legs as described above, but hold a block between your thighs.
          1. The purpose of the variant is a good control of the closed legs. A certain degree of asynchronousness is often observed when attempting a two-legged upswing, i. e. one leg is dragged behind more or less clearly because the mind is not clear enough. In a similar way as the handstand, even with single-legged swings, represents the loss of the ground under the feet, which is still moderate in comparison to the two-legged upswing, one has to push oneself off the ground with all firmness and, at one time and without compromise, to give up the grip of the ground, to push it away in the strongest of consciousness.
          2. Especially when cork blocks are used, this variant is not very dangerous as far as the loss of the block on the way is concerned. Only if the block is lost when the legs are already just in front of the wall could it hit the chin or face.
           
          known issues that can occur even when running correctly


            two-legged upswing with bound feet

            Learn to keep your legs closed
            instructions details
            1. tie a belt tightly around the ankles, so that the two legs can only be moved as a whole
            2. jump into the handstand with both legs as described above
            1. The purpose of the variant is to achieve good control over keeping the legs closed and better focusing on jumping off. It is often observed that the two-legged upswing is attempted as a faster and yet faster pulling behind of the second leg in a normal one-legged upswing, which runs completely counter to the nature of the two-legged handstand and does not necessarily lead to its learning. This variant prevents this error safely.
             
            known issues that can occur even when running correctly


              not moving arms

              Control of shoulder movement during upswing
              instructions details
              1. Jump into handstand as described above, but try not to move your arms.
              1. In many cases, the shoulder moves towards the wall during the handstand upswing. This movement must be controlled and limited for several reasons:
                1. the shoulders must not hit the wall, this could cause shock and uncontrolled bending of the arms, which in most cases is no longer controllable due to a lack of strength, so that in the end an uncontrolled and rude setting of the head on the ground with danger to the cervical spine could be possible.
                2. even when the shoulders come to the wall with arms stretched (and not uncontrolledly bent), depending on the distance between the hands and the wall, many people no longer have the strength to detach the shoulders from the wall and take the correct handstand.
                3. the wrists could be forced beyond their flexibility into the dorsal flexion, the resulting pain could irritate to such an extent that it distracts from the necessary correction movement.
                This variant is intended to give a better sense of movement and control of the shoulder. In general, the upswing with control of the shoulder is perceived as more difficult than without, the movement of the shoulder away from the wall contradicts the natural kinetics of the body and requires more and more concentrated force. In many cases it is observed that the practitioner who is asked not (or less) to move his shoulders towards the wall, will not be able to make the upswing in the handstand.
               
              known issues that can occur even when running correctly


                two-legged upswing as Jumping

                instructions details
                1. take handstand as described above in a double-legged jump
                2. as soon as the handstand is taken, jump back to the ground with both legs, dive deep into your knees and jump off without delay and without thinking about it.
                3. repeat this as long as endurance allows or until the control ceases, which could lead to a hazard.
                1. As already described in the two-legged upswing, it is not accessible to everyone at first. The trick described there, to land both legs after a one-legged upswing, to bend deeply in the knees and immediately without delay or delayed thinking with full jumping power jump up again, becomes a repeatable jumping action here. This may make it easier to get up in the two legged way, on the one hand because the movement becomes more conscious and the parameters and dependencies become better known and felt, on the other hand because the blockages in the head, which often lead to insufficiently strong jumping off in the sense of subconscious or partially conscious avoidance behaviour, become smaller, not least because of the successful doing and confirmation, but also because of the necessary extraordinary focusing.
                2. when strength/endurance or control diminish, abort!
                3. here, the dependence of the point in time at which the stretching of the legs is started, its speed and the resulting force with which the heels hit the wall (if at all) can be investigated and it becomes clear that too early onset or too high a speed of stretching leads to the slowing down or even breaking of the upswing movement, of course the reason is the increased lever of the centre of gravity of the acceleration consuming swing energy.
                4. most processes of thinking, which are not closely related to movement and the evaluation of motion, are here extremely obstructive.
                 
                known issues that can occur even when running correctly


                  dips

                  instructions details
                  1. take the handstand, jumping off with one or both legs
                  2. Bend the elbows precisely to the outside slowly to the limit of power, even with a lot of power in the arms but not more than about 120
                  3. Stretch your elbows slowly and in a controlled manner to bend again, then stretch again and so on.
                  1. excessive bending in the elbows puts an excessive strain on the elbow. Even if there is enough power available, which is rather rare, that the arms can be bent (and stretched) much more than 90°, the upper limit for bending should be about 120°.
                  2. If there is little power in the arms and shoulders, this variation may begin with a few degrees, as is also known from the stick pose. Especially younger women are often equipped with less arm strength and have to build it up continuously.
                  3. when unpleasant sensation occurs in the ulnar side of the wrists, the angle of the hands can be varied.
                   
                  known issues that can occur even when running correctly


                    eka pada

                    instructions details
                    1. take the posture as described above
                    2. slowly move one leg further and further away from the wall towards the floor until it reaches the limit of the ischiocrural group's ability to stretch.
                    1. When moving the leg towards the floor, depending on the exact position of the pelvis, shoulder and distance from the wall, there is a point of no return from which one inevitably falls out of the position, because the centre of gravity, seen from the wall, lies beyond the wrists. The distance from this point can be felt by the weight with which the remaining heel presses against the wall. If the distance of the hands from the wall is not too large, it is important to move body mass towards the wall, i. e. shoulder or pelvis or both in the direction of the wall. As already described above, the movement of the shoulder towards the wall is to be treated with clear respect, because for almost everyone somewhere there comes the point where the strength of the shoulder is no longer sufficient to remove the shoulder section from the wall back to its original position. Particularly with moving of the shoulder, therefore, caution is called for. The movement of the pelvis towards the wall is much less critical. Often, when the leg is lowered a little, releasing the tension of the abdominal muscles is sufficient. If the pelvis is moved in the direction of the wall without having bent one leg in the hip, an unpleasant hollow back can naturally occur. Here order and dose are therefore not unimportant. So move the leg from the wall to the floor in such a way that you can feel a sufficient pressure of the heel on the wall at any time with when necessary moving of the pelvis and possibly the shoulder. If the leg is moved very quickly back up to the wall from a position bent wide in the hip, the above heel can leave the wall for a short time, despite the parameters that would otherwise be appropriate. However, this does not indicate that the centre of gravity, i. e. the position of pelvis and shoulder in relation to the distance of the hands from the wall, would not be appropriate, but is a kinetic phenomenon, which would not occur statically in the same position of the leg and would disappear when the leg is raised again.
                    2. As already described in the last point, the distance of the hands from the wall must not be too small, because otherwise the center of gravity would be beyond the wrists with the maximum lowered leg, so the pose would be physically impossible to maintain.
                    3. The gravitational force of the lowered leg creates a moment in the related hip, which tilts the pelvis (in relation to the other leg in the direction of extension) and continues over the back to the shoulders in the sense of frontal adduction. Consequently, lowering the leg will increase the necessary work in the shoulders and arms to keep the shoulders stretched and not to move them towards the wall. At the same time, the lowered leg over the momentum generated in the hip and the resulting straightening of the lumbar spine largely protects against an unpleasant hollow back
                     
                    known issues that can occur even when running correctly


                      free

                      instructions details
                           
                          known issues that can occur even when running correctly


                            hands turned inward

                            instructions details
                            1. Put your hands with the wrists shoulder-width approx. 20 cm in front of the wall so that the tendons of the middle fingers point towards each other, i. e. turned inwards.
                            2. take the posture as described above (single-legged upswing)
                            1. In this variant, as in the case of hands turned outwards or backwards (away from the wall), the force of the palmar flexors, which limits or absorbs the movement of the shoulder towards the wall, is missing. This variant is therefore not suitable for inexperienced beginners. Only the stronger supination is available as a rather weak replacement, which is significantly weaker due to the lower lever (half the hand width compared to the length of the palm). Experience and attentiveness are therefore necessary to prevent shoulders from moving significantly towards the wall, which cannot be absorbed from a certain, relatively early point.
                            2. The altered position of the hands results in a different effect on the shoulder and forearm muscles. If the hands were placed too far away from each other, the stretching requirement in the wrist would increase further and further in the sense of dorsal flexion up to an unperformable level. Even before this, compression pain in the dorsal wrist area is likely to occur, which can hardly be controlled even with strong use of the palmar flexors of the forearm. On the other hand, it is not advisable to keep your hands too close to each other, as the lateral stability is lost.
                             
                            known issues that can occur even when running correctly


                              hands turned outward

                              This variant allows you to feel the stretching in the inner arm area better and gives you a little more sense of free standing than the normal handstand.
                              instructions details
                              1. put on your hands pointing outwards, about shoulder-wide, not narrower, and swing into the handstand
                              1. A too narrowly selected distance between the hands reduces the width of the support base and makes it more susceptible to lateral wobbling. This is usually not a problem in handstand, but it is for practitioners who don't have much momentum when taking handstand, since the upswing of the leg and the upswing itself, due to their asymmetry and dynamics, involve the need to balance torques around the longitudinal axis of the body and torsional moments. The lower the speed of the upswinging leg and as a result of the pelvis and upper body with which they move into the posture, the more force and attention must be used to balance these moments.
                              2. As already described elsewhere, the possibility of keeping the shoulder away from the wall with the help of the plamar flexors of the wrist is no longer possible, which is very important for taking the handstand, especially for inexperienced users. It follows that this is not a variant for the less experienced. A sovereign mastering of the upswing is necessary in order to practice this variant safely. We recommend a stepwise approach to the 90° turned position, e. g. by turning the hands 10° - 20° in a quick sequence compared to the normal position and not holding the handstand for a long time, so that the change due to the rotation can be perceived and evaluated in a close temporal context.
                              3. If pain occurs in the dorsal wrist, the distance between the hands can be increased a little bit.
                              4. this variant feels a little "freer" and more relaxed in shoulders and arms, but this must not lead to the loss of care. So there is a certain risk of hanging in one of the shoulders. Stretch out from both shoulders, straight and strong upwards
                               
                              known issues that can occur even when running correctly


                                hands turned backward (away from the wall)

                                This variant behaves significantly different from normal handstand. Here, the inclination of the shoulder to move towards the wall during the upswing is very pronounced, which requires careful approaching through different harmless angles of turning the hands. This posture shouldn't be practiced by beginners for a long time and should be practiced by advanced beginners under the supervision of an experienced teacher. In addition, the demands on flexibility of the shoulder and forearm muscles are high.
                                instructions details
                                1. Put your hands on the floor with your hands facing away from the wall, the tendons of your middle fingers parallel. Keep your shoulder absolutely moved away from the wall, as it wants to move clearly towards the wall during the upswing, which is very difficult to control here.
                                2. swing into handstand
                                1. Make sure to approach the 180 degree turn of the arms step by step. Observe the tendency to be less able to control the shoulder (its escaping to the wall) during each further step .
                                2. Typical (and at the beginning legitimate) protective measure of many people who are not trained in this posture is to try to make the first heel of the foot softer on the wall by bending the leg a little bit: due to the inertia of the mass, the body wants to move further towards the wall when the heels touch down on the wall. In the forearms/hands, however, there is no possibility to counteract this, this must be done solely from the power of the shoulders, which is a movement that is usually very unusual and which also takes place at the limit of flexibility and against movement restrictions!
                                3. The necessary and correct attempt to keep the shoulder away from the wall at all costs makes the upswing somewhat more difficult, which means that more momentum is needed.
                                4. A slight bending of the arms at the beginning of the upswing can facilitate control over the shoulder. Of course, it must remain under control. It should also be noted that the slight bending of the arms in the direction of dorsal flexion beyond 90° is a clear requirement for the flexibility and strength in the wrists, i. e. the forearm muscles.
                                5. Ideally, the arms will stand completely still during the upswing. It makes sense to practise this especially beforehand with the normal hand position, see above.
                                 
                                known issues that can occur even when running correctly


                                  hands pushing toward each other

                                  The purpose of this posture is to get more of a feeling for stretching up. In addition, the m. pectoralis becomes involved in the posture and the inclination of the arms to overstretch becomes smaller
                                  instructions details
                                  1. Take handstand in a normal way and make sure that the hands are not more than shoulder-wide apart.
                                  2. start pushing your hands together against the resistance of the ground.
                                  1. Avoid reducing the angle of frontal abduction in the shoulders compared to the required 180°, in order to have more force for pushing the hands together, which is similar to the attempt to shift the work of the usually weaker shoulder muscles towards the mostly stronger pectoral muscles. The elbows should also not bend, which would also increase the force with which the hands can be pushed towards each other.
                                  2. Besides pushing your hands together, also stretch from the shoulders as far as possible. This is a good preparation for free standing in handstand.
                                  3. those who overstretch the elbow have here apart from the use of the biceps described in the FAQ, another good possibility to reduce or prevent overstretching: strong pushing of the hands together should not be compatible with overstretching, because almost inevitably the biceps are used. Rather, care must be taken to ensure that the arms do not bend clearly here, especially with less mobile shoulders where this inclination is present anyway.
                                  4. pushing your hands towards each other tends to reduce the exorotation of your arms, make sure that it remains totally preserved.
                                   
                                  known issues that can occur even when running correctly
                                  1. Krampfneigung
                                    Tendenziell kann eiene Krampfneigung in Pectoralis oder vorderer Schultermuskulatur auftreten


                                  head and back on the wall

                                  instructions details
                                  1. put your hands on the floor at a small distance from the wall, your palms pointing to the wall as usual, your fingers slightly spread out.
                                  2. swing into handstand
                                  3. slowly put your bottom on the wall, your shoulder remains moved away from the wall in the first step.
                                  4. when your bottom is resting on the wall, start slowly and carefully to move your shoulders towards the wall until they finally touch down on the wall.
                                  5. Check the work of the arms again and push the upper part of the body up from the shoulders against the existing friction
                                  6. To leave this variant go back the same way: first remove the shoulders from the wall, then the bottom (not vice versa!). and then come out of handstand.
                                  1. Warning: this option is completely unsuitable for beginners! You need experience, power and control!
                                  2. This variant requires a lot of strength in the arms and shoulders, especially when the distance of the hands from the wall is not really small. A few centimetres already make a lot of difference!
                                  3. Especially for less experienced users, a very small distance of the hands from the wall should be used. If the hands are directly on the wall, it is very difficult for experienced practitioners not to fall out of the handstand immediately, if it is too big, the strength of the shoulders (and the upper back) will not be sufficient to put the shoulder slowly on the wall in a controlled manner, much less still, to release it later from the wall in a controlled way.
                                  4. If at any time during this variant a lack of strength should arise in the arms or the feeling that the shoulders can no longer be detached from the wall, then tear a leg out of the pose towards the floor, which already relieves the arms very clearly and enables a relatively orderly and safe leaving of the handstand.
                                  5. The wrists are situated here in clearly more than 90° dorsal flexion! Depending on the chosen distance and flexibility of the forearm muscles (palmar flexors and finger flexors) a clear sensation of discomfort can occur in the dorsal side of the wrist. This is a sensation that does not imply anything constructive such as stretching or strengthening, but simply compression of non-muscular structures of the joint, which must be avoided. If more vigorous use of the palmar flexors is not enough, take the pose with a smaller distance of the hands from the wall.
                                  6. The bottom is placed on the wall by reducing the tension of the abdominal muscles and, if necessary, by bending the lower back slightly backward with the help of the autochthonous muscles. To put on the shoulders, this slight back bending must be removed and the angle of the frontal abduction in the shoulders must be reduced. This combination is not known from other poses, it rather appears when leaving such postures as the bridge. If the shoulder area is placed on the wall, the power required increases as the shoulders are brought closer to the wall. The maximum force required significantly increases with the distance of the hands from the wall. Similarly, the required flexibility increases in the direction of the dorsal flexion of the wrist. Both items quickly exceed any achievable dimension!
                                  7. Keep your arms consistently stretched, even and especially when it gets hard!
                                  8. in the case of hip flexors with limited flexibility, the heels could possibly lift off the wall when the back with the shoulder area is also attached to the wall after the bottom. This is not fundamentally problematic, but takes away the feeling of safety in the pose and costs lateral stability!
                                   
                                  known issues that can occur even when running correctly


                                    feet standing on the wall

                                    demands and gives more balance
                                    instructions details
                                    1. take the handstand and choose a good own lower leg length as distance of the hands from the wall.
                                    2. place your feet one by one with the sole on the wall, so that the lower leg is horizontal. The whole body goes from the initial inclination of the normal handstand to almost vertical position.
                                    1. as already mentioned in the instructions this variant differs clearly from normal handstand in the sense of the alignment of the body: while in most variants the body leans against the wall and thus a considerable pressure of the heels can be felt on the wall, it is sense of this variant to bring the body so well into the vertical, that the pressure of the heels on the wall goes towards zero. In this respect, this variant is a good preparation for free handstand, in which there is no wall that the heels would press on. When the first sole of the foot is put on the wall, the body is still in the usual alignment, which results in a distinct flexion in the hip of the leg placed on the wall with the sole of the foot. Then the foot is pressed more firmly on the wall so that the whole body already moves about in the vertical and the corresponding hip moves almost in the direction of being stretched. In the next step, the second heel is taken off the wall and the other foot sole takes over the pressure, which should be noticeable, even if the pressure is now quite low due to the almost vertical position of the body. When the second sole of the foot is placed on the wall, distribute the pressure evenly over both feet and align the whole body as much as possible vertically, with the pressure of the soles on the wall going towards zero. The centre of gravity is then under the palms of the hands. If there is a risk of falling out of the handstand, the pelvis can quickly be moved a little towards the wall, which makes the centre of gravity favourable again and puts pressure on the soles of the feet. Don't move your shoulders towards the wall instead of your pelvis.
                                    2. If the feet on the wall threaten to become so light that free standing is close, the goal of the posture is achieved. If a somewhat greater stability, i. e. a little more pressure of the soles on the wall is required, then both pelvis and shoulder can be moved a little bit towards the wall. Because of the much greater power given there it is far easier to move the pelvis towards the wall than the shoulders
                                     
                                    known issues that can occur even when running correctly


                                      with back bend

                                      instructions details
                                      1. place your hands at a much larger distance than usual from the wall.
                                      2. Take handstand as usual
                                      3. move the pelvis over your hands, tilt your hips into extension by power of the butt muscles and stretch your legs on the wall.
                                      1. As always in back bends in the sense of extension in the hips, the lumbar spine is also in a back bend (in hyperlordosis), depending on the position and distance of the hands from the feet. As usual, this requires the use of the butt muscles, although in this pose probably not quite as strong as in urdhva dhanurasana or setu bandha sarvangasana. Just like other back bends, make sure that you don't exorotate your legs
                                      2. Compared to the above variant with soles of the feet on the wall, here the heels press with noticeable weight on the wall.
                                       
                                      known issues that can occur even when running correctly


                                        upswing with unfamiliar leg

                                        come into handstand as usual, but now use the other, probably unfamiliar leg to swing and jump off.
                                        instructions details
                                          1. This psoe once again shows many people how familiar we are with poses and movements and how unusual it feels when we try to perform them in reverse. This applies not only when it comes to the trained fine motor skills of the arms, such as writing, painting, making music, but also when it comes to the legs. Many people, who are now able to take handstand with confidence, first get thrown into a spin at the first attempt to reverse the upswing. As already mentioned above, a certain minimum swing is necessary to avoid running the risk of tipping over sideways during the slowing down upswing. It is well known that many people have a "mind problem"when they try handstand upswing, which is all the more evident or even more pronounced here.
                                           
                                          known issues that can occur even when running correctly


                                            only head on the wall

                                            This is a comparatively simple preliminary exercise for free standing, which helps to learn the use of muscles or balancing from the strength of the skeletal muscles.
                                            instructions details
                                            1. take the handstand on the wall in the usual way, so that the distance of the hands from the wall is not more than about 10-15 cm.
                                            2. take your head clearly in the neck and look at your hands.
                                            3. Move your shoulders in a controlled way towards the wall until your head touches the wall.
                                            4. start to use the front skeletal muscles to move the feet away from the wall with stretched legs, applying uniform pressure of the head against the wall.
                                            1. strecke die Beine unbedingt durch, damit du das genaue Gespür für den Einsatz der Skelettmuskulatur, insbes. des stretch your legs so that you can develope a keen sense for the use of the skeletal muscles, especially the m. rectus abdominis
                                            2. In einigen Fällen verletzter HWS oder deutlicher Verspannung dort sollte von dieser Variante abgesehen werden
                                            3. A certain amount of strength in the shoulders and arms is a prerequisite for practicing this posture without danger. If the feeling of not being able to detach the head from the wall occurs, the heels can be placed on the wall, which makes it possible to release the head from the wall with the force of the back of the body. In order to break off the pose as quickly as possible, a leg can of course also be accelerated quickly towards the ground, which already relieves the head or neck muscles and arms a little bit.
                                            4. balance carefully. React in time but don't overreact.
                                             
                                            known issues that can occur even when running correctly


                                              free (P)

                                              instructions details
                                                   
                                                  known issues that can occur even when running correctly

                                                  1. 2

                                                  2. 4


                                                  padmasana

                                                  instructions details
                                                  1. Take the handstand as usual
                                                  2. press one heel closer to the wall and lift the other one from the wall
                                                  3. start to bend the leg loosened from the wall, to abduct it a little, to bend and exorotate it in the hip. Aim with the back of the foot towards the opposite groin and then take this position with momentum.
                                                  4. put your buttocks on the wall and make the same movement with your second leg as with the first one.
                                                  5. bring both legs in a horizontal position
                                                  1. this pose is not quite elementary. The condition is not only that padmasana is possible, but also that it can be easily taken, since both hands are not available to put the legs in the appropriate position. Instead, the combination of gravitational effect (in this position, gravity, contrary to the normal lotus, benefits the posture) and swinging movement must suffice. It is helpful to carry out the swinging movement of the two legs not in 90° flexion in the hips but in a much smaller angle of flexion, i. e. when the legs are a little closer to the wall. Of course, it is the muscle that carries out this movement, from where its name "Tailor's muscle" comes from, but synergistic muscles are at his side for all movement components, although they - If we consider the bending of the knee, for example - may run into active insufficiency and a tendency to cramp, which is why the movement should be carried out with momentum.
                                                  2. As always in lotus-like poses, knee pain can occur. It is difficult to predict whether they are larger or smaller than in the normal lotus. On the one hand, the weight-bearing effect of the leg on the inner knee is missing, on the other hand, the hands are not available to twist each of the legs out strongly once.
                                                  3. in most of the handstand variants with the bottom on the wall there is a hollow-back-inclination. However, it is less here because the gravitational force of the legs causes a moment in the hips and the segments of the spine, which counteracts this.
                                                  4. The easiest way to leave the pose is by abducting one of the two legs further, whereby the foot detaches from the entanglement and both legs can be moved freely again. After one leg has been stretched upwards, the corresponding heel is pressed against the wall and stretched and the related hip is stretched in order to release the buttocks from the wall. Unconditionally release the interlocking of the legs before you leave the pose. An uneven landing on the knees with legs still crossed would result in injury!
                                                  5. if you don't take enough momentum and therefore try to bend your knee further with the help of the ischiocrural group to get your foot into the pose, there is easily a tendency to cramp in the back of your leg.
                                                  6. for standard lotus, the knees are pulled in again by hand after taking the pose; this is of course not possible here. The best possible position of the knees is achieved by the appropriate swing when taking the lotus.
                                                   
                                                  known issues that can occur even when running correctly


                                                    Padmasana forward bend

                                                    instructions details
                                                    1. take the padmasana variant as described above
                                                    2. bend in both hips as far as possible to pull the legs against the upper body
                                                    1. when the forward bend is carried out, the buttocks may slip up a little on the wall and the lumbar spine will start to become convex. However, this does not pose any problem
                                                    2. As the legs move to the upper part of the body by gravity, there is hardly any tendency to cramp, which would otherwise be the most common problem. in the Satorius. The flexibility of the butt muscules may be the main limiting factor for the movement of the legs to the upper body
                                                    3. all remarks on knee problems in lotus-like poses are also valid here, but the painfulness may be slightly lower
                                                    4. The easiest way to leave the posture is by abducting one of the two legs further, whereby the foot detaches from the entanglement and both legs can be moved freely again. After one leg has been stretched upwards, the corresponding heel is pressed against the wall and the related hip is stretched in order to detach the bottom from the wall. Unconditionally release the interlocking of the legs before you leave the posture. An uneven landing on the twisted knee would result in injury!
                                                     
                                                    known issues that can occur even when running correctly


                                                      supta padmasana

                                                      instructions details
                                                      1. take the padmasana variant like described above
                                                      2. stretch in the hips and move the legs away from the upper part of the body until they lie on the wall as best as possible.
                                                      3. presses the thighs so strongly on the wall that the bottom lifts off the wall and the hips are stretched - as far as possible with the given flexibility.
                                                      1. If you stay in the pose for a longer period of time and use a certain amount of force to press the knees against the wall and keep the pelvis away from the wall, this could result in tension of the pomusculature or other parts of the muscular abduction and extension apparatus.
                                                      2. The easiest way to leave the posture is by abducting one of the two legs further, whereby the foot detaches from the entanglement and both legs can be moved freely again. After one leg has been stretched upwards, the corresponding heel is pressed against the wall and the related hip is stretched in order to release the buttocks from the wall. Unconditionally release the interlocking of the legs before you leave the posture. An uneven landing on the twisted knee would result in injury!
                                                      3. In contrast to the previous padmasana variants of the handstand, the hollow back inclination is significantly greater here, since the adductors are clearly under tension and with their hip-flexing effect they will tilt the pelvis against the upper body into flexion.
                                                       
                                                      known issues that can occur even when running correctly
                                                      1. Tension in the buttocks and pelvic muscles
                                                        After pressing the knees on the wall for a longer period of time, parts of the muscles in the buttocks or pelvis could contract. Attempting to loosen this tension should in any case include the half lotus forward bend, hip opening with the edge of the mat and the third hip opening.


                                                      butts on the wall

                                                      Rückbeuge
                                                      instructions details
                                                      1. Take handstand as described above
                                                      2. release the tension in the abdominal muscles and the buttocks will sink to the wall. The legs are as far as possible completely leaned against the wall
                                                      3. Slide your bottom down the wall until you reach the maximum of flexibility.
                                                      1. This is a back bend for the back of the thoracical spine and the lumbar spine with simultaneous flexion in the hips. This is one of the rarer and therefore interesting cases. In contrast to poses like the uttanasana-variant table or the corresponding variant of the prasarita padottanasana, hardly any work of the back musculature is necessary to get far into the back bend, so that the gravitational force of the legs and the pelvis causes already a great deal of this. After construction, there is quite little load on the back of the lumbar spine, so that the back bend is usually not very heavy. can be taken far away without major discomfort in the lower back
                                                      2. Due to the back bend, the stretching requirement in the shoulder area becomes greater, so pay special attention to the important movements of the arms: turn out, stretch, stretch from the shoulders (elevate the shoulder blades).
                                                      3. To get out of the posture, apply pressure to the heels, then contract your butt muscles and stretch your hips, which pushes your legs up on the wall and later detaches them from the wall until normal handstand is reached.
                                                      4. Since the upper body is bent back over the shoulders, it may be a little unfamiliar to stretch out of the shoulders. This movement however is same as at other backbends, e. g. at bridge and here as important as there
                                                      5. Legs are leaning against the wall with little weight
                                                       
                                                      known issues that can occur even when running correctly


                                                        butts on the wall, legs towards trunk

                                                        This variant is a great strengthening for wide areas of the back and the muscles on the back of the shoulder.
                                                        instructions details
                                                        1. take the above-mentioned variation with butts on the wall
                                                        2. Slowly and without momentum pull your legs away from the wall and let them sink as far as possible in the direction of your head, moving your shoulders away from the wall.
                                                        1. people inflexible in the backs of the legs will not be able to remove the legs far from the wall, so that apart from increased work in the shoulders/arms, they will not be able to reach the actual benefits of the posture, namely the strengthening of the back.
                                                        2. in the phase in which the legs are moved away from the wall, an increasing Torque in the shoulders occurs, which wants to push them against the wall and bend the arms. Be very careful to keep your shoulders and arms as far away from the wall as possible, your arms turned out and stretched and stretching from the shoulders should not be lost.
                                                        3. Legs tend to bend when lowered. With the power of the Quadriceps stretch the knees except cramping tendency in the m. rectus femoris. , would occur, which is quite rare here
                                                        4. Significant forces also occur in the wrists. Push the finger ground joints pronouncedly onto the ground in order to relieve the dorsal side of the wrists.
                                                        5. due to the large lever arm of the legs, torsional movements may occur in the upper body and shoulder area if the legs are not moved vertically downwards or if they are not moved at the same time. This leads to unusually high one-sided loads or momentums
                                                        6. The further one gets into the pose, i. e. the further one's legs sink in the direction of the horizontal, the greater the momentum in the hips, which is mainly stretching the lumbar spine, but also higher parts of the spine. This leads to a great effort, mainly in the lower back, but possibly also in the middle back, representing a beautiful strengthening.
                                                        7. The distance of the hands from the wall is very important here. If the distance is too small, no notable back bending will be achieved, but rather in the attempt to lower the legs, the centre of gravity shifts to the area beyond the wrists, so that one falls back on one's own feet. If the distance is too large, the pelvis may sink sufficiently far enough, but depending on the flexibility, the butts will not reach the wall or if they do, the muscular requirements will quickly become excessively large, and the forearms may not be able to stand vertically any more, but are inclined towards the wall at the top, forcing in the wrists angles of dorsal flexion, which may not be possible at all.
                                                        8. if the posture can be carried out well, the forearms are about vertical and the abdominal wall about horizontal, so that a cup can be placed on it. The legs then are close to the upper body
                                                        9. lifting your heels off the wall may cost a lot of effort. Once the legs have crossed the vertical, they sink further on their own until the pull of the hip extensors outweighs the effect of gravity. The hip flexors must then be used for further flexion.
                                                         
                                                        known issues that can occur even when running correctly


                                                          shoulders to and away from the wall

                                                          Assessment and development of shoulder strength
                                                          instructions details
                                                          1. take the handstand as usual, but first of all with smaller distance of the hands from the wall.
                                                          2. Move your shoulders carefully and slowly towards the wall, possibly until they can be placed on the wall, and then back to normal handstand
                                                          3. as long as power is available, the forwards and backwards of the shoulders can be repeated as many times as desired
                                                          1. this is not a beginner's version! Not everyone has the strength, at a given distance of the hands from the wall, to gently set the shoulders down on the wall and to remove them from the wall again! If it becomes clear that the limit of the available force has been exceeded and the force comes to an end, the pose can be abandoned at any time by tearing one leg to the ground; this immediately relieves the shoulders and arms and enables a safe leaving of the pose.
                                                          2. act very slowly and carefully! With every centimetre that the shoulders move in the direction of the wall, the necessary force increases in shoulders, upper back, upper and lower arms, the further you move towards the wall, the faster!
                                                          3. Depending on the distance from the wall and the available flexibility of the wrists in the direction of dorsal flexion as well as the strength in the palmar flexors, the limit of the strength of the forearm muscles or a compression pain in the dorsal wrist gap may appear. If this is not controllable with more use of the forearm muscles, choose a smaller distance of the hands from the wall.
                                                          4. The shoulders do not move towards the wall in an isolated way, but with the shoulders the whole back of the body moves onto the wall. The weight with which the heels previously pressed against the wall is now distributed over the entire back of the body. This makes the heels appear suspiciously light and the pose may be a little shaky.
                                                          5. the forwards and backwards of the shoulders are a good strengthening of the shoulders and upper back
                                                           
                                                          known issues that can occur even when running correctly
                                                          1. pain in the wrists
                                                            if the shoulders are moved to the wall, the forearms may reach the limit of their flexibility and despite strong use of the palmar flexors pain in the dorsal wrist gap may occur.


                                                          shoulders towards the wall

                                                          instructions details
                                                          1. take handstand as described above
                                                          2. move the shoulders carefully and slowly towards the wall as described in the variant with forwards and backwards of the shoulders, taking into account the available strength and load-bearing capacity of the wrists, and set them down there.
                                                          1. take care not to place the shoulders on the wall with maximum weight, but to maintain a high level of activity in the muscules, which can remove the shoulders from the wall.
                                                          2. In order to leave the pose, press the heels on the wall in order to be able to lift the shoulders from the wall more easily.
                                                          3. Depending on the distance from the wall and the available flexibility of the wrists in the direction of dorsal flexion as well as the strength in the palmar flexors, the limit of the strength of the forearm muscles or a compression pain in the dorsal wrist gap may appear. If this is not controllable with more use of the forearm muscles, choose a smaller distance of the hands from the wall.
                                                           
                                                          known issues that can occur even when running correctly


                                                            support with upswing (P)

                                                            instructions details
                                                            1. take handstand as described above
                                                            2. The supporter stands on the side of the swinging leg, not the jumping leg. It must be agreed upon how many turns the performer jumps off with the jumping leg
                                                            3. for the supporter it is important to keep his own body and especially his head out of the line of fire, a heel that hits the temple could easily knock you out!
                                                            4. the performer swings the swinging leg and jumps off as agreed with the jumping leg. The supporter holds the same side (to the swinging leg) hand behind the upper shoulder/back, in order to be able to quickly and vigorously absorb excessive movement of the performer's shoulder towards the wall if necessary. If it can be foreseen that the swinging energy plus the bounce force is not sufficient, the supporter grips the swinging leg and supports the upswing with one hand (same side as the jumping leg). The other hand must always remain in the shoulder area of the performer and is only then removed when the performer stands calmly and safely in the pose!
                                                            1. If the power of one supporting arm is not enough to support the upswing movement, this is not a mistake of the supporter, but the cause lies in the performer, presumably his thinking or his subconsciousness prevents sufficient effort out of fear!
                                                            2. Especially inexperienced beginners who want to learn handstand sometimes lack a little body awareness and do not control the shoulders sufficiently. For this reason, it is extremely important that a hand of the supporter lies in the area of the shoulder or upper back in order to be able to catch the upswinging person if necessary, i. e. to press the shoulder away from the wall. It should be noted that depending on how the user behaves, looking at his or her swinging leg in the worst case can cause the shoulders to move further towards the wall. If it is foreseeable that the performer lacks information or body consciousness, abort the attempt and work better on the preconditions. If the upswing succeeds together, it is urgently advised to take the hand off the shoulder area only then when the performer is visibly calm and stable in the posture. During support, the supporter may need to push quickly and vigorously, perhaps faster and stronger than expected, to keep the shoulder area of the performer away from the wall.
                                                            3. One of the two should count the swings that precede the jumping off, it is recommended that the supporter does this because he is in the more comfortable situation. Loud counting helps to prevent misinterpretation of the executioner's movements
                                                            4. make sure to stand strictly on the side of the swinging leg! The grip from the other side, i. e. that of the jumping leg, can result in injury of the supporter's hand or wrist when the executer is pulling his jumping leg and the supporters hand is still on the thigh.
                                                             
                                                            known issues that can occur even when running correctly


                                                              twist

                                                              instructions details
                                                              1. take the pose as described above
                                                              2. exorotate the right leg in the hip to place the outer edge of the foot on the wall without changing the position of the right heel beeing next to the left heel.
                                                              3. contract the but muscles to avoid falling into a hollow back during the following movement and turn the whole body to the right as far as possible. Only the hands stay where they were. When the maximum rotation is reached, place the left inner edge of the foot on the right inner foot
                                                              1. the rotation causes a different and differently intense work in the shoulders. If these are clearly restricted in flexibility, the upper part of the body can tilt slightly through the rotation, thus reducing the frontal angle of flexion in the shoulders. When the upper body tilts and the more it does so, the greater the hollow-back inclination becomes that has to be counteracted with the help of the butt muscules.
                                                              2. The second inner edge of the foot does not have to be placed on the other inner foot at the end. This can also be done at the beginning
                                                              3. The rotation covers the whole body apart from the hands, already the arms become warped, i. e. the shoulders also take up a clearly different distance to the wall. Possibly the feeling of standing on one arm more than on the other occurs and a wrist may become noticeable.
                                                              4. Before leaving the posture, turn back to the starting position.
                                                               
                                                              known issues that can occur even when running correctly


                                                                transition to uttanasana

                                                                instructions details
                                                                1. take the pose as described above.
                                                                2. for the transition to uttanasana loosen your heels from the wall, so that you stand in the air for one to two seconds before your feet reach the ground again, bend your knees and bend your hips using the power of the hip flexors to accelerate your legs towards the ground.
                                                                3. land on the ground with moderate but sufficiently bent knees, bring the center of gravity under your feet, stretch your legs and release your hands from the ground to take uttanasana.
                                                                1. on the one hand, hip flexion pulls the legs into an area where they are no longer completely above the centre of gravity or further up the wall, on the other hand, their acceleration causes a force that irreversibly pulls the body out of handstand. This process has to be designed in such a way that a clean uttanasana is created in the shortest possible way and completely physiologically. Of course, it is necessary to land with bent knees and not with stretched knees, the latter would be very dangerous. land in such a way that the centre of gravity is already underneath the feet and the necessary steps to uttanasana only exist in stretching the legs and interlocking the arms and not in shifting the body weight partly away from the hands to the feet.
                                                                2. the transition is much more offensive than just falling out of the handstand
                                                                 
                                                                known issues that can occur even when running correctly


                                                                  virasana in handstand

                                                                  instructions details
                                                                  1. take handstand a described above. Take one foot off the wall, bend that leg slightly in the hips and very clearly in the knee, endorotate it while at the same time slightly adducting it, so that the knee joint is more medial than the hip joint.
                                                                  2. In this way, swing the leg into the typical virasana undercut position and align it exactly.
                                                                  3. with the second leg the same way
                                                                  4. press the knees hip-wide on the wall, carry out a maximum extension in the hips from power of the butt muscles, move shoulder and pelvis away from the wall.
                                                                  1. Exactly speaking, it is neither virasana nor supta virasana but rather a very flat ustrasana, because the movement in the knees is not a bending and certainly not a bending of gravity as in virasana / supta virasana, but a stretching movement in the knee, comparable to that in ustrasana.
                                                                  2. The distance of the hands from the wall is a very important parameter. If the distance is too small, the virasana cannot be taken because the bending ability of the knees is not sufficient. If the distance is marginal too small, the bending ability in the knees would be sufficient, but there is no possibility to bring the legs into this position. Either because the force required to bend the knees so far is so great that it pushes the body too far away from the wall in the sense of its centre of gravity further away from the wall than the wrists, or, with execution of the necessary bending of the knees, a tendency to cramp occurs in the ischiocrural group, which forces to break off. This tendency to cramp increases the more force is exerted to bend the knees, the further the knees are bent and the longer the process of active bending of the knees lasts! It is therefore advisable to bring the legs into the pose with a quick movement, bending them in the hips and knees and endorotating them in between to give the knee a little more space towards the wall.
                                                                  3. In the pose, the feet press moderately, but above all the knees press on the wall. Use the butt muscules for a maximum extension in the hips as the knees may still slide down a little bit on the wall against the given friction. Of course, the shoulder area also moves away from the wall, but this without the knees becoming too light
                                                                  4. To leave the posture, first bring your legs out of the bent position
                                                                  5. The tendency of the legs to abduction is difficult to control, i. e. the knees and the feet also push outwards. Try to bring the knees back to hip width by force of the adductors, correct the presumably reduced extension in the hips (the working adductors bend in the hip) and turn the legs back to neutral position. Also during corrective adduction of the legs, i.e. when trying to approach the knees, try not to twist in the legs.
                                                                  6. supta-virasana-typical misperceptions in the lower back are also known here, but less so, not least because the knees are less flexed than in supta virasana: firstly because of the lack of gravity effect of the upper body, which would bend the knees, secondly because of the subdued stretching motion in the knees, whose acting forces improve the situation in the knee.
                                                                   
                                                                  known issues that can occur even when running correctly


                                                                    handstand with krouncasana

                                                                    instructions details
                                                                    1. take the virasana variant described above
                                                                    2. bring one leg out of the bent position, stretch it, remove a possible rotation of the leg and bend in the related hip as much as possible to move the leg in the direction of the upper body.
                                                                    1. This variant is unequally more back-friendly (for the lumbar spine) than the virasana variant, comparable to the difference between supta virasana and supta krouncasana.
                                                                    2. The pelvis is tilted maximum into extension (or out of the remaining flexion causing a hollow back) in the hip at the lever of the stretched leg related to the leg on the wall, so if the hip of the stretched leg is bent far enough, a good extension of the rectus femoris of the leg on thhe wall should take place and the lumbar spine should feel good, further the ischiocrural group of the stretched leg may be stretched mostly also because of the pull of the ischiocrural group causing bending momentums in the knees .
                                                                    3. there is also a point of no return here. Move the stretched leg slowly away from the wall towards the chest to observe how the pressure of the knee on the wall develops. If the pressure becomes too low, you are not only just before the point of no return, but together with a non-linear but slightly sideways running movement of the stretched leg to the ground, this could result in an instability in the lateral direction, which has to be avoided strictly.
                                                                    4. Of course, here also the shoulder moves away from the wall as much as possible, which reduces the weight of the knee on the wall. Therefore, try to keep the distance from the wall rather large so that the knee can rest well on the wall, even if the stretched leg comes down quite far. Another argument for a large distance is the lower tendency to cramp when placing the legs in supta virasana position. An argument against large distance is the strength of the shoulder, whose requirement increases with distance
                                                                    5. to leave the pose, bring the lowered leg back to the wall until the heel comes onto the wall, press the heel on the wall and take the other leg out of the bent position.
                                                                     
                                                                    known issues that can occur even when running correctly


                                                                      looking to the feet

                                                                      Ausrichtung der Schulter
                                                                      instructions details
                                                                      1. take the pose as described above
                                                                      2. bend the cervical spine and look towards the feet
                                                                      1. Contrary to commonly seen designs, in handstand you should not look to hands or wrists. Not only should there be little exciting to see, if one excludes the frequently seen finger joints and wrists lifted from the ground: the movement of taking the head in the neck can also cramp it and still suppresses the correct relative movement of the arms to the trunk, as well as the maximum frontal abduction. The attempt to look at the feet now reverses these conditions and supports the maximum frontal abduction of the arms. Of course, not everyone will see their own feet, but what matters is that the position of the upper body in relation to the arms is improved
                                                                      2. When moving the head, it is important to note that the butt muscles do not become inactive at the same time and the hips do not fall into flexion and the lumbar spine therefore falls into the hollow back. You could also try to look at the pubic bones instead of trying to look at the feet.
                                                                       
                                                                      known issues that can occur even when running correctly


                                                                        looking to the hands

                                                                        instructions details
                                                                        1. nimm die Haltung wie oben beschrieben ein.
                                                                        2. schaue zu den Händen
                                                                        1. to look at the hands, you usually have to take the head a little bit in the neck. This movement usually leads to a reduction of the frontal abduction in the shoulders, i. e. the upper body is tilted in the wrong direction in the shoulders opposite the arms. Of course, this is not in the sense of handstand, but this variant clearly illustrates the connection, especially if it is observed from the outside.
                                                                        2. Many who try free handstand make use of such aids as reduced frontal abduction (in contrast to 180°) in the shoulders or the back bend, in order to distribute the body mass better and thus facilitate balancing or to increase the room for manoeuvre in the shoulders with which balancing is done
                                                                         
                                                                        known issues that can occur even when running correctly

                                                                        1. 2

                                                                        2. 4


                                                                        samakonasana (sideway split)

                                                                        instructions details
                                                                             
                                                                            known issues that can occur even when running correctly

                                                                            1. 2

                                                                            2. 4


                                                                            wrists on patches

                                                                            Enables posture with very limited dorsal flexion in the wrist
                                                                            instructions details
                                                                            1. put several patches on top of each other under the wrists up to about 3 cm, maximum 4 cm under the palm of your hand
                                                                            2. take the pose as described above
                                                                            1. Patches under the wrists are sometimes the only way to maintain a correct and painless pose if the dorsal flexion in the wrists is severely restricted and 90° under load is achieved only under pain. The patches cause the palms of the hands to tilt and the angle remains significantly smaller. Instead of patches, other aids can also be used if they meet the most important requirements: low compressibility, soft edge and good slip resistance.
                                                                             
                                                                            known issues that can occur even when running correctly