{ "@context": "http://schema.org", "@type": "Article", "headline": "Hundestellung Kopf nach oben", "alternativeHeadline": "Beschreibung der asana Hundstellung Kopf nach oben mit Details, Hilfsmitteln, Partnerübung, vorbereitende Übungen, diagnostische Hinweise", "image": "http://www.yogabuch.de/bigimg/hund_oben.jpg", "author": { "@type": "Person", "name": "Stefan Rolf Paff" }, "award": "hatha at its best", "editor": "Stefan Rolf Paff", "genre": "yoga", "keywords": "asana, Beschreibung, Details, Partnerübung, Korrektur, Hilfsmittel, Hundestellung, Hund, Kopf nach oben, heraufschauend, vorbereitende Übungen, diagnostische Hinweise", "wordcount": "1120", "publisher": { "@type": "Organization", "name": "Yogabuch", "logo": { "@type": "ImageObject", "url": "http://www.yogabuch.de/img/logo.png" } } , "url": "http://www.yogabuch.de", "datePublished": "2017-09-20", "dateCreated": "2017-09-20", "dateModified": "2017-09-20", "description": "Beschreibung der Yogahaltung (asana) Hundestellung Kopf nach oben mit Details, Partnerübungen, Korrekturen, Hilfsmitteleinsatz, vorbereitenden Übungen, diagnostischen Hinweise", "mainEntityOfPage": { "@type": "WebPage", "@id": "http://www.yogabuch.de/deu/asanas/hund_oben.htm" } }

urdhva muhka svanasana
"upface dog"

Feedback to: postmeister@yogabuch.de
last updated: 5.8.2017
name: urdhva muhka svanasana
trivial name: upface dog
level: A
classification .
classically: slight backbend
psychomentally: . slightly energysing
physiologically: . Stretching fo belly msucles and hip flexors, strenghtening of the shoulders
effects:
preparations:
  • The lumbar spine, with its tendency to stress and the high extension requirement in the hips, is one of the biggest problems in upface dog. The following preparations are suitable:
    1. hip opening 1st
    2. hip opening 2nd
    3. warrior pose 1st with strong uprighting of the pelvis
    4. purvottanasana all variants (the "eight treasures", which have only a limited stretching effect on the hip flexors due to the work against gravity, but which shake up the required butt muscles - to be precise, the extensors of the hip joint)
  • going in the same direction, but not necessarily suitable as preparation because even more demanding, but in any case synergistic are the following and all related poses:
    1. urdhva dhanurasana
    2. ustrasana
    3. setu bandha sarvangasana
    and all beckbends with hip extension
  • in the event of difficulty with the dorsal flexion of the wrists, which must be slightly more than 90°:
    1. forarm stretching for the palmar flexors to stretch the performing muscles in the wrist
    2. forarm stretching in upavista konasana for the palmar flexors for further stretching of the performing muscles in the wrist
    3. forarm stretching for the dorsal flexors to prevent the antagonists of the performing muscles in the wrist from cramping
  • are preparatory and synergistic about lifting the trunc:
    1. tolasana in all variants
  • post practice poses:
  • If, after upface dog, there is still a feeling of discomfort in the dorsal wrist due to the limited ability of dorsal flexion of the wrists, it may be necessary to use the poses as a cure, which can also be used as a preparatory means:
    1. forarm stretching for the palmar flexors to stretch the performing muscles in the wrist
    2. forarm stretching in upavista konasana for the palmar flexors for further stretching of the performing muscles in the wrist
    3. forarm stretching for the dorsal flexors to prevent the antagonists of the performing muscles in the wrist from cramping
  • If an unpleasant sensation remains in the lumbar spine area after the pose due to the hollow back, the following poses can be used to counteract this.
    1. uttanasana, esp. the "parsva" variant
    2. parsva upavista konasana
    3. parsvottanasana
    4. karnapidasana
    5. rolling up the back
  • similar asanas:
    diagnostic hints (Nos.):
  • (711) hip flexors A pelvis which drops only little and performs harly any extension in the hips with a resulting sharp hollow back, indicates shortened hip flexors. The pelvis should sink low, but should be tilted into extension as far as possible, i. e. the hip bones should be raised opposite the buttocks. The lumbar spine should curve moderately and uniformly concave. Concerning the risks of the hollow back see FAQ
  • (650) Kyphosis and lordosis of the spine: The deviations from the physiological double-S-form of the human spine are quite well visible in this pose. The cervical spine should become straight or even slightly extended (concave from dorsal). The lumbar spine is hyperlordosed compared to the physiological posture, but as little as possible. See the FAQ
  • (651) pelvic obliquity/uneven shoulder height/scoliosis of the spine: The lateral deviations of the spine from the sagittal plane, referred to as scoliosis, are also quite clearly visible in this posture. See the FAQ
  • (704) Hip joint: It's possible that the extension may show hip problems such as:
    1. Arthrotic change of the joint (degenerative with cartilage loss)
    2. arthritis (articular inflammations) of various types
    3. Dyslocation / subluxation, which would cause a significantly increased sensation of tension in various muscles covering the hip joint.
    4. Suffered joint trauma, which may also cause pain in the joint after many weeks or months.
  • (401) (404) wrist: weaknesses of the wrists are most likely to occur in extensive dorsal flexion and under greater load
    1. Ganglion, usually in the dorsal area between hand and forearm, creates pressure sensation when the wrist is flexed dorsally
    2. Tendosynovitis of the tendons of the palmar flexors or finger flexors
    3. Carpal tunnel syndrome: aggravation of symptoms in this posture
    4. Fractures and fractures of carpal bones, especially the scaphoid bone
    5. Arthrotische Veränderung (degenerativ mit Knorpelschwund) des Gelenks
    6. arthritis (articular inflammations) of various types
    7. Dyslocation / subluxation, which would cause a significantly increased sensation of tension in various muscles covering the hip joint.
    8. Suffered joint trauma, which may also cause pain in the joint after many weeks or months.
    but also purely muscular symptoms like:
    1. Shortening/hypertension of the dorsal flexors of the wrist, which then become apparent cramp-like in the dorsal side of the elbow joint.
    2. Shortening/hypertension of the palmar flexors of the wrist, which make the dorsal flexion of the wrist in the performing muscles on the palmar side of the forearm painful
    3. Golf elbow: Stress pain at the origin of muscles of the ulnar side of the forearm in the transition to the upper arm.
  • (886) knee: in this pose, knee problems associated with complete stretching under load become evident: for example, traumatic or degenerative meniscus damage, arthrosis, arthritis, subluxations, ligament damage, plica syndromes and others, see FA
  • variants::
    feet reversed
    on fists
    on fingertips
    (P) pulling on the shoulders
    (P) pressing onto the thighs
    shifting a brick with the pubic bones
    from the floor
    transition between different foot postures
    transition to uttanasana
    transition to stick pose
    (P) transition to stick pose with thumb under the pelvis
    shrigging the armpit
    pushing heels onto the wall
    hands on the wall
    head in the neck (reclination)
    wrists on patches

    instruction details/hints
    1. stand in downface dog
    2. don't give up pushing backwards and move the pelvis forward-downward against the resistance of the shoulders pushing backwards.
    3. use the butt muscles as early and powerfully as possible to tilt the hips towards the extension and move the pelvis forwards and downwards.
    4. stretch the chest upwards as far as possible.
    5. exorotate your upper arms (intner elbow forward) and start pushing your body backward with a constant high force.
    6. If necessary, correct the position of the hands or feet in such a way that the wrists are no further forward than the shoulders, even when they push strongly backwards.
    1. The contraction of the butt muscles is not supposed to be done in the sense of "squeezing", as that contains the exorotation movement in the hip joints. This is to be omitted. Instead, move the inner legs upwards more strongly in order to use the butt muscles to bring only the pelvis further into extension. Check the work of the butt muscles quite often
    2. press the pelvis downwards, but lift the back of the legs upwards
    3. Make sure that the knees remain fully stretched.. The quadriceps have to work for that. Esp. lift the inner knees
    4. lifting the chest requires constant attention, as it is quickly lost. Measure this on the sternum or upper part of the m. trapezius between neck and shoulder. It should rise above the shoulders maximum (depression of the shoulder blades). The movement of the shoulder blades is different than in the downface dog: in this one they move away from the pelvis (elevation), in upface dog they move with all their strength towards the pelvis, whereupon the upper part of the body moves upwards between the arms.
    5. the wrists should not be further forward than the shoulders, when they are pushed strongly backwards
    6. keep your fingers spreed, the tendons of your middle fingers parallel to the front., in order to be able to push down the finger base joints better
    7. if the power relations are so favourable that the feet slip away by pushing backwards, place the feet backwards against a wall.
    8. if the arms are used correctly (turned out and pushing strongly backwards), clear work must be felt in the m.biceps brachii (arm-biceps) and in the shoulder muscles (m. deltoideus) here the frontal part, pars clavicularis.
    9. If pushing backwards is not strong enough, the arms may still be overstretched, but this decreases with increasing pressure to the rear, since the biceps muscles as frontal abductors cause a inclination of the elbows to bend as they are also elbow flexors.
    10. the position clearly tends to lighten the inner finger base joints . In order to prevent this from happening, very strong work may be necessary in the forearm muscles (palmar flexors) and finger flexors. Given their lack of strength and mobility, this is a good exercise to improve both.
    11. untrained people may quickly notice the lower back. In most cases this is normal and not critical, unless a vertebral disc herniation is known or suspicious.. Occurring slight pain should be gone after a downface dog, at the latest after a hip opening 1st . In cases of weak back with shortened hip flexors sometimes it happens that a person cannot stay in the pose for more than about 10 seconds
    12. the further the wrists are positioned at the back, the more intensive the work becomes in the back of the wrist. m.bizeps brachii (elbow flexor) and the m.deltoidei (shoulder muscles)but also the palmar flexors of the wrist. As long as the wrists do not hurt, the distance of the hands to the feet can be reduced, which makes the transitions from and to upface dog more intensive.
    13. Difficulties with the wrists can occur after holding the position for a longer period of time and are almost always temporary. Helps against it:
      1. while in the pose: more powerful pushing down of the finger base joints
      2. after the pose: dorsal forearm stretching, stretching of the dorsal flexors) and maybe also the plantarflexors
     
    known issues that may occur even when practicing correctly
       

      variants

      feet reversed

      This variant has significantly different effects on the shoulder/arm area. Not the m. biceps is strengthened and thr front part of the m. deltoideus but the triceps, esp. the biarticular middle head.
      instructions details
      1. compared to normal upface dog increase distance that far, that the wrists are a little further forward than the shoulders.
      2. turn your feet over so that the back of your feet lie down
      3. keep turning out your arms well and start pulling the body forward with a lot of constant force. The skin is stretched on the back of the foot and effort is felt into the back of the upper arm., the triceps
      1. in the first times this exercise is performed intensively (assuming that the arms are turned correctly and the forward pull is very strong) an unknowingly intense sensation occurs, especially in the middle part of the m. triceps , which is characterized by exertion and tendency to cramp. With correspondingly strong work, muscle aches can occur due to this very unusual requirement. If this effort is not felt, there is mostly no use of force to push the arms backwards yet, the complete exorotation of the arms may be missing or the maximum eleving of the shoulder blades.
      2. Let the toes lie calmly on the ground or press them (especially if the sole of the foot is known to be prone to cramp) against the ground.
      3. the tendency of the muscles to cramp in the sole of the foot when the foot is stretched is well known; by pulling the foot forward vigorously, this should be kept within limits.
      4. The height of the upper body is lost very easily, i. e. stretching out from the shoulder upwards. Push the upper body upwards with force and make sure that this is not lost when pushing backwards.
      5. The complete exorotation of the arms is an essential movement in this pose. If the arms are turned out less than maximum, the elbow joints block mechanically as a hinge joint in the direction of the force exerted (pushing backwards), which is undesirable for the joint, because forces act unphysiologically on the joint structure that cannot be absorbed by muscles and on the other hand a valuable possibility for muscular work is lost.
       
      known issues that can occur even when running correctly
      1. Cramping tendency in the middle triceps
        Even with reasonably developed and sufficiently flexible m. triceps it can lead to a tendency to cramp, if you push strongly backwards


      on fists

      This variant largely neglects pushing the body backwards and therefore reduces the tension in the lower back . Therefore, an increased concentration on lifting the trunk is possible. Also the arm-, especially the forearm muscles are stressed less and differently. This is often a possible execution, if otherwise because of injury of the wrist or parts of the hand the upface dog would be impossible.
      instructions details
      1. push the fists onto the ground so that the palms of the hands point towards each other (inwards), approximately at the place that corresponds to the normal dog position.
      2. put pressure on the fists and take the pose as usual, but with a bit of reduced backwards pushing of the body. The arising moment in the wrist with which it is pushed into ulnar abduction (which places more stress on the forefinger or its base joint) should be controllable by forearm force.
      3. In extremely rare cases, the upper body could be so much longer against the arms and at the same time the flexibility of the hip flexors could be so good that in the normal execution of the upface dog the pubic bones or more than these touch the ground. This variant might be helpful then because the shoulders are higher about the length of the palm of the hand.
      1. Due to the different length of the metacarpal bones, probably not all knuckles will touch the ground and if they do, at least not with equal pressure, which will cause higher pressures for those who press on the ground, which may exceed the limits of individual tolerance.
       
      known issues that can occur even when running correctly
      1. significant pressure sensation on the knuckles
        Depending on the individual sensitivity and, of course, body weight, the pressure sensitivity of the knuckles could be too high for this variant.


      on fingertips

      instructions details
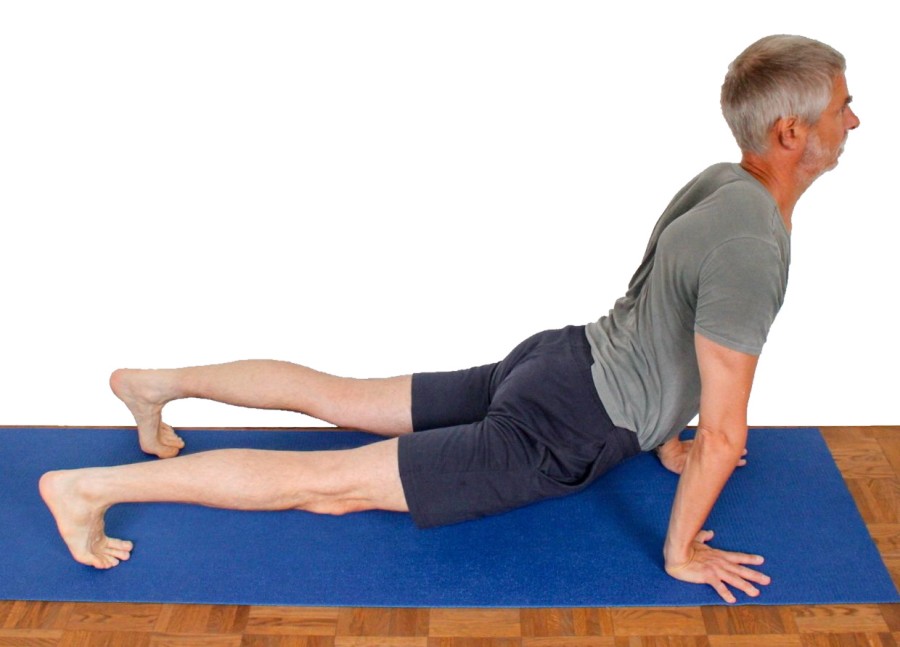
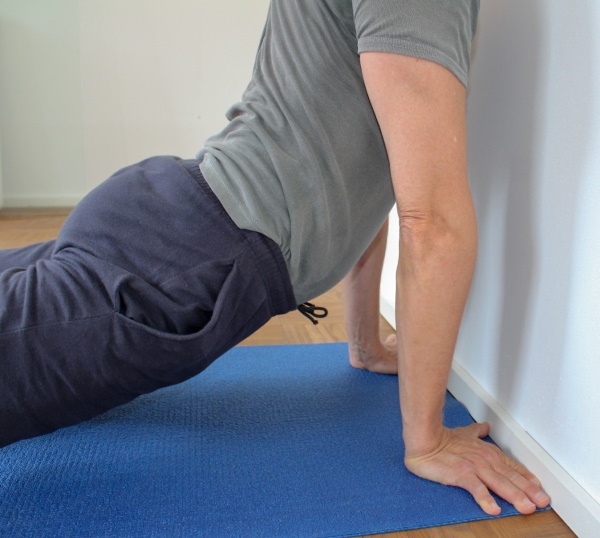
      1. take downface dog on fingertips
      2. come up slowly and cautiously in the upface dog, if the pressure in the fingers allows it.
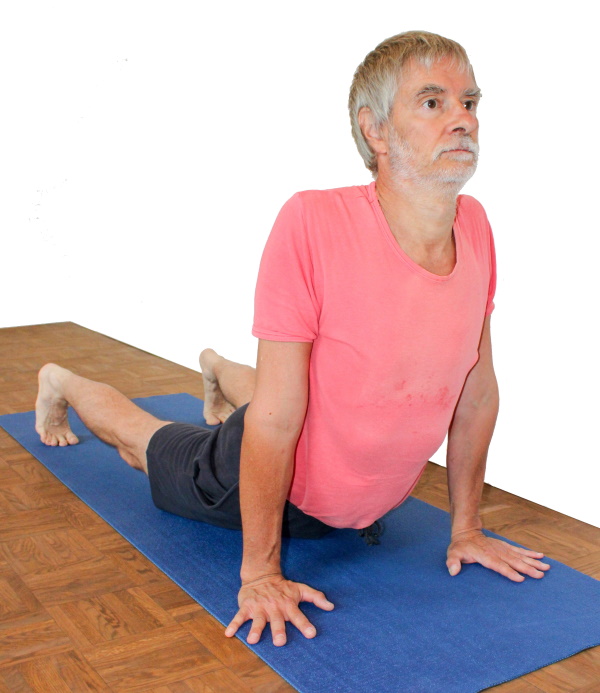
      1. Here the pose is described from upface dog, because in the transition to upface dog the increase of pressure or force in the fingers can be felt exactly and until reaching upface dog, if necessary, the attempt to take it can be aborted without danger if it really feels like the fingers might not be able to withstand the strain.
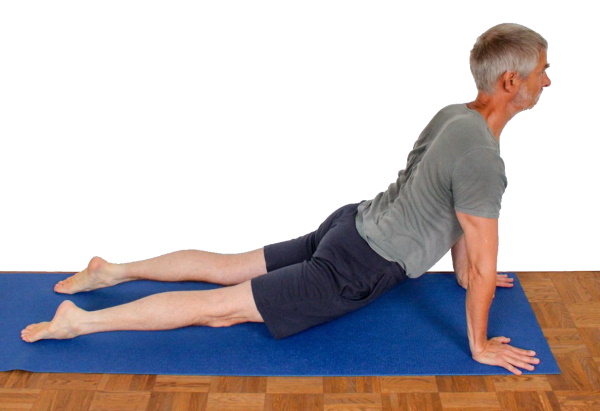
      2. As in downface dog, the finger joints are held high and the fingers are placed quite close to each other on the ground, so that the finger base joints remain at 180° angle and the fingers remain halfway steep, which reduces the bending momentums. Basically, these momentums are quite high in this pose and the steeper the fingers are, i. e. the closer the fingertips are to each other and to the thumb, the better. Press your fingers together with all your strength to absorb at least some of the forces/momentums acting towards overstretching of the finger joints. Hold the hand turned 10° - 20°, i. e. the tendons of the middle fingers diverge slightly.
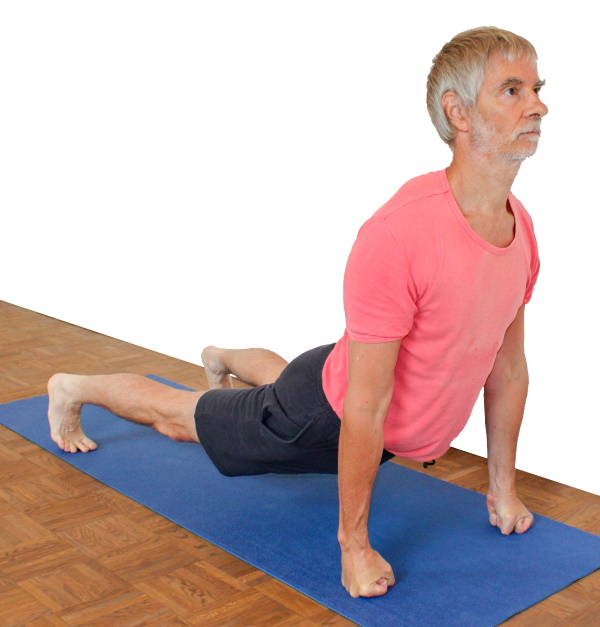
      3. If on the way from the downface dog into the upface dog, it becomes apparent that the fingers might not be able to hold the load, go back into the downface dog. Practical experience shows that in all cases where it was possible to make the decision that the fingers should/would hold the strain, they did hold. Nevertheless, the strain and the force to be applied by fingers, hand and forearm is extremely high. In other words, this is a very high level of strength that should be treated with respect!
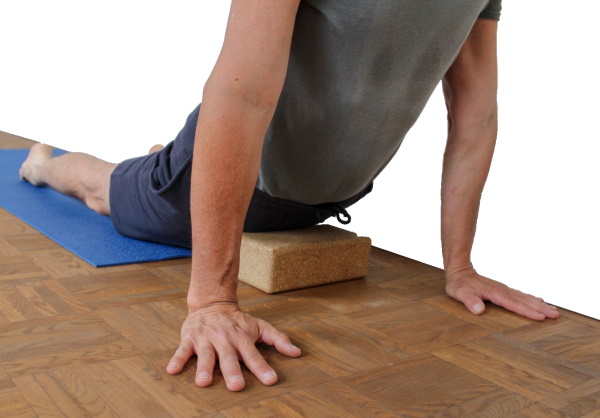
      4. The overstretching in the finger joints should remain moderate. In cases of high overstretching ability in the finger joints as well as especially in the thumb joints, if the force necessary to avoid excessive overstretching is not available, this posture should be dispensed
      5. Maybe a very intense sensation occurs not only during the posture but also a short time afterwards in the fingers. Persistent pain for a long time afterwards, however, is not normal or tolerable.
      6. In contrast to upface dog, the pressure in the fingers is felt here much more intense. In the order of training the fingers, the downface dog would be the first, the second would be upface dog, then you would try stick pose, then the rectangular handstand, in which already all body weight lies on the fingers of both hands, even after that the ardha vasisthasana, in which more than 50% of the body weight rests on one hand and only afterwards the handstand, in which again only 50% rests on each hand, but dynamic forces occur, which, when taking the aforementioned poses hardly occur and with a slow, attentive build-up should be negligibly small in handstand Here's the recommended sequence again as a list:
        1. downface dog
        2. upface dog
        3. stick pose
        4. rectangular
        5. ardha vasisthasana
        6. handstand
       
      known issues that can occur even when running correctly
      1. intense sensation in the fingers
        intense sensation in the fingers is normal, Depending on the force in the finger flexors, this can be limited or occurs pronounced


      (P) pulling on the shoulders

      instructions details
      1. take the pose as described above
      2. the supporter stands behind the back of the performer and pulls slowly (!) taking into account the feedback of the performer, the shoulders backwards in the direction of the feet up to the stop signal of the performer
      1. pulling on the shoulders not only helps to reduce the thoracic spine kyphosis (or to enlarge an already attainable thoracic spine lordosis), it also increases the lumbar spine hyperlordosis. This must be done very carefully and with the greatest possible effort of the performer's pomusculature, so that no unpleasant sensation or damaging effect occurs in the lumbar spine or its accompanying muscles. It is strongly advised that both performers and supporters are not beginners!
      2. From the point of view of the supporter, other parameters of the pose can also be observed, such as stretching of the knees and the work of the butt muscles or stretching out from the shoulder (depression of the shoulderblades: relative movement of the upper body to the arms fixed on the ground) which, if performed powerfully, usually leads to a trapezius line rising towards the medial, the absence of which, on the other hand, would indicate insufficient effort to depress the shoulder blades. .
      3. The pull on the shoulders also supports the otherwise sometimes neglected movement of the shoulder blades to the back.
       
      known issues that can occur even when running correctly


        (P) pressing onto the thighs

        Development of feeling and proportionality for the use of quadriceps
        instructions details
        1. take the pose as described above
        2. the supporter presses slowly and with increasing pressure in the middle of the back of the thighs to force the performer to work in the quadriceps.
        1. A cardinal feature of upface dog is the simultaneous lowering and tilting of the pelvis into extension while keeping the knee stretched. The stretching effect on the hip flexors depends directly on the angle of the thighs to the pelvis and thus, in the case of fixed feet, on the extension of the knees. Each degree of knee flexion changes the angle of the thighs to the pelvis and costs a considerable amount of effectiveness. Since there is often little awareness of the power relations and the necessary intensity of the work of the quadriceps, this is a good way to help, as well as to show the possibilities of the quadriceps, i. e. the available power, and to develope it
        2. In contrast to the variant with pulling on the shoulders, the supporter can use quite high force without hesitation for the attempt to bend the knees of the performer or to provoke him/her to use the quadriceps more strongly.
        3. This support naturally also has a challenging effect on the relative movement of the upper body to the arms fixed on the ground, the stretching out of the shoulders, so that here too a effort is provoked and strengthening possible. Depending on the constitution, some muscle groups can reach their limits easily
         
        known issues that can occur even when running correctly


          shifting a brick with the pubic bones

          instructions details
          1. take upface dog with reversed feet as described above, where a block is placed directly in front of the pubic bone.
          2. push as good as possible with the pubic bone against the block or even push it out of the force of the movement to the front
          1. as a variant with the reversed feet, this is also about the movement of the pubic bone to the front and down as a result of the extension in the hips and about pressing the hands backwards or pulling the body to the front with the force of the arms, which is frontal abduction in the shoulders. The block offers a resistance that makes the movement tangible.
           
          known issues that can occur even when running correctly


            from the floor

            instructions details
            1. lie on your belly. Place the palms under your shoulders, pointing your fingers forward.
            2. contract your butt muscles to tilt the pelvis as much as possible into the extension, stretch your legs and lift your upper body with the power of your arms until you reach upface dog
            3. push back forcefully by power of forearms and shoulders
            1. While upface dog is often taken from the downface dog, there is of course also the possibility to take it from the ground. It is well known that the way in which one takes a pose influences the result. Here, more conscious work must be done on pushing backwards, whereas the movement of lifting the upper body may become more obvious
            2. The position of the hands depends of course on the flexibility of the hip flexors, the better, the smaller the distance of the hands from the feet must be, it further depends on the power of the triceps, the forearms, the shoulder and the dorsal flexing ability of the wrists.
             
            known issues that can occur even when running correctly


              transition between different foot postures

              instructions details
              1. Start with normal downface dog and switch to the stretched foot version. give up pushing the body backwards, put your hand a little bit forward and roll over the tips of your toes on the back of your foot.
              2. Adjust the distance of both hands to the feet in such a way that in the variant with stretched feet the wrists stand just in front of the shoulders and push the stretched, turned out arms with all their strength against the friction of the mat backwards (where of course the hands stay in place) to be able to pull the pubic bones forwards and down.
              3. For the transition back, move backwards exactly the other way round: give up the pull to the front, put one hand a little further back and roll back over the tips of your toes into normal upface dog, in which you push the body maximum backwards.
              4. then adjust the distance between both hands so that the wrists are just behind the shoulders.
              1. One of the difficulties with this transition is dealing with the different distances: in the normal variant with dorsal flexion in the ankle and pressing the hands forward resp. pushing the body backwards, the distance between wrists and balls of foot standing on the floor is considerably smaller than the distance for the variant with inverted feet should be. This means that the distance must be adjusted at some point in the transition. In order to avoid that normal upface dog is carried out with a much too large distance, which would make it possible to hang unpleasantly and possibly damagingly in the lumbar spine, the adjustment of the distance in the transition or variant should be done with stretched feet. In this case, however, the too small distance is not without problems, since this means an excessive angle of dorsal flexion in the wrists, so that the described procedure appears as an optimal solution to avoid both problems.
               
              known issues that can occur even when running correctly


                transition to uttanasana

                instructions details
                1. using the power of the hip flexors and with the help of the abdominal muscles, from upface dog jump with the feet between the hands, where the pelvis is clearly lifted.
                2. with stretching the legs bring the pelvis into the uttanasana position and bend from the hips maximum forward.
                1. The transition from upface dog to uttanasana is not for beginners. Before practicing, there should be some experience with dynamic transitions, the hip flexors should have been stretched and the muscles of the lumbar spine should be well warmed up.
                2. The hip flexors are one of the strongest muscle groups in the human body. Since the m. psoas major has a distinct tensile effect on the lumbar spine, it should be in a well stretched state. The actual jump with the feet between the hands is an explosive rapid force movement in which the pelvis lifts. The Psoas changes from the state of being stretched completely to a maximum concentric contraction. Its power is it, together with the Iliacus, that drives the transition
                3. as always with jumps land with (at least slightly) bent knees. In the stronger condition and the more problem-free especially the hip flexors and muscles of the lumbar spine are, the more the knees can be stretched during landing, but never completely so that the shock absorbing effect in the knees from the muscles of the thighs is maintained during landing..
                 
                known issues that can occur even when running correctly


                  transition to stick pose

                  instructions details
                  1. tabke the pose as described above
                  2. bend the arms backwards until the upper body is stretched horizontally
                  1. push backwards all the time over the body, the heels are at all times maximum backwards and downwards, i. e. the ankles are in maximum dorsal flexion; for this, the force of the arms and shoulders is required to push the hands forward against the friction of the mat.
                  2. When taking stick pose, the pelvis should not be allowed to come up, as one often sees it as a relief, just as the shoulders should not be held lower than the pelvis and the heels are. everything is at the same height.
                  3. the arms are loosely attached to the body in stick pose, they should neither be kept apart nor pressed against the body to facilitate by friction
                  4. The extension of the upper body remains intact, even if there is no more thoracic back bend in stick pose, as it was required in upface dog
                  5. The butt muscles do not stop working. while in upface dog it was their task to generate a maximum extension in the hips, they should keep the hips away from the flexion, which is taken too often as a slight ease
                  6. The legs remain stretched, especially lift the inner knees. In people who are not very flexible in the hip flexors, they will not (be able to) lower the pelvis so far that the thighs become horizontal in upface dog, this is now possible here.
                   
                  known issues that can occur even when running correctly


                    (P) transition to stick pose with thumb under the pelvis

                    instructions details
                    1. take the pose as described above
                    2. bend the arms backwards until the upper body is stretched horizontally
                    3. The supporter places a clenched fist with the outer hand area on the floor below the proximal thigh and presses with a spread thumb from below against the upper thigh. The transition should now be made in such a way that the pressure of the thumb against the thigh remains approximately the same.
                    1. here the same remarks apply as practiced on your own, see above.
                    2. the weight witch the pelvis presses on the thumb should be the same all the time. When the weight becomes smaller this mostly shows an attempt to ease the pose. When the weight becomes more, it is a sign of missing power without the aforementioned attempt being undertaken
                     
                    known issues that can occur even when running correctly


                      shrigging the armpit

                      instructions details
                      1. Take dog head up as described above with maximum lifting of upper body between the arms.
                      2. Let your upper body sink completely with your arms still stretched, then lift it as much as possible and continue changing between these two states
                      1. The shrug of the armpit should create awareness about the relative movement of the upper body to the arms. For many practitioners it doesn't seem to be easy to raise the upper body between and relative to the arms in upface dog (shoulder blades in depression). In contrast to the comparable movement in the downface dog (shoulder blades in the direction of the head: elevation), stretching from the shoulders, i. e. also a relative movement of the upper body to the arms, this is done here (shoulder blades to caudal, to the pelvis) in the other direction and is less restricted than in downface dog, since the strong latissimus dorsi does not oppose this movement. The shrug of the armpit described here represents the periodic alternation between the lifting of the upper body between the arms and its passive, gravity-induced sinking..
                      2. Especially when the upper part of the body is lowered, the arms develop a tendency to flex and may also deviate sideways from the body. This position is meant as an exclusive change between the raised and the sunk position without any change in the arms, i. e. without bending the elbows, without lateral deviation of the arms or change of their rotation, they always remain in maximum exorotation.
                      3. There is a connection between the lifting of the upper body and the ability to move the shoulder blades backwards from the sternum in such a way that when the upper body is raised (i. e. shoulder blades moving at most to the pelvis) this is somewhat restricted; try to reach the maximum here nevertheless.
                      4. sometimes the movement of the upper body in relation to the arms also influences the pushing of the body backwards, also this factor should be kept as constant as possible.
                       
                      known issues that can occur even when running correctly


                        pushing heels onto the wall

                        instructions details
                        1. lie on the belly with the heels a few centimetres away from a wall
                        2. put your hands about next to your shoulders and come as usual in upface dog pushing the heels strongly against the wall
                        1. pushing the heels against the wall gives much more awareness about pushing backwards as the pressure can be felt directly in the heel. For this purpose, however, the distance of the hands from the wall must be adjusted exactly, if the approximately maximum dorsal flexion in the ankle is to be achieved. Even without reaching it, you can practice pushing backwards and control it yourself. The pressure to the back comes from the anterior portions of the shoulder muscles, (the front part of the deltoid muscle) and the palmar flexors of the wrists, (forearm muscles). When strong pressure is built up, this should be felt well in the muscles. According to construction there is no limit to the strengthening of the mentioned musculature, if one disregards a hypothetical possibility that the hands could slip forward - which is very unlikely to happen because the arms stand also almost vertically on the ground - and arising possible lower back issues. The distance to be chosen for the pose depends of course on the dorsal flexion ability of the ankle.
                        2. Since the heels are in downface dog further back than in upface dog, it is advisable to build up this pose from the ground with minimal distance of the heels to the wall and not from downface dog.
                        3. Of course, as the force in the lumbar spine increases with increasing pressure to the back, the butt muscles have to ensure maximum extension of the hips. But even then, it is advisable to be alert with the lumbar spine!
                         
                        known issues that can occur even when running correctly


                          hands on the wall

                          instructions details
                          1. enter downface dog with your hands on the wall, your fingers on the wall bent outwards, your thumbs inwards
                          2. Push yourself away from the wall as much as possible, when you go into upface dog and keep the shoulder area from evading to the side
                          1. The pose offers a slightly better exorotation of the arms than normal. Above all, however, taking the pose is interesting, because in particular for the head and also as you feel even for the shoulders there is less space available than needed. Instead of evading sideways to come from downface dog with hands on the wall into upface dog, try to push the body away from the wall with all the force that can exert pushing you back and go straight into the downface dog
                           
                          known issues that can occur even when running correctly


                            head in the neck (reclination)

                            instructions details
                            1. take the pose as described above and slowly take your head as far as possible in the neck.
                            1. This is a good way to keep the larynx area flexible. In cases of a noticeable tendency to tension in the neck muscles, one may have to be careful with this pose.
                            2. Use only that much muscles for the movement of the head backwards, that the neck does not start to cramp. The further the head goes, the more gravity works for further reclination so that muscular action is less required und cramping tendency reduced
                            3. Basically, the head in the neck supports the desired decyphosing of the thoracic spine in this pose. However, make sure that other factors such as the work of the butt muscles or the extension of the knees do not get lost.
                             
                            known issues that can occur even when running correctly


                              wrists on patches

                              Enables posture with severe restricted dorsal flexion in the wrist
                              instructions details
                              1. put several patches on top of each other under the wrists, up to about 3 cm, maximum 4 cm
                              2. take the pose as described above
                              1. Patches under the wrists are sometimes the only way to get a correct and painless pose if the dorsal flexion in the wrists is severely restricted and 90° is achieved under load only under pain. The patches cause the palms of the hands to tilt and the angle (of dorsal flexion) remains significantly smaller. Instead of patches, other aids can also be used if they meet the most important requirements: low compressibility, soft edge and good slip resistance.
                              2. emerging pain caused by lack of flexibility in the wrists in the direction of dorsal flexion at the transition between downface dog and upface dog are often the reason why the elbows are bent in the transition, because with the resulting mild ulnar abduction plus a slightly greater pronation the pain can be alleviated. If this is the reason for bending the arms, the use of patches is the method of choice, so that the work can be done precisely in the arms. In a similar way as a restriction of flexibility of the palmarflexors a dorsal ganglion in the area of the wrist can also cause comparable pain and comparable avoidance behaviour resp. evasion. Here, too, improvement would result from the use of patches.
                               
                              known issues that can occur even when running correctly