adho mukha svanasana
"downface dog"

Feedback to: postmeister@yogabuch.de
last updated: 30.6.2017
name: adho mukha svanasana
trivial name: downface dog
level: A
classification .
classically: .
psychomentally: . balancing, mood raising
physiologically: . Pelvic forwardbend (therefore hamstring stretching), upper body extension, shoulder opening, strengthening of the forearm resp. wrist.
effects:
preparations:
  • an important preparation for all those who are not particularly flexible in the ischiocrural group is their warming up, so that the flexion in the hip joint in this pose is easier and the upper body moves more easily towards the thighs:
    1. uttanasana as a generally effective and efficient stretching of the ischiocrural group for preparation of flexion in the hips in this posture, so that insufficient flexion does not restrict the work in the shoulders.
    2. prasarita padottanasana very similar to uttansana
    3. hip opening IV as a very effective stretching of the ischiocrurals, even stronger than uttanasana.
    4. warrior pose 3 due to flexion in the hip of the standing leg
    5. parsovttanasana as very effective and efficient stretching of the ischiocrural group with additional significant stretching of the triceps surae
    6. parivrtta trikonasana as also quite good stretching of the ischiocrural group with additional clear stretching of the triceps surae
    7. uttanasana as generally effective and efficient stretching of the ischiocrural group for the preparation of flexion in the hips in this posture, so that insufficient flexion does not restrict work in the shoulders
    8. uttanasana also as generally effective and efficient stretching of the ischiocrural group for the preparation of flexion in the hips in this posture, so that insufficient flexion does not restrict work in the shoulders
  • Depending on the flexibility and resilience of the shoulder, it is also advisable to warm it up well.:
    1. upface dog as a pose that prepares the shoulders for powerful work, above all through correctly executed transitions from and to the downface dog
    2. rectangular handstand as a related pose that differs essentially only in the rotation of the arms
    3. backstretching, esp. variant "high" as a general extension of the shoulder and ischiocrural group
    4. ellbow downface dog as a very related and strongly synergistic pose
    5. hyperbela as one of the most effective and efficient stretches in the direction of frontal abduction without exorotation of the arms
    6. shoulder opening at the chair as one of the most effective and efficient stretches in frontal abduction with exorotation of the arms
    7. purvottanasana if the tone in the Deltoideus is too high or has become too high as a result of preparation
  • The following postures can be used to prepare the calf muscles for dorsal flexion in the ankle joint:
    1. warrior pose 1 in which the respective rear leg is stretched
    2. parivrtta trikonasana in which the respective rear leg is stretched
    3. parsvottanasana in which the respective rear leg is stretched
  • to counteract an existing tendency to cramp in rectus femoris:
    1. ardha supta krouncasana
    2. quadriceps stretching 1 at the wall
    3. quadriceps stretching 2 at the wall
  • post practice poses:
  • should unpleasant tension remain in the deltoids after leaving downface dog, this can be reduced with :
    1. gomukhasana in which the deltoid of the lower arm is stretched
    2. uttanasana with hands behind the trunc for both arms at the same time
    3. prasarita_padottanasana for both arms at the same time
  • If rectus femoris has showed a tendency to cramp in the dog:
    1. ardha supta krouncasana
    2. quadriceps stretching 1 at the wall
    3. quadriceps stretching 2 at the wall
  • similar asanas:
  • Geometrie:
    1. rectangular handstand
    2. urdhva hastasana-variant of dandasana
    3. supta dandasana
    4. rectangular uttanasana
    5. rectangular headstand
    6. navasana
    7. dvi-pada-variante of handstand
  • diagnostic hints (Nos.):
  • (712) Strength of the hip flexors The lack of strength of the hip flexors in this position will lead to the result that the attempt to tilt the pelvis into the flexion does not result in any significant stretching of the ischiocrural group.
  • (293) excessive tension in the trapezius: quite rarely, despite performed stretching out of the shoulder (elevation) and turning out (exorotation) of the arms, cramps of the trapezius can occur, but this indicates a clearly increased tension. The trapezius, which plays a decisive role in lifting and rotating the shoulder blades, is one of the most strained muscles in Western civilization. Inner and outer posture, including today's widespread computer workstations, make a significant contribution to this.
  • (880) overstretching of the knees: overstretching the knee is the ability to reach an angle of more than 180° in the knee joint or the current state of doing so. To a certain extent, this is considered normal for the anatomists and is on average more widespread and pronounced in the female sex. However, it can also indicate a weakness of the quadriceps or the hamstrings. Furthermore, unphysiological sensations often occur in overstretching in the ventral side of the knee below the patella or on the back of the knee, which do not originate from stretching or exertion of the muscules and should be avoided, see also FAQ
  • (231) (234) shoulder : In downface dog, the flexibility of the shoulder can be seen, as well as differences in the sides and, if necessary, there is evidence of disorders of the shoulder.:
    1. Irritating hypertonus of the deltoid: especially ambitious beginners in yoga tend to develop irritable states in the deltoidus, which are localized in the area of muscle origins, presumably due to an overstrain of the structures caused by frequently repeated demands in full frontal abduction and which are also noticeable under the same strain, see FAQ
    2. various pathological changes of the shoulder joint, e. g. impingement syndrome (highlight: pain between 70° and 130° frontal abduction), frozen shoulder, calcification of the biceps tendon, which cannot all be discussed here and which require clarification. Until further notice, medical specialist is the orthopaedist.
    3. Side differences in flexibility
    The flexibility of the shoulder becomes recognizable in the form of the degree of evasion into the three dimensions of movement:
    1. Outward evasion of the upper arms with consequent bending of the elbows due to fixed hands
    2. Loss of exorotation of the arms
    3. squint angle of frontal abduction that does not reach 180° or does not reach 180° permanently
  • (650) lumbar spine kyphosis and lordosis : The deviations from the physiological double-S-form of the human spine are quite clearly visible in this pose. There should be a certain amount of lordosis in the lumbar spine and cervical spine and a certain amount of kyphosis in the thoracic spine. How far the natural lordosis of the lumbar spine can be restored is extremely dependent on the flexibility of the hamstrings and the focus of the posture. Even flexible people - depending on the focus in the posture - may still have a "only" straight or rudimentary kyphotic lumbar spine. Decisive parameters are above all the distance of the hands to the feet and the question whether the heels are pressed to the ground at the expense of flexion in the hips. See the FAQ
  • (651) pelvic obliquity/scoliosis of the spine: The lateral deviations of the spine from the sagittal plane, referred to as scoliosis, are also quite clearly visible in this pose. Here it is also sometimes observed that the pelvis is not straight, but one hip higher than the other. See the FAQ
  • (721) (724) ischiocrural group: in forward bending movements (flexion in the hips), but also under load in the muscles of the back of the leg, various disorders can be found:
    1. Shortening of the ischiocrural muscles, see FAQ.
    2. Damage to the ischiocrural musculature, which causes pain or functional limitations, can also be easily recognized here, from simple tension and straining to (partial) muscle rupture. Ruptures would lead to a reduction in strength when leaving the posture quickly
    3. Irritations of the n. ischiadicus: especially in forward bends, irritations of the n. ischiadicus, which innervates leg and foot, can become symptomatic, even if they are otherwise rather calm. See also FAQ
    4. Irritations of the ischiocrural group's insertion into the tuber ischiadicum (hump) will clearly become apparent in this pose and require protection from the intensive stretching this pose demands.
    5. Baker cysts create a feeling of tension or foreign body sensation in the back of the knee, see FAQ.
  • (404) (352) (354) wrist: although the wrist is far less in dorsal flexion than for example in upface dog, under about a quarter of the body weight disorders in hand or wrist can still occur.
    1. Ganglion, usually in the dorsal area between hand and forearm, creates pressure sensation when the wrist is flexed dorsally
    2. Tendosynovitis of the tendons of the palmar flexors or finger flexors
    3. Carpal tunnel syndrome: aggravation of symptoms in this posture
    4. Fractures and fractures of carpal bones, especially the scaphoid bone
    5. Arthrotische Veränderung (degenerativ mit Knorpelschwund) des Gelenks
    6. arthritis (articular inflammations) of various types
    7. Dyslocation / subluxation, which would cause a significantly increased sensation of tension in various muscles covering the hip joint.
    8. Suffered joint trauma, which may also cause pain in the joint after many weeks or months.
    but also purely muscular symptoms like:
    1. golfers elbow: Stress pain at the origin of muscles of the inner ulnar side of the forearm in the transition to the upper arm. See the FAQ
  • (886) knee: In this posture, knee problems associated with stretching the knee under a certain load may become apparent. For example: traumatic or degenerative meniscus damage, arthrosis, arthritis, subluxations, ligament damage, plica syndromes and others, see FAQ
  • variants::
    wide
    hands at the wall
    feet at the wall
    one leg lifted (eka para prasarita)
    backwards against the wall with one leg raised
    hands inward
    on fists
    on fingertips
    hands vigorously pushed on the ground
    hands shifted towards each other
    biceps tensed
    head on the floor
    lift and lower wrists
    hands on bricks
    heels on bricks
    single handed
    heel on the floor
    stretch from bent knees
    (P) with 1 assistant
    (P) with 2 assistants
    (P) with 3 assistants
    (P) with 4 assistants
    shrugging
    hands on a carpet
    chest towards one leg
    one leg bent
    one leg stretched in front (hip opening 5)
    narrow
    narrow with hands on the wall
    hands outward
    hands inward
    (P) turning arms
    (P) stretch from bent knees
    (P) pushing on the sacrum
    shift from outer to inner hand
    with reversed feet
    transition to supta virasana
    transition to uttanasana
    transition to ardha vasisthasana and back
    transition to upface dog
    transition to downface dog with stretched feet
    transition to parsvakonasana
    transition to stick pose
    (P) transition to stick pose with pelvis on a thumb
    transition to dog elbow pose
    transition to downface dog against own shoulder force
    (P) transition to downface dog against resistance
    transition to uttanasana backward

    instruction details/hints
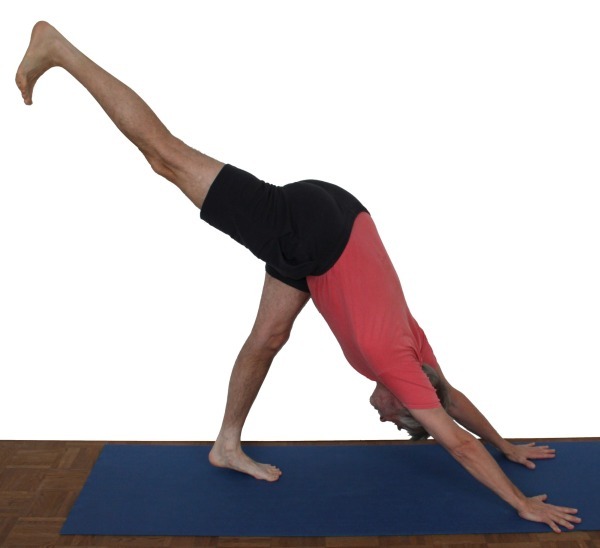
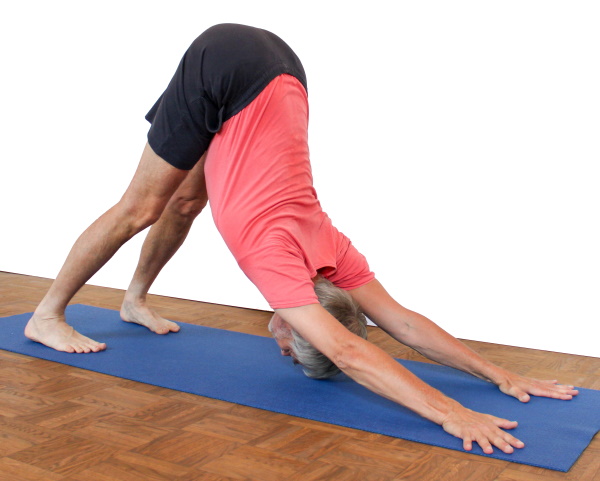
    1. sitting upright on the lower legs
    2. bend the upper body forward and put it down on the thighs
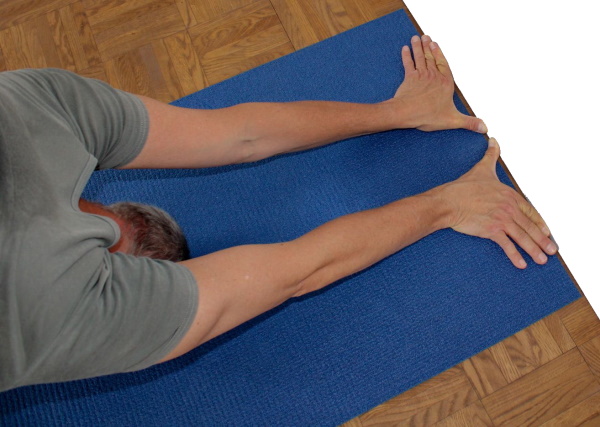
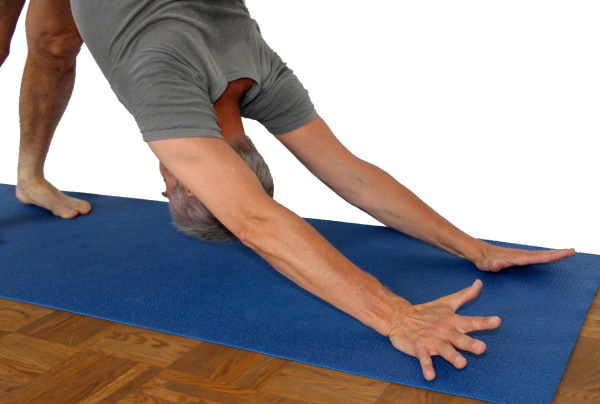
    3. stretch your arms forward and place the palms shoulderwide on the ground.
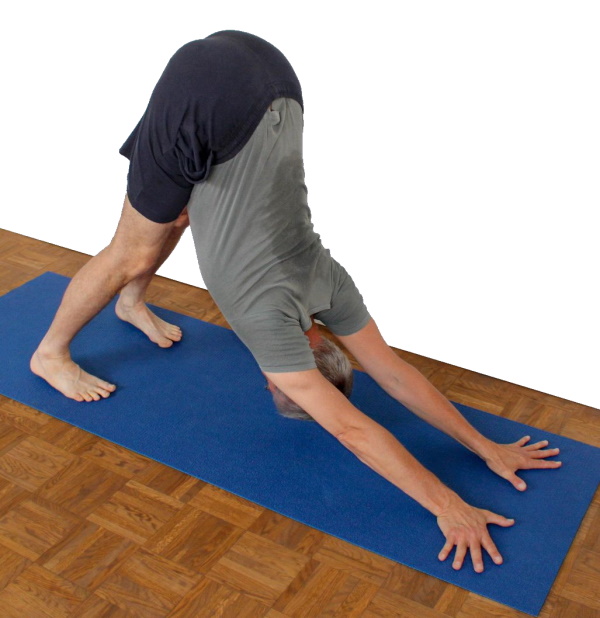
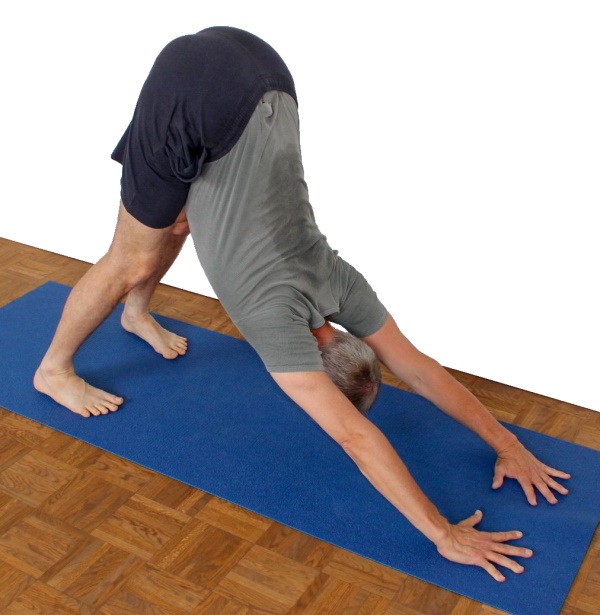
    4. raise the pelvis until thighs are horizontal
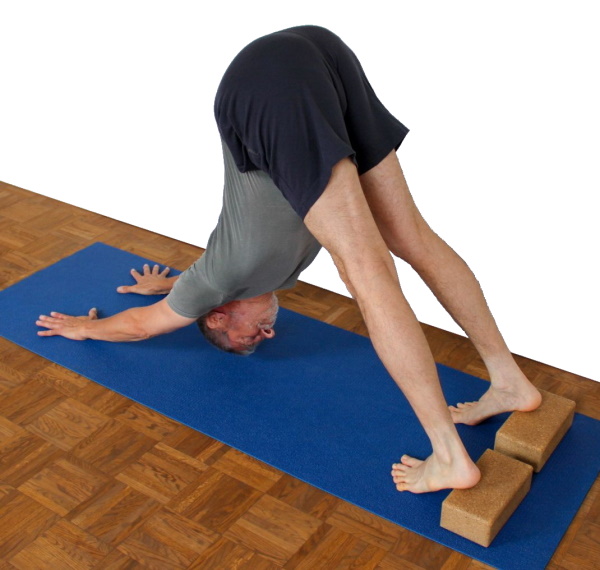
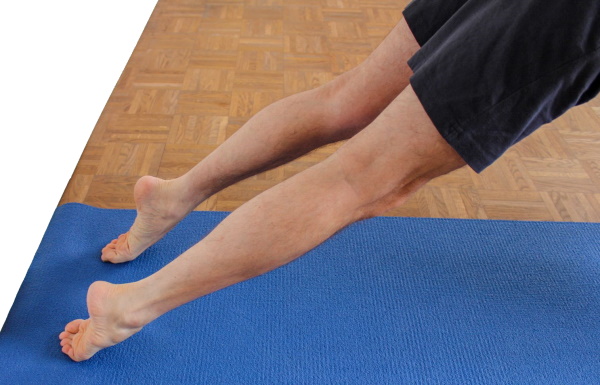
    5. turn the toes over so that the underside of the toes are on the ground
    6. put weight on the hands
    7. stretch your legs backwards
    8. drop your heels
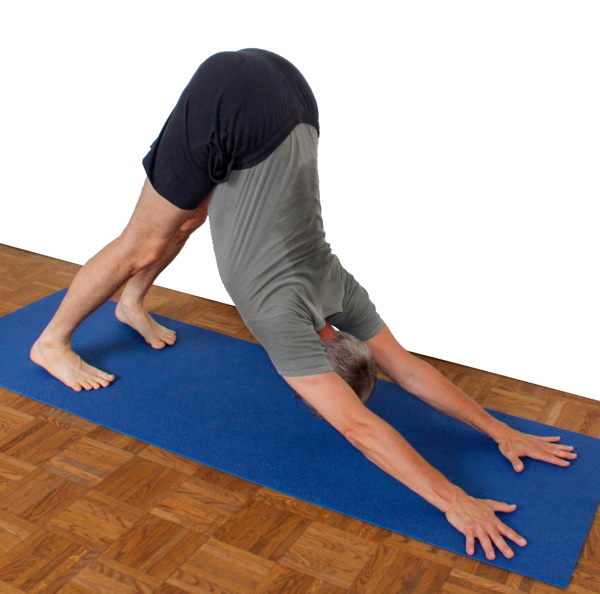
    9. tilt the pelvis forwards until (if possible) the sacrum is at least in the line between pelvis and hands or even further.
    10. let the shoulder sink in the connecting line between wrists and ischial bone, but don't move it forwards and downwards towards the hands, but upwards and backwards towards the pelvis.
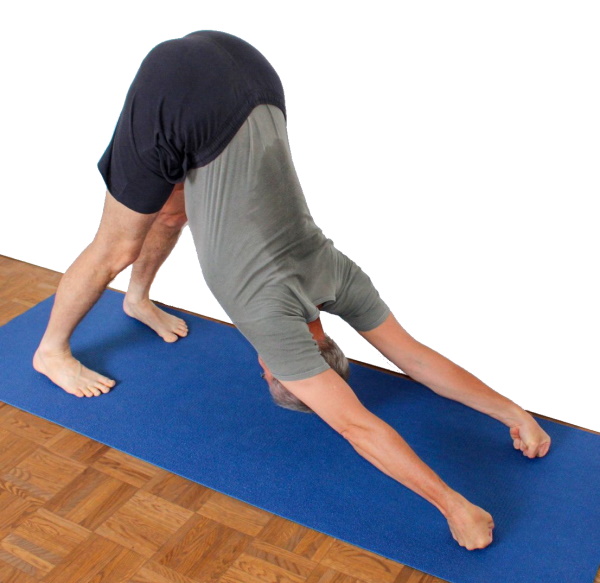
    11. press the respective inner Finger base joints (articulation between finger and palm) firmly on the ground to distribute the pressure between the different parts of the hand and the fingers as evenly as possible
    12. exorotate the upper arms (i.e. the tripezs to the ground)
    13. reach out from the shoulder as far back as possible
    1. pay attention to the legwork: thoroughly stretch the knees except the rectus femoris part of the quadriceps would start to cramp (because it is short in both joints, which it spans, and thus close to active insufficiency and cramping tendency), if so you should:
      1. not tilt the pelvis so far in dowaface dog
      2. practice stretchings of the quadriceps more frequently
      3. bend your knees and tilt the pelvis further down instead of first stretching your legs and then bending the pelvis as usual
      The flexion in the hips should be performed as isolated as possible from the parts of the m. iliopsoas and not at all from also hip bending rectus femoris
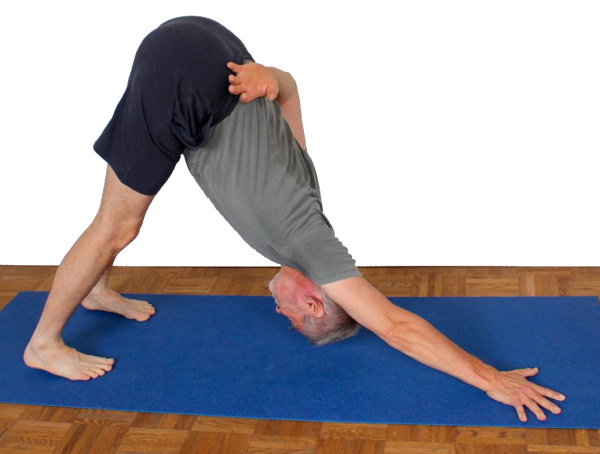
    2. push the ischial bones away from the hands by power of the arms and shoulders, means nothing more than to stretch as much as possible in all joints in between elevating the shoulder blades as well.
    3. keep abdominal muscles soft. The upper part of the body shouldn't be bent by the power of the rectus abdominis, but rather be stretched as straight as possible based on a far tilted pelvis.
    4. on cramping tendency in the (deltoids) you can:
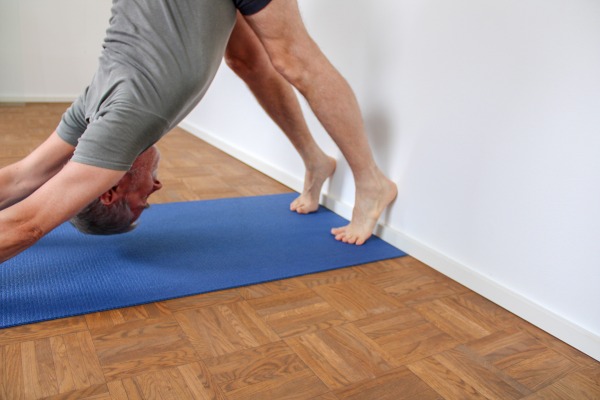
      1. if it significantly restricts the pose, more often practice downface dog with the hands on the wall . Furthermore
      2. in between, or if the tendency to cramp hampers the pose too much, practice gomukhasana. If the handstand can be practiced with bending arms, this is also highly recommended.
      3. inbetween practice upface dog more often
      4. tonus-regulating exertion and strengthening of various kinds
    5. endorotate the thighs rather than turn them out and push them away from each other, that pulls the ischial bones a little bit apart and promotes the ability to bend in the pelvis a little bit.
    6. in some cases, the weight distribution between the inner and outer foot requires special attention. Especially in cases of shortened calf muscles it can be useful to focus more often on pressing down the inner heel. For example, in the case of athletes who are regularly out heavy strain on the lower leg muscles, such as by jogging, endurance running or the like, because the gastrocnemius trained with it also supinates.
    7. Make sure that when the arms are turned out, the inner hands do not become light. instead constantly work with the lower arm muscles, palmar flexors and pronators of the wrists, because pressing down the inner metacarpal joints (metacarpophalangeal joints) that have a tendency to take off is a combination of palmar flexion and pronation of the forearm. Until further notive exorotate the upper arms to the maximum
    8. Difficulties with the wrists (usually dorsal) can occur after holding the position for a long time and are almost always temporary. Helping against:
      1. in the position: the stronger pushing down of the finger ground joints (metacarpal joints)
      2. after the pose: dorsal forearm stretching
    9. Make sure not to loose the exorotation of the arms when you stretch out from the shoulders. The known connection between the three dimensions of motion (exorotation, (not) lateral-abduction, maximum frontal-abduction) naturally applies and all the more so here. The force acting in the direction of frontal abduction is great enough to force the shoulders into the other two dimensions of movement in case of doubt, depending on which movement is lighter or the other way around, which can be better controlled out of consciousness about it and power to do it. Be careful not to allow the arms to move outwards and let them not be turned into the endorotation.
    10. work with your hands in such a way that not one or more fingers turn to the side, which can be seen e. g. by a nail tilted to the side. If this is the case, a sideways pushing movement of the whole hand or individual fingers can be used to bring the fingers into the upright position (against the friction resistance of the fingers on the surface). Probably this effect does not affect all fingers equally. The indicated correction is therefore only intended as a corrective measure for the unwanted fingers and accepts that the inclination of other fingers may be overcompensated or that some fingers may even be rolled in the opposite direction. The degree of correction is based on the most rotating finger. Of course, this instruction also applies to the thumb, which for anatomical reasons cannot be expected to lie upright.
    11. Cramping tendency in the m. trapezius should not occur; if so, you should first check whether it can be turned off with your own more powerful exorotation of the arms. If not, an assistant can turn out the arms correspondingly strong.
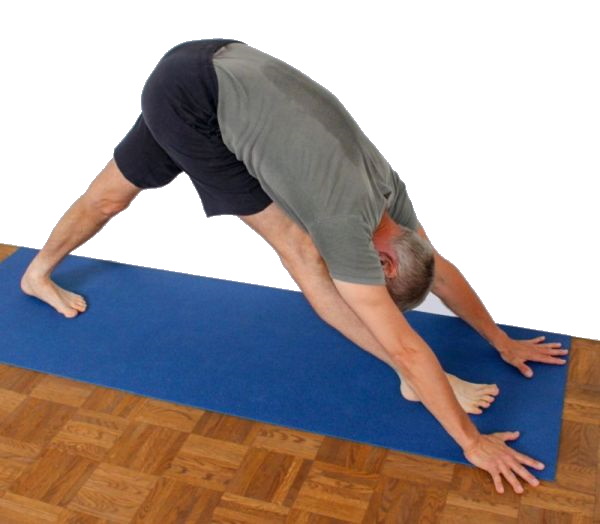
    12. spread the toes, as in different standing poses, in order to ensure that the metatarsophalangeal joints of the toes are placed as evenly as possible on the floor.
    13. Sinking or pushing the heels down counteracts flexion in the hips in most cases, as both movements are coupled via the limited flexibility of the back of the leg. The gastrocnemius plays an important role here, bending the knee at the same time as the plantar flexing the ankle. In downface dog, the opposite is performed pronouncedly in both joints, so that it is strongly stretched here and usually sets the limit in at least one of the two movements (flexion in the hips and plantar flexion). Except for other (therapeutic) indications, the movement of the pelvis is the more important: it is more important to tilt the pelvis as far as possible than to force the heels to the floor; as a temporary focus, however, this makes sense.
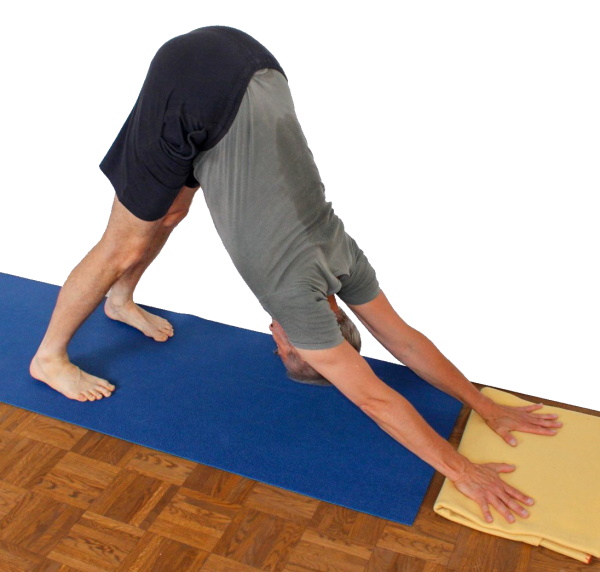
    14. from the above instructions for taking the pose a clear measure results of the distance of the hands to the feet. If you change from the downface dog to the upface dog, the distance of the hands must be adjusted accordingly so that the wrists do not stand further forward - better one or two centimetres back - than the shoulders. If you change between these two poses several times, you should keep the of upface dog and not change it every time you change the pose. For downface dog this has the consequence that the pelvis tilts less or at least less easy forwards (in the sense of flexion in the hips), which is the smaller disadvantage compared to a too big distance in upface dog, which can cause an evil hanging in the lower back and related missensations. The advantages of the smaller distance for upface dog are described there, among other things the transitions become more intensive and the Deltoideus can work better.
    15. in some people, the tendons of one or more fingers are shortened, usually the small finger. This peculiarity impairs the execution of the pose only to the extent that, mostly, the first finger joint cannot be pushed onto the ground. If an assistant is available, the affected joint can usually be treated by the assistant. push it down slowly for several minutes, which should be (almost) painless. Otherwise, a weight can be placed on this joint. Fast successes are not to be expected, especially if it is a tendon contracture, but a slow, steady improvement.
    16. when palmar flexion is performed thouroughly, the work of the associated muscles of the forearm should be clearly perceptible. In rare cases, this kind of muscular work can cause irritation at the origin of the muscles in the forearm near the elbow joint or show up a preexisting golfer elbow. Then it is recommended to force this work in the dog's position less and to practise the stretching of this muscle group with palms placed on the ground (palmar forearm stretching) more often. Therapeutic weight training with many repetitions and such a light weight that no pain occurs during the execution is usually helpful.
    17. especially when there is a lack of strength in the forearm muscles, the carpus (carpal bones distal to the wrist) is often subjected to a lot of unpleasant pressure. People with little training often have not only little muscle to relieve this area actively, but also little protective muscle spanning the bones.
     
    known issues that may occur even when practicing correctly
    1. shoulder pain
      For beginners who regularly or even ambitiously practice downface dog, it can happen that they develop a slight cramp-like painfulness of the front shoulder, which almost only occurs when the arms are held upside down. This may also apply to the handstand and the rectangular handstand, for example, and is a consequence of the disproportion of the requirement to the current abilities of the muscles. It then makes sense to train the (especially front) shoulders for strength and endurance in more moderate angular ranges than in approx. 180° frontal abduction. Suitable are the dip-variations of the poses with otherwise 180°-frontal abduction, but above all the clean and intensive transition between downface and upface dog. !
     

    variants

    wide

    This design allows a clearly improved shoulder opening by downface dog as well as a more powerful work in the lateral back muscles (for those who can already use them voluntarily)
    instructions details
    1. increase the distance of the hands to the feet by at least one, in case of stiff shoulders by up to 2 whole hand lengths (including fingers).
    2. stretch the body even stronger to the back here. If you slip away with your hands, push them against the wall:  
       
    1. for people flexible in the shoulder, it is essential to take care not to sag in the shoulder (this happens when the stretching of the body backwards is negligent) so that no stretching or exertion can be felt anymore..
    2. This does not mean that the shoulder must not sink below the connection line between pelvis and hands, but that the stretching out of the shoulders must be maintained
    3. with increasing shoulder flexibility, it is necessary to work more intensively on the exorotation of the arms, which results in a more intensive work of the m. latissimus dorsi
    4. for people who are inflexible in the shoulders, for some time the main task is to move their shoulders backwards and in direction of the pelvis. restricted flexibility of the shoulder limits both exorotation and frontal abduction and elevation of shoulder blades
    5. The above mentioned about the relation between three dimensions of motions (turning, not laterally-abducting, maximum front-abducting) applies here all the more. The force that works in the direction of frontal abduction is great enough to force the shoulders into the other two directions in case of doubt, depending on which movement is lighter or the other way around, which can be better controlled out of consciousness about it and power to correct it. Be careful not to allow the arms to move outwards and let them not endorotate.
     
    known issues that can occur even when running correctly
    1. slipping of the hands
      As described above, the hands may slip off the surface. This depends not only on the type and degree of deterioration of the mat, but also to a large extent on the hand's moisture. In the yoga school we always have some older patches ready to offer good slip resistance to the participants who come with their own, new stil a little bit slippery mat. Nevertheless, high hand moisture can make your hands slip after intensive body work or in case of hyperhidrois. Putting your hands on a wooden floor is worth a try. If they are not too dry, friction in a certain humidity range can be almost better than on a mat. Last but not least, as shown above, it still helps to push your hands against the wall or to grip the edge of the mat, as well as to let a supporter push your hands on the floor.


    hands at the wall

    This variant can reduce the tendency to cramp in the shoulder muscles (deltoids) and help to exorotate the arms. In addition, it may also be possible to apply more force to press the upper body against the thighs
    instructions details
    1. push your hands against a wall so that the thumbs point inwards and the remaining fingers point outwards.
    2. Kee on pushing down especially the finger ground joints while you take the pose
    3. turn out the arms as much as possible while at the same time stretching out of the shoulder to the back and find the possible work in the Latissimus dorsi
    1. make sure that especially the inner finger ground joints don't become light but are pushed on the ground firmly. This is done by the palmar flexors and pronators of the forearm
    2. Here, the exorotation of the arms can be trained more easily, so that the work with the lateral back muscles (latissimus dorsi) can be experienced as soon as possible
    3. the reduction of the tendency to cramping in the deltoids should be noticeable if there is one
    4. In most cases, the upper body can be better pressed towards the thighs. This may be because the force for this may not be limited by the fact that care must be taken to ensure that the hands do not slip forward, but it may also be due to the fact that, in order to avoid this slipping away, the hands are often pressed a little bit from above onto the mat in the normal variant, which is equivalent to the movement of a frontal adduction (not exactly vectorial, but in the case of mobile people in the main orientation), which counteracts the movement of the shoulder movement to be carried. On the contrary, the hands can be subjectively attempted to lift off the ground up to the front, which results in a further frontal abduction and at the same time pushes the shoulders and upper body towards the thighs.
    5. the stretching of the ischiocrural group may not be felt much in the pose - which is also not the aim of the variant - at best the calves are still noticeable in some cases.
     
    known issues that can occur even when running correctly


      feet at the wall

      This variant allows to:
      1. move the work a little bit away from the legs to the arms and shoulders
      2. tilt the pelvis forwards and downwards better and thus
        1. keep the (in particular lower) back straighter (useful for some lower back injuries)
        2. move the work in the back of the leg: away from the calves to the back of the thighs
      instructions details
      1. put the heels about (depending on the flexibility in the sense of the dorsal flexion in the ankle joint: the better, the less height is needed) 10-15 cm increased against the wall, the balls of foot in front of it on the floor so that the foot stands about in more than one 45°-angle to the ground and go into the downface dog
      1. take full advantage of the degree of freedom gained in the hips and tilt forwards and downwards into the flexion until the maximum stretching sensation in the back of the legs is reached.
      2. leave the lower back and the rectus femoris soft, thus get the movement from the power of the m.iliopsoas. The pelvis may be able to tilt further than usual and it becomes clearer, where this movement comes from, because in the normal version there is no choice for beginners, especially for less flexible beginners, to change the position of the pelvis, because the stiff hamstreings force a certain position. This pose also shows the connection between the dorsal lower leg and the dorsal thigh muscles: there is at least one knee flexor in both parts of the extremity (thigh: ischiocrural group; lower leg: gastrocnemius) and depending on how far the pelvis is tilted, the heels can sink to the floor or vice versa, depending on how far the heels are moved towards the floor the pelvis can be tilted. To put it this way, the total length of the leg back muscles is limited and you can choose between more flexion in the hips and more plantar flexion in the ankles.
      3. Here, the force of the arms can often be used better than in the normal pose for pushing the upper body towards the thighs, i. e. the shoulders below the connecting line between the wrists and the pelvis, which primarily exercises the flexibility of the shoulders. This is due to the fact that the pelvis tilts further and the upper body and thus also the shoulders can move closer to the thighs, whereby the pressure exerted with the hands in the direction of the shoulders forces the shoulders and upper body to move downwards rather than upwards. A comparable evasive calculus can be found in the powerful transition between upface dog and downface head without the use of force of the hip flexors in the instruction "lift the pelvis until the hip joints are above the connecting line of the heels with the shoulders", so that the pelvis evads upwards instead of downwards.
       
      known issues that can occur even when running correctly


        one leg lifted (eka para prasarita)

        This variant is a strengthening of the m. glutaeus max. as well as the biarticulär parts of the ischiocrural group, furthermore a strengthening and stretching of the calf muscles
        instructions details
        1. from normal downface dog press the hand firmly on the floor
        2. slowly lift one of the legs, leave it stretched. Lift it to the maximum while the m.glutaeus max. becomes noticable in its work to lift the leg and the stretching and strengthening effort of the calf muscles as well
        1. if the work of the quadricepsfor strechting the knee of the lifted leg can not be felt the knee is highly likely not to be stretched completely.
        2. supress the lifted leg's tendency to exorotate. Instead focus on lifting the inner knee of the lifted leg
        3. the further the leg is lifted the more stretching will be felt in the standing leg because from a certain point lifting the leg tilts the pelvis in further flexion related to the standing leg
        4. keep the pelvis straight. The hip of the lifted leg tends to evade upward in order to deminish stretching sensation in the standing leg
        5. stretch the heel of the lifted leg away like in tadasana. This promotes stretching the lifted leg. The intention should not be to lift calf or heel but the back of the thigh by the power of the ischioocrural group and the m.glutaeus maximus
        6. If the heel of the standing leg does not reach the ground the stretching felt in the calf muscles is significantly more maybe borderline or even to strong. In the latter case the heel may be held slightly or support under the heel will help. If that heel rests on the floor heavily the stretching felt mostly will not too intensive unless further lifting of the other leg and consequently further tilting of the pelvils causes significantly more stretching sensation. The pyhsical base of support is a narrow triangle in this pose. Therefore the calf muscles of the standing leg will habe to perform balancing work which may be clearly felt. The balance aspect of the posture is reinforced by the fact that after the construction of the posture the rear foot is not straight behind the centre of gravity, or in other words the centre of gravity is not in the middle of the transverse axis of the support base.
         
        known issues that can occur even when running correctly


          backwards against the wall with one leg raised

          This is a nice and effective warm-up exercise that warms up the back of the legs for coming stretches and strains as well as the shoulders for coming strains. In our school it is called the "favourite winter warmup pose"...
          instructions details
          1. take downface dog with heels raised on the wall
          2. bend the right leg and take it out of the pose. Put your right foot as far up behind you as possible with the ball of that foot against the wall
          3. stretch the right leg through and the right heel maximum upwards
          4. move the upper body backwards as far as possible, i. e. to the left standing leg
          5. stretch out of the shoulders at maximum, which should raise the heel of the lifted leg further
          1. When positioning the foot of the leg to be lifted, it is of course necessary to largely give up the typical pressure of the upper body to the rear and up. Then rebuild it again and include the raised leg by trying to move its heel, especially the inner heel, as far as possible backwards and upwards.
          2. In this posture, it may not be easy to keep the pelvis straight, as the hip of the upper leg is generally not straight but evades to the front and upward. This is due to the fact that there is often not enough flexibility in the hip flexor group to reach the stretched angle in the hip of the raised leg. The bending tendency of the raised leg, as well as the tendency to turn the raised leg out, results from the limitation of the flexibility of the hip flexor group, i. e. for the most practitioners, the hip of the raised leg must be moved further backwards and downwards in case of doubt. Also, the hip of the standing leg must move backwards-up
          3. if the foot of the leg to be lifted is placed too low against the wall, stretching the leg pushes the pelvis away from the wall, if it is placed too high on the wall, possibly the pelvis may tilt less far than possible due to the restricted flexibility of the knee flexors, and the shoulders may then no longer be able to sink sufficiently into or below the connecting line between the wrists and pelvis and stand too far up and in front.
          4. As a rule, an angle of 60° of the foot, whose heel is placed on the wall, is a good choice.
           
          known issues that can occur even when running correctly


            hands inward

            instructions details
            1. take the pose as described above, but do not let the tendons of the middle fingers point parallel to the back of the front but turn the hands as much as possible inwards.
            1. The anatomical possibility of radial abduction, i. e. to turn the hand towards the thumb side in relation to the forearm (so called radial abduction), is relatively limited. In some cases, however, with this means it is still possible to treat cramps or shortening of the ulnar flexors (i. e. the opposite movement) on the ulnar side of the forearm
             
            known issues that can occur even when running correctly


              on fists

              This design sometimes makes it possible perform downface dog, when different kinds of injuries of the wrist or the hand itself would otherwise prevent it, e. g. in case of scaphoid fracture.
              instructions details
              1. clench your hands to your fist and place your fists so that the palms of your hands point towards each other.
              2. press your fists firmly on the ground and take the downface dog as usual. The thumbs enclose the fist from the outside
              1. in this version, less pressure can be build up in backward direction, since the ankles may be more pressure-sensitive than the palms of the hands and possibly also because the wrist is working at the limit of the available ulnar abduction and therefore do not want to tilt due to painful restriction of movement.
              2. don't experiment with hands turned backwards (palm of the hand faces backwards), as the wrist is very unstable and may be damaged by buckling
              3. apply as evenly as possible pressure to all ankles pressing on the ground
              4. the further the shoulders are moved backwards, the greater is the ulnar abduction of the wrist, which is a quite unusual movement, especially under the use of force, and in addition it may be less pronounced than is necessary according to the flexibility of the shoulder and leg back.
              5. If the pressure is very unpleasant, patches under the ankles can be used. A blanket would be inappropriate as an aid, since both the fists on the blanket tend to slip and the different layers of a folded blanket against each other as well. For the latter reason, the otherwise promising combination of blanket and patches on top is not a good choice either. This is due to the often flat angle in which the forearms apply force to the ground and becomes more pronounced with increasing flexibility of the shoulders and the ischiocrurals.
              6. Not only is less force available for stretching out of the shoulder as described above, but the shoulder opening also suffers a little bit in this variant, since the normally carried out intensive palmare flexion pushes the shoulders a little bit to the ground and thus stretches them better. In addition, possible wrist discomfort may prevent maximum frontal abduction of the shoulders.
               
              known issues that can occur even when running correctly


                on fingertips

                This design strongly strengthens the fingers, especially the finger flexors (m.flexores digiti). Its transition to upface dog on fingertips is very interesting from a psychomental point of view, because here confidence, freedom from fear and steadfastness are practiced during (greater) strains. In any case, determination and clarity are required and
                instructions details
                1. Put the fingertips on in such a way that the hand is slightly turned out compared to the normal downface dog
                2. Press your fingers firmly on the ground und shift the towards the thums against the friction of the mat. Be aware that your fingers will carry your body weight.
                3. Keep putting more pressure on your fingers until you've taken up the position.
                1. for ease, the hand can be turned a little more (thumb inwards)
                2. We need determination and trust. I know only a few people who have such weak fingers that they cannot carry out this pose. Nearly all people feel a challenge in overcoming and trust. The latter even more so applies to upface dog on fingertips and stick pose on fingertips where in these two variants, in fact, clear force in the fingers is required, which perhaps not everyone can exert.
                3. In this pose a great pressure is generated in the finger joints, which wants to overstretch them (or seldom bend them strongly). Make sure that the fingers bend as little as possible (the finger joints become concave from the dorsal side). To achieve this, take up the position with a clear pretension in the fingers, so use the force of the finger-flexing muscles to push the fingers together against the resistance of the floor. This reduces the tendency of the fingers to buckle - with sufficient strength being applied. Versions with convex (flexed) finger joints are not advisable, as the position of the joints is much more difficult to control. A certain overstretching as a starting position is normal and tolerable, since the finger flexors try to get the joints out of their overstretching with their maximum power. In contrast to finger extensors, finger flexors in humans are considerably stronger, which is why it is highly probable that this bending action will largely absorb the damaging forces in the joint that would be caused by unaware overstretching under load.
                4. Versions with the inner finger ground joints on the floor are not permitted, since weight acts destructively in these joints by eroding the ligament (or even bone) structure and avoiding the desired strengthening of the fingers. Instead, set your fingers quite steep.
                5. one can say that as a rule the execution is possible if you know that it is, or if you are undoubtedly determined to execute it
                6. if the sensation arises that the skin is pulled away from underneath the fingernails, push the fingers more towards each other, thus compensating for the forces that cause this sensation.
                7. Of course, some aspects of the normal downface dog posture remain underrepresented here, such as the strong stretching from the shoulders and the pressure with which more flexible people can push the upper body to the thighs.
                 
                known issues that can occur even when running correctly


                  hands vigorously pushed on the ground

                  This is a completely different work in downface dog. Instead of pushing the body backwards from the hands, emphasis is placed on pushing the hands down. Hands and feet tend to be pulled together, which results in a strong work of the abdominal muscle (rectus abdominis), the m.iliopsoas, thigh muscles such as the rectus femoris, the m.pectoralis and possibly the m.latissimus dorsi .
                  instructions details
                  1. From normal downface dog, gives up the pressure backwards of the body
                  2. start to press your hands on the ground with all your strength, with your hands now moving to your feet rather than to the front. This action involves the belly muscles (m.recti abdomini) and the hip flexors, especially the m.iliopsoas and the leg front sides
                  1. the position mostly can be maintained at full intensity for a few seconds only in the beginning, so reduce the intensity a little bit so that you can perform the pose for at least 10-15 seconds.
                  2. Cramping tendency in the m.rectus femoris should not occur. In the belly muscles (m.recti abdomini) pronounced work should be felt. However, much of the work in this pose comes from the hip flexor group, which moves the upper body towards the thighs. This movement feels like pulling the ischial bones upwards and in fact is a flexion in the hips, which subjectively increases the pressure of the hands on the floor.
                  3. The work of the arms counteracts the desired frontal abduction in the shoulders a little. This is clear and normal, because the kind of work here is completely different. The work in the hips however remains the same and becomes even more intensive here
                  4. Since the movement of pressing the hands towards the feet is not accessible to everyone, especially in the face of an apparent impossibility as far as a visible movement is concerned, one can remember the "pullovers" in the gym (the lifting of the dumbbell corresponds to the movement to be carried out) or also build up the pose from downface dog, in the construction of which the hands are immediately pushed powerfully in the direction of the feet, already during the build-up while the knees still are on the ground. Dorsal flexion of the ankles is also impeded. Nevertheless, leave the foot lifter muscles inactive.
                   
                  known issues that can occur even when running correctly


                    hands shifted towards each other

                    Here the emphasis is on work in the chest muscles and in the m.biceps brachii (arm biceps). This is a very helpful option for people with a tendency to overstretch their arms.
                    instructions details
                    1. From normal downface dog, with increasing use of force, the hands start to push towards each other. As this is done against the friction of the ground, little external movement will occur. but strong work starts in the m. pectoralis and m. biceps brachii on both sides.
                    1. From a certain amount of force with which one pushes the hands together, the use of muscular work in the (arm-)biceps is given, which relieves the strain on the outside of the joint when the arms overstretch. In any case, such a relief is achieved by this movement if it is sufficiently strong enough, even if it is not yet apparent that the elbow joint reaches 180 degrees again after initial stretching.
                    2. für den (Arm-)Bizeps this is an interesting and extraordinary work, because the angle in the elbow is a stretched one. With a string execution, the biceps may be felt in the entire elbow area up to the insertion in the forearm.
                    3. The use of the biceps should not cause the arm in the elbow joint to get into the flexion (angle less than 180°), otherwise the triceps must be used to restore and maintain the extension, which allows a quite complete work of the upper arm muscules. Also, the exorotation of the arms should be completely maintained
                    4. if there is a tendency to cramp in the pectoralis, the intensity with which the hands are pushed towards each other must be reduced.
                    5. The adduction may press the palms better on the floor. However, this is not an adequate solution for the "mouse hole problem".
                     
                    known issues that can occur even when running correctly


                      biceps tensed

                      Learn to avoid the overstretching of the arms and the associated pain in the dorsal elbow.
                      instructions details
                      1. take the pose as described above
                      2. contract the biceps in both upper arms and, in the case of overstretched elbows, bend them until the angle of 180° is reached.
                      1. The ability to overstretch the elbows is individual, some people experience pain in the dorsal elbow under load, which is why it makes sense to learn how to avoid overstretching the elbows in a targeted way. Often there is little willful control over the elbow joint in the overhead position of the arms and it is not easy to bring the elbow permanently and steadily back to 180° from overstretching. The best way to achieve this control is to use the elbow flexors, for example the biceps (although in some cases the m. brachialis is the stronger flexor). It is observed that many people in the over-head position of their arms are not at all or only with difficulty able to contract the arm flexors deliberately. Helpful in attaining this capability may be the following procedure also described under deliberately contracting biceps :
                        1. sit comfortably and stretch your right arm to the side with the inner elbow and biceps pointing upwards
                        2. bend the arm to 90° in the elbow joint and contract the biceps very strongly, like bodybuilders do with posing. Of course, biceps and triceps work equally strong as agonists and antagonists in a fixed angular position, otherwise a movement in the elbow joint would result. Tension in both muscle groups should be felt very clearly
                        3. Stretch your arm slowly without loosing the tension of the biceps. The further the arm is stretched, the more difficult it is to maintain the tension of the biceps.
                        4. turn your forearm into pronation (palm down), again without loosing the tension of the biceps. This step also requires a lot of attention and effort. For most people, contracted biceps with stretched elbow is completely unfamiliar, especially when the forearm is pronated.
                        5. Suddenly release the tension of the biceps and restore it in a flash, thus interrupting it for a fraction of a second only. Repeat this several times and successively prolong the intervals of the biceps not being contracted.
                        6. Keep on releasing and tensing the biceps with your elbow straight and forearm pronated while slowly lifting your arms into the overhead position. This is done with each arm separately before practicing with both arms at the same time.
                        If this is practiced several times, the ability should be established to contract the elbow flexors in any desired overhead position of the arms. The effect of this contraction is a change in the balance of forces in the elbow joint, which cancels out the effects of overstretching or even overstretching itself. Of course, this tension is very unfamiliar and requires some practice to develop the necessary control and strength, but then a safe and very effective tool is available to prevent overstretching regardless of its magnitude and effect. This method of avoiding overstretching is far superior to the possibility of pushing hands towards each other, because it is not possible to push the hands against each other because:
                        1. much more body awareness and control is established in the particular area
                        2. it trains the arm flexor muscles
                        3. is universally applicable and does not depend on the presence of a wall or floor on which the hands could be pushed towards each other.
                        4. it also works in other positions of the arms than their overhead position, e.g.
                          1. with non-loaded arm in second warrior pose
                          2. with moderately loaded arm in trikonasana
                          3. with heavily loaded arm in vasisthasana and ardha vasisthasana
                        Therefore, it is worth the effort to learn this procedure
                       
                      known issues that can occur even when running correctly


                        head on the floor

                        This variant is impossible for people immobile in the shoulder. It allows a stronger work in arms and back when the head stands almost without weight on the ground or hovers just above the ground. At the same time, of course, it is a clear shoulder opening. Perhaps the most interesting effect lies in the possibility of rolling a little further back on the head after putting it on, in order to give the neck a gentle stretch. This exercise also serves as preparation (recommended for advanced students only) for the complex of postures related to shoulderstand (sarvangasana) and dog headstand. dog headstand
                        instructions details
                        1. Depending on the flexibility of the shoulder, take downface dog with only a little larger (person flexible in the shoulders) or considerably larger (for persons inflexible in the shoulder) distance between hands and feet.
                        2. Stretch your body strongly backwards from your shoulders.
                        3. Now let the shoulders sink further - without slackening the pressure backwards - until the head has reached the desired position. Be sure to turn your arms out strongly and stretch from the shoulders (elevate the shoulder blades). If necessary, cautiously place the head on the floor with some weight. If you put your head on, choose the same area as in the headstand
                        4. You might roll carefully, initially only a few millimetres, on your head backwards. Observe the neck and go carefully to just before its limit
                        1. This exercise should not be performed by beginners and people with neck problems, except when recommended by professionals and under their supervision. Incautious execution can cause neck problems.
                        2. if used properly, this pose may relieve tension in the neck muscles, but not the relatively frequent chronic cramps of the middle trapezius. m. trapezius, which can hardly be treated in any other way than by applying prolonged pressure on the muscle transverse to its longitudinal axis.
                        3. Make sure your hands and feet are resting on a safe surface, and no sudden slipping can endanger the neck.
                        4. keep the arms powerfully active in order to be able to dose the desired effect on head and neck safely and sensitively
                        5. For those who have shoulder mobility, but lack the strength to control the pressure exerted on the head and dose it safely, it is not advisable to practice this variant.
                         
                        known issues that can occur even when running correctly


                          lift and lower wrists

                          This posture is an effective exercise for strengthening the forearm. In many cases, it will be impossible for beginners to execute it.
                          instructions details
                          1. take downface dog
                          2. then transfer pressure from the wrists to the area of the finger ground joints the wrists then should become noticeably lighter.
                          3. increase the pressure evenly so much that the wrists lift off at the same time.
                          4. in the end position, the wrists are convex from above (on the back of the hand) and the finger ground joints concave. The weight rests on index fingers and middle fingers and their base joints, the fingers 4 and 5 as well as the thumb are lifted.
                          1. even though it looks like there's an unhealthy way to hang in your finger ground joints , that is not the case, as there is no significant bending momentum (and in no case on external momentum, das in other comparable poses with increased angles in the finger ground joints , but this angle is held at any time by own muscle power (except for people with extremely worn out finger joints, which can set up the palm of the hand steeply with attached basic joints). Furthermore, there is still a backward pushing momentum (in reverse, for a destructive external moment, the opposite would be necessary).
                          2. don't lose the exorotation of the arms nor the stretching in the elbows
                          3. Make sure that the shoulders do not come forward or up during and after the attempt to lift the wrists. That would be an inadmissible relief
                          4. lift the wrists simultaneously and evenly. Synchronize their movements. This may be impossible at first due to a lack of strength in the forearm muscles (palmar flexors). Then take the pose by lifting off one wrist after the other and practice yourself to put the wrists down as slowly and controlled as possible at the same time.
                          5. if it is not yet possible to take off at the same time, it makes sense for an assistant to provide the missing power, so that a feeling for this unusual movement can be developed.
                          6. Make sure not to roll on the outside of the hand before lifting the wrists, but to raise their inside (inner wrist) and outside at the same time and evenly.
                          7. work without momentum, but rather by slowly steady build-up of force. In most cases, momentum is used to replace strength to overcome obstacles or achieve results. This principle is not called for here, but rather the repeated decision, because
                            1. even more and possibly even more power can be made available and used, and
                            2. the result is possible now and for you
                            in this sense, the exercise is interesting from a psychomental point of view
                          8. In case of a lack of strength, one wrist and then the other is often lifted off the ground. As a very first step, this can be acceptable, but that's all it takes.
                          9. slowly move from the outer hand towards the inner hand until the little finger and ring finger lift off. Then try to lift the thumb as well.
                           
                          known issues that can occur even when running correctly


                            hands on bricks

                            increased downward pressure involves abdomen and hip flexor more
                            instructions details
                            1. take the pose as described above, but don't put your hands on a mat, instead place each hand on a (longitudinally aligned) block..
                            2. press firmly on the block from above to prevent sliding away
                            1. press firmly on the block from above to not slip away. This pose reminds a little bit of the variant "Pressing hands to the ground intensively". Since the pad offers less friction than a (good) mat, the hands must be pressed tighter (vertically) onto the floor. That means, with the available force of gravity, push vertically downwards rather than forwards and downwards. How hard the block has to be pressed down and how you can still stretch from the shoulders depends on the hand moisture and the texture of the blocks. For example, too dry or sweaty hands slip away on wooden blocks rather quickly, medium moist hands on cork blocks offer but quite good hold..
                             
                            known issues that can occur even when running correctly


                              heels on bricks

                              relieves with regard to the strain in the m. gastrocnemius
                              instructions details
                              1. take the pose as described above, but place the heels on blocks.
                              2. Tilt the pelvis into maximum flexion
                              1. Since the block holds the heels raised, the flexibility of the m. gastrocnemius probably no longer plays a role here and does not limit the forward bend so that the pelvis can be tilted more freely. This, in turn, allows the upper body to move more in the direction of the legs and finally to go further into the frontal abduction in the shoulder.
                               
                              known issues that can occur even when running correctly


                                single handed

                                instructions details
                                1. take the pose as described above
                                2. increase the force in one arm and lift the other hand off the ground in order to drop it on the sacrum
                                1. Not only that an arm and the muscles moving it in the trunk have to work and be strengthened considerably more, the asymmetry brings new aspects to this pose, for example the oblique abdominal muscles have to work a little bit or the pectoralis is felt here for the first time as a stabilizing muscle. This is also due to the fact that the center of gravity is no longer centered in the support base.
                                2. don't let your arm turn in. The tendency to this follows from the use of endorotating pectoralis
                                 
                                known issues that can occur even when running correctly


                                  heel on the floor

                                  This position brings more work to the back of the leg.
                                  instructions details
                                  1. take the pose as described above
                                  2. take the posture as described above. From normal downface dog, push the heels down slowly towards the ground.
                                  1. Make sure that the inner heels move downwards just as strongly as the outer heels. Pressing the inner heels downwards (and thus stretching the inner calf muscles) is particularly important for all people, who tend to suffer from shin splint syndrome or do a lot of running.
                                  2. Since the total length of the muscular system between the ball of the foot and the ischial bone (reguarded over all three joints) in this variant is naturally the same as in the normal version, there is an inevitable inclination to let down a little bit of the flexion in the hip by pressing down the heels. Not that this would be avoidable, one should only be aware be aware of this effect and its extent during the transition from one variant to the other in order to obtain information for the other variant. It will usually be the case that the two movements (flexion in the hips and lowering of the heels) will prove as not commutative (order interchangeable), i.e. the result differs with the order
                                  3. The lateral position of the heels should be chosen in such a way that it corresponds approximately to the middle of the forefoot, i. e. the imaginary midlines of the feet are parallel. Often, with the above mentioned inclination to stand more on the outer feet, it is observed that the heels tend to move towards each other. It is more correct to keep the heels rather wider apart, as this corresponds to a minimal endorotation of the legs, which facilitates the hip flexion a little bit.
                                  4. This pose, together with the warroir pose 1st and parivrtta trikonasana, is one of the most useful stretches of the calf muscles. Here, only about a quarter of the body weight is effective, but this variant can be kept for a relatively long time.
                                  5. Note that for a good stretching of the calf muscles due to the biarticularity of the m. gastrocnemius the knee must be fully stretched. As everyone can easily determine, the (stressed) ankle joint can be brought much further into dorsal flexion if the knee joint is bent, because in this case only the limitations of the m. soleus play a role, but not those of the m. gastrocnemius. If the knee is then stretched, the Achilles tendon pulls the foot out of the dorsal flexion a little further. In this sense, the exercise can also be practiced alternatively or better additionally in such a way that only with bent knees the heels are put full on the ground and then one tries to stretch the knees without making the heels lighter, but this requires good flexibility of the Soleus
                                   
                                  known issues that can occur even when running correctly


                                    stretch from bent knees

                                    this variant allows to achieve a better flexion in the hips
                                    instructions details
                                    1. take downface dog position as described above
                                    2. bend the knees and tilt the pelvis further and further downwards (flexion) until the abdominal wall or the lower rib bones come to rest on the thighs. If possible, press these parts firmly against each other
                                    3. build up strong pressure backwards in the arms and start stretching the legs so that the position of the shoulder, upper body and pelvis is maintained, at least to a great extent.
                                    4. Repeat the last two points several times
                                    1. As already discussed elsewhere, the individual movements from which an pose is formed are not necessarily commutative (order interchangable). This fact is used here to achieve better flexion.
                                    2. this variant is indicated when irritation of the origins of the ischiocrural group is present in the ischial bones (usually due to weak constitution and frequent practice of forward bending in beginners), as already discussed elsewhere, see the FAQ
                                    3. Holding the position of the pelvis is strong work in the hip flexor muscles. Since the rectus femoris is one of them Since the hips are almost maximum in flexion and he is involved in stretching the knee, this muscle may have a tendency to cramp. Then try to work more with the "lifting" of the ischial bone to keep the pelvis tilted forward (maximum flexion in the hips)
                                    4. while you are stretching your legs again, ideally the position of the shoulders and upper body should not change, which usually is hardly possible. To approach this ideal push the shoulders maximum backwards in the best possible way, and - in contrast to the normal dog position - rather downwards.
                                    5. The stretching of the knees should be done slowly and carefully and will require some effort when the hip flexors and arms are used vigorously. With increasing stretching of the knees, the stretching sensation in the back of the leg (ischiocrural group) must also increase. If the exercise is done well, it is almost impossible to stretch the legs completely and requires a lot of effort and time.
                                     
                                    known issues that can occur even when running correctly


                                      (P) with 1 assistant

                                      instructions details
                                      1. There are several useful application options for an assistant, which deal very precisely with the specific weaknesses of the performer, see under details
                                      2. it makes sense to apply these corrections from time to time, so that the performer can find out how far he has already implemented the individual details of the pose affected by them.
                                      1. the possible corrections in detail:
                                        1. tilting the pelvis (further into the flexion) by pushing with both hands (one above the other) on the sacrum
                                        2. exorotate the arms; for this, with your hands grasp around the middle of the upper arms of the performer so that your thumbs are inside and your fingers are outside. Slowly turn the arms out (exorotate). If the elbows tend to bend, they can be pushed together at the same time as the arms are turned out, in order to restore the stretching of the elbows.
                                        3. the pressure on the sacrum, which goes parallel to the legs in order to move the heels further towards the ground
                                        4. the pull on the hips by an assistant standing behind the performer, which makes it easier to stretch out of the shoulders. Often through this assistance this movement is experienced for the first time. If the traction becomes too strong, the hands of the performer may lose contact with the ground.
                                        5. the pull on the thighs, in which the assistant with crossed arms grabs the front of the thighs from behind and pulls his legs towards him. This pull triggers a tendency to endorotate the legs, which counteracts the slight tendency to exorotate, which is often observed (the heels then move inwards) as a result of the use of hip flexors..
                                        6. the pressure on the shoulder area (middle of the spine between the shoulder blades) with which the assistant presses the shoulder in the direction of the connecting line between the ankle joints of the performer. This can be combined with the exorotation of the arms when applying pressure to the shoulder area with the head. The pressure on the shoulder area should not be applied to people who are already very flexible in the shoulder.
                                        7. correcting the fingers and metacarpophalangeal joints, the inner joints of which generally lift off or are at least too light. In people with shortened finger tendons, the prolonged pressing down of the elevated joints also can be required
                                        8. pressing down the heels, best done by the assistant grabbing with the thick toes and the other toes from both sides around the upper heel area of the performer, i. e. holding the Achilles tendon between the 1st and 2nd toes and slowly pushing the heel of the performer further down.
                                      2. like all corrections, these are to be carried out carefully, slowly increasing and respectfully, but without any wrong consideration, which mostly originates from one's own unreal ideas or fears, but with understanding and quick and intelligent reactions to possible objections or complaints of the performer. It is also very important that the use of force at the end of the correction is slowly and not abruptly reversed so that there are no reflective tensions in the musculature.
                                       
                                      known issues that can occur even when running correctly


                                        (P) with 2 assistants

                                        instructions details
                                        1. the variant with 2 assistants is a combination of two of the above mentioned corrections
                                        2. known and more frequently used combinations are the combinations listed under Details.
                                        1. good combinations in detail:
                                          1. Pulling on the thighs and turnign out the arms
                                          2. Pressure on the sacrum for further tilting of the pelvis and unscrewing of the arms with the use of the head to push the shoulder section down
                                          3. Pressure on the sacrum to push down the heel and press down the heel with the feet.
                                        2. for execution, the above (1 assistant) applies.
                                         
                                        known issues that can occur even when running correctly


                                          (P) with 3 assistants

                                          instructions details
                                          1. the variant with 3 assistants is a combination of three of the above mentioned corrections
                                          2. known and more frequently used combinations are the combinations listed under Details.
                                          1. the combinations in detail:
                                            1. Pulling on the thighs plus unscrewing of the arms (possibly with the use of the head to push the shoulder section down) plus tilting pressing on the sacrum.
                                           
                                          known issues that can occur even when running correctly


                                            (P) with 4 assistants

                                            instructions details
                                            1. the variant with 4 assistants is a combination of four of the above mentioned corrections
                                            1. Pulling at the thighs plus turning out of arms plus pushing down of the heels plus pressure on the sacrum tilting the pelvis
                                             
                                            known issues that can occur even when running correctly


                                              shrugging

                                              this variant makes the movement of stretching out of the shoulders more obvious
                                              instructions details
                                              1. take the posture as described above and stretch out of the shoulders backwards-up
                                              2. now give up the stretching out of the shoulders backwards-up, so that the shoulder area and with it the upper body slowly sinks to the maximum in the direction of the wrists.
                                              3. then slowly stretch out of the shoulders backward-up to the maximum.
                                              4. Repeat the last two steps at least until the movement is completely clear and can be carried out without problems and at any tempo.
                                              1. In cases of significant limitations of flexibility in the shoulders, the two conditions described above (outstretched and sunken) may be identical from the outside. The performer may in some cases have made a willful effort to move on to the other state, but the impulse may be fully absorbed by the resistance of the antagonistic muscles. In other cases, the performer is not even aware of what he or she should do, not least because he or she cannot identify any of the described options for action. Before this the attempt is given up, an assistant should first try to assist the performer in the movement by periodically starting and stopping pulling on the pelvis or thighs.
                                              2. the sunken state can be perceived as less pleasant, since there is a tendency for the m. trapezius to be more prone to cramp than in the stretched out state.
                                              3. Be careful not to confuse the sinking in with the bending of the arms, but to keep them constantly stretched out by the force of the triceps.
                                              4. Make sure that the exorotation of the arms is not lost, which can often be observed when fully stretching out from the shoulders.
                                              5. movements should be possible at any speed, especially not only jerky, but also slow flowing - also for better control over the stretching and turning of the arms for the following reasons
                                              6. often the shoulders move forwards or forwards and upwards when sinking in, which will be the case especially with limited flexibility in the shoulders. An assistant can then be called in to prevent this. If the ability is given to bring arms and back into a plane in downface dog, neither the upper body nor the arms should leave this plane. If there is even better flexibility and the angle of the frontal abduction is greater than 180°, the arms and back should maily remain in their own planes with the movement undertaken here.
                                              7. even if it is not primarily about the work in the hands, try to keep your hands completely still and not to relieve the inner finger joints in between.
                                               
                                              known issues that can occur even when running correctly


                                                hands on a carpet

                                                the lower friction on the carpet lets the hands slip away slowly but surely, which can only be prevented with a different than the usual work.
                                                instructions details
                                                1. don't put your hands on the exercise mat, but on a piece of carpet, so that they slip away slowly when your dog is in a certain position.
                                                2. press your hands so tightly on the floor that slipping stops.
                                                1. the slipping away is to be prevented by using the power of the hip flexors to move the upper body and thighs towards each other and to transfer this power through the abdominal muscles, the pectoralis, the arms to the hands. The hands are not pushed away from the feet as usual in downface dog, but are powerfully pressed vertically down onto the ground and a little bit towards the feet.
                                                2. With significant use of force, the work of the abdominal muscles may become noticeable, possibly with a more or less pronounced tremor.
                                                3. Possibly, the muscles of the frontal adduction of the arms, i. e. chest muscles and latissimus dorsi, can also be felt.
                                                4. possibly work in the shin muscles (m. tibialis) starts
                                                5. Depending on the moisture of the palms of the hand, the hands may not slip. Other materials can then also be used to cause the slipping
                                                 
                                                known issues that can occur even when running correctly


                                                  chest towards one leg

                                                  instructions details
                                                  1. take the pose as described above
                                                  2. move the chest to the right leg
                                                  1. this variation is deliberately asymmetrical, which increases the stretching in one shoulder and in the ischiocrural group and possibly also in the m. gastrocnemius of one leg.
                                                   
                                                  known issues that can occur even when running correctly


                                                    one leg bent

                                                    instructions details
                                                    1. take the pose as described above
                                                    2. bend a leg clearly or lift the foot off the ground and put the leg or the foot behind the leg remaining on the ground.
                                                    3. lower the heel of the leg remaining on the ground further to the ground and tilt the hips into maximum flexion
                                                    1. Here the load is distributed on one of the two legs, which results in increased stretching both in the ischiocrural group of the same leg and in the calf muscles, in particular because of the stretched knee in the Gastrocnemius. Finally, the load of the body (or about half of it) is no longer carried by two calves but only by one and this must carry also the load of the other leg!
                                                    2. in some cases, the heel of the leg that remains on the ground can be placed on the floor. Then it has to be distinguished: if the feeling of stretching in the calf muscles is still very intense, the posture can be carried out in such a way; if it has become smaller as a result, the distance of the hands to the one foot on the ground should be increased until the heel again floats just above the ground and again can move towards it.
                                                    3. in rare cases the resulting stretching in the calf is felt to be too severe, which is probably in relation to the muscular robustness of the calf. Then the posture must be varied and softened that there is no danger of cramping due to overloading, either by only light (!) active lifting of the heel or better by reducing the distance between the foot and the hands or by a small pad under the heel. In cases where this necessity arises, the calf muscles should be practised more frequently in strengthening postures such as warrior pose 1st, parsvottanasana, parivrtta trikonasana, vrksasana (the tree) und auch . warrior pose 3rd, also backwards against the wall
                                                     
                                                    known issues that can occur even when running correctly
                                                    1. Cramping tendency with weak calf muscles
                                                      As already described in the details, a tendency to cramp can occur with rather weak calf muscles under intensive stretching and at the same time a high load. This is of course to be avoided and any cramps that may occur are to be stopped immediately. In order to counteract this tendency, the calf muscles should be strengthened, various sports activities are basically suitable for this purpose, but above all the postures described above, as they give more strength and flexibility at the same time.


                                                    one leg stretched in front (hip opening 5)

                                                    one-sided, intensive stretching of the ischiocrural group
                                                    instructions details
                                                    1. take the pose as described above
                                                    2. bring the right foot forward, approximately centered between the hands (i. e. the heel at the level of the wrists)
                                                    3. press the upper body maximum on the thigh of the front leg
                                                    4. hold the just established contact and slowly stretch the front leg so that the contact is not lost or at least the distance remains as small as possible.
                                                    1. the front leg tends to turn outwards, prevent this by moving the inner knee and the inner foot strongly downwards.
                                                    2. the front inner foot tends to become lighter or even lift off, so consciously push it downwards, which also makes the above correction easier.
                                                    3. the rear leg remains in the downface dog, the foot therefore points straight forward, the heel moves towards the ground
                                                    4. For almost all people it is possible to make more or less strong contact between the thigh and upper body after pulling the leg forward. For beginners, especially in the ischiocrural group quite stiff ones, it is often not possible to maintain this contact when stretching the front leg, it is often lost after the first 20° extension in the knee (compared to the initial position with the upper body on the thigh).
                                                    5. the hip belonging to the front leg should be moved up and backward so that the pelvis remains straight and does not turn away as an evasive movement of the front leg
                                                    6. this variant can be carried out better if you perform forwards bends like e. g. uttanasana beforehand.
                                                    7. the forehead may be placed on the lower leg and remain there while the leg is stretched
                                                    8. in this posture both feet move away from each other as well
                                                     
                                                    known issues that can occur even when running correctly


                                                      narrow

                                                      Emphasis on the stretching of the ischiocrural group
                                                      instructions details
                                                      1. take the posture as described above, but choose the distance of the hands to the feet a full hand length (measured including the fingers) smaller than normal, with a reasonably good extensibility of the ischiocrural group maybe two hand lengths.
                                                      1. in this variant it is much harder to stretch the back so that it could become straight or even slightly concave. Instead, in most cases it remains clearly convex
                                                      2. the heels may be able to reach the ground, even if this is not possible in the normal dog pose
                                                      3. The main work here is in the flexion of the hips, i. e. in tilting the pelvis forward into flexion in the hips, which subjectively feels like pulling up the ischial bones.
                                                      4. Often the shoulders do not reach the connecting line between wrists and ischial bone.
                                                      5. due to the limited overall length of the muscles in the back of the leg, it is often possible to either bring the pelvis into maximum flexion or to press the heels onto the floor, which is generally the case for all dog pose variants, but is particularly noticeable in this case.
                                                      6. Possibly the focus shifts during work in the shoulders from the usual stretching out to pushing backward (in the direction of the toes)
                                                      7. note that the movements of the shoulder and the pelvis are partly dependent on each other, i. e., if you allow the shoulder to evade upwards, the flexion in the pelvis will often subside and vice versa, if the pelvis is tilted further, it is easier to move the shoulders in the direction of the legs.
                                                       
                                                      known issues that can occur even when running correctly
                                                      1. Cramping tendency in rectus femoris
                                                        Shoulder mobility plays a smaller role in this variant than in other distances, so the upper part of the body can be moved more easily and more closely to the thighs, which means that due to the smaller angle in the hips the m. rectus femoris has a greater tendency to cramp. Try to work more with the hip flexors located in the pelvis, the m. iliopsoas, which feels like pulling up your buttocks and ischial tuberosity.


                                                      narrow with hands on the wall

                                                      supports the backward and down pushing of the shoulders and thus tends to support flexion in the pelvis
                                                      instructions details
                                                      1. take downface dog with close distance as described above, but push your hands against the wall, your thumbs pointing inwards and the remaining fingers outwards.
                                                      1. Here the shoulders can be pushed a little better backwards-downwards, as the hands can not only be pressed against the wall but also lifted (thus made lighter by the strength of the shoulder muscles) without they would tend to slip more easy. This results in a better movement of the upper body in the direction of the legs and an increased stretching of the ischiocrural group, possibly additionally of the m. gastrocnemiums of the calfes
                                                       
                                                      known issues that can occur even when running correctly
                                                      1. Pressure sensation in the inner edges of the hand
                                                        Some people find the pressure on the wall, especially in the area of the finger ground joint of the index finger, unpleasant. Here you can with the help of a patch try to generate more softness and better pressure distribution


                                                      hands outward

                                                      erleichtert die Exorotation der Arme
                                                      instructions details
                                                      1. take the posture as described above, but turn your hands (finger-sided) as far as possible outwards
                                                      1. The hands twisted into the ulnar abduction give a little extra space to turn out the arms. Make maximum use of this effect
                                                      2. For beginners who intensively practice downface dog, it is sometimes observed that the shoulder muscles show a clear tendency to fatigue, cramps and burning. This is due to the emphasis on strengthening these muscles in the "over-head position" of the arms, i. e. at (at least) 180° frontal angle of the arms to the upper body. In these cases, this variant may prove to be a small relief
                                                      3. the arms turned out further reduce the tendency of m. trapezius in this pose
                                                      4. in case of difficulties of different kinds in the wrist or hand, for example after surgeries or injuries, it is worth trying this alternative
                                                       
                                                      known issues that can occur even when running correctly


                                                        hands inward

                                                        instructions details
                                                        1. take the pose as described above, but keep your hands as far as possible turned inwards, thus in radial abduction
                                                        1. this posture may prove to be a pleasant stretching of the muscles of the outer (ulnar) forearm in some cases.
                                                        2. The ability to eliminate the "mouse holes", especially the inner finger joints (index and middle fingers) can be noticeably reduced here.
                                                         
                                                        known issues that can occur even when running correctly


                                                          (P) turning arms

                                                          gives a feeling for maximum exorotation of the arms
                                                          instructions details
                                                          1. the assistant sits or kneels in front of the performer
                                                          2. he grasps with his hands around the upper arms so that the fingers lie outside and the thumbs inside
                                                          3. with a slow increase in force, he turns the upper arms further and further until the practioneer gives the signal to keep it.
                                                          1. Make sure that the upper arms are evenly grasped so that the development of haematomas (blue spots) is avoided as far as possible. In cases of very weak connective tissue, these can possibly not be completely avoided.
                                                          2. in cases of very voluminous upper arms (especially if very muscular) it may not be possible to sufficiently grip the upper arms. Then you can work with 2 assistants, each of which grabs and turns one arm. A precise feedback from the prationeer is then necessary to ensure that the turning is carried out evenly.
                                                          3. By exorotating the arms, a bending inclination of the elbow can be corrected at the same time, if necessary, by pushing the upper arms towards each other, after all, each correction of one dimension of motion influences the other two.
                                                          4. this correction can be easily combined with pressing down (and pressing the upper part of the body) of the shoulder area when the head is used for this purpose.
                                                          5. Make sure that the inner hands esp the inner finger ground joints do not become lighter or lift off. Keeping them firmly pressed to the ground is one of the challenges of this variant.
                                                           
                                                          known issues that can occur even when running correctly
                                                          1. Haematoma in case of weak connective tissue
                                                            In cases of weak connective tissue and, of course, hemophilia, haematomas (blood effusions) may develop due to the pressure on the upper arms, but these should be harmless and disappear completely on their own


                                                          (P) stretch from bent knees

                                                          Improvement of the flexion in the hips (forward bending)
                                                          instructions details
                                                          1. take variant "stretch from bent knees" as described above
                                                          2. The assistens is at the head of the performer
                                                          3. after bending the knees, the assistant supports the tilting of the pelvis by pressing the sacrum downwards (in the perspective of the performer to his feet) and tries to hold the position of the pelvis, in particular its inclination, while the performer stretches the knees with force against the resistances of his own muscles on the back of his leg(ischiocrural group) slowly trying to minimize the evasion of the upper body and shoulder to the front (in direction of the hands)
                                                          1. in most cases stretching the legs will cause the angle of the pelvis (to the ground - best observed on the sacrum) to increase again. Only when very flexible in the ischiocrural group the position of the pelvis can be kept, may even the initially made contact of the trunc (lower rip bones) with the thighs can be maintained with stretched knes.
                                                          2. for the assistant it will be optimal if he presses with both hands lying on top of each other (at an angle of approx. 30°-60°) on the sacrum of the performer. His stand must be firm, as the forces that the practitioner applies when stretching the legs and as a result of the evasive movement of the pelvis are great. Probably the assistant will have to use a part of his body weight by shifting the centre of gravity
                                                          3. the above made remarks apply here
                                                           
                                                          known issues that can occur even when running correctly


                                                            (P) pushing on the sacrum

                                                            instructions details
                                                            1. This variant corresponds to the static end position of the afore described variant, but the pressure on the sacrum is slowly increased and thus the attempt is made to tilt the pelvis further into the flexion.
                                                               
                                                              known issues that can occur even when running correctly


                                                                shift from outer to inner hand

                                                                provides a feeling for the right movement of the hand
                                                                instructions details
                                                                1. take the pose as described above
                                                                2. shift the weight away from the inner palm to the outer palm and there from the finger ground joints to the wrist.
                                                                3. on the outer edge of the hand roll as far as possible in the direction of the base joints (palmar flexion), so that you can bring maximum weight to the small finger joint area.
                                                                4. roll off the hand from outside to inside while retaining the palmar flexion. (pronation) until you reach maximum weight on the palm - and there, above all on the index finger base joint area
                                                                1. the two movements should first be practised separately (first roll on the outer edge of the hand, then roll from the outer hand to the inner hand), then combined as diagonal movement from the ulnar wrist side in the direction of the index finger base joint. When the weight has been moved away from the outer hand and wrist, the fingers should press moderately and evenly on the ground, especially the different finger joints should exert even pressure.
                                                                2. the fingers should press moderately and evenly on the floor, in particular the different finger joints should exert even pressure
                                                                3. Take care to keep the exorotation of the upper arm as far as possible during pronation. These movements contradict each other above a certain level
                                                                4. It is frequently observed that with the initial rolling onto the outer hand the arm is simultaneously bent. Avoid this by ensuring that the arm is stretched evenly throughout the entire procedure
                                                                5. the shift of weight away from the outer hand should not be done by turning in the arm but in spite of maximum turning out of the arm
                                                                 
                                                                known issues that can occur even when running correctly


                                                                  with reversed feet

                                                                  instructions details
                                                                  1. take the pose as described above, but don't stand on the underside of your toes and balls of the feet, but reverse your feet over and stand on the back of your feet.
                                                                  2. don't push your hands forward as usual, but pull your hands towards your feet.
                                                                  1. This pose represents the analogy to upface dog with reversed feet. As expected, other parameters change with the changed foot position. The most important is the direction in which the hands push: this time in the direction of the feet instead of away from the feet. This increases the flexion in the hips and the movement of the upper body towards the thighs, regardless of the flexibility of the shoulders and whether or not the shoulders sink below the connecting line between the wrists and the pelvis. At the same time, with the work of the hip flexors and the movement of the arms, a possibly unexpectedly strong work of the pectoralis and rectus abdominis occurs.
                                                                  2. The work of the palmar flexors of the forearm is far less important here than in the other variants, as they can no longer be used for the movement of the upper body.
                                                                  3. a certain amount of trembling, especially in the abdominal muscles, can occur during pose and is harmless.
                                                                  4. the forces acting on the ankle joint could pull it out of the dorsal flexion. Let the heels still sink as best as possible. Presumably the work of the arms will not be carried out in such a strong way that the weight of the part of the body acting on the ankles would not outweigh it. Use the calf muscles for stretching the feet only so strongly that they do not cramp
                                                                  5. Do not choose the distance between feet and hands too small so that the metatarsophalangeal joints of the toes are bent well towards the plantar plane and the tension of the foot lifter muscles is clearly outweighed by the effect of gravity and the ankle does not fall into dorsiflexion by itself.
                                                                   
                                                                  known issues that can occur even when running correctly


                                                                    transition to supta virasana

                                                                    Part of the extended sun salutation
                                                                    instructions details
                                                                    1. take downface dog position as described above
                                                                    2. bend the knees
                                                                    3. roll over the toes on their topsides
                                                                    4. with dorsal flexion in the ankle place the knees on the floor less than hip wide at the resulting distance.
                                                                    5. turn out your calves with your hands
                                                                    6. sit slowly and cautiously (note the sensitivity of the knees) with the bottom between the feet on the ground until the ischial bones give maximum weight to the ground.
                                                                    7. push your buttocks with your hands in the direction of the knees (the part that lies on the floor) while you drop the upper body backwards, first resting on the elbow and later maybe with your head and back on the floor.
                                                                    8. put the pelvis as flat as possible (hip bone downwards) with the power of the butt muscles.
                                                                    1. the knees must be well prepared for this transition. If the thighs were not sufficiently warmed up with poses like e. g. or the knees "refuse" against this transition according to subjective estimation, it should not be practiced. Esp. for people whose knees crack once and more or less clearly with further flexion (meaning not the "smacking" reproducible at every flexion of the knee) it is recommended to wait for the knee to creack before practicing this transition with appropriate preparations since the condition before creacking probably represents a kind of slight subluxation in which the knee should not be strained.
                                                                    2. if this transition is practiced as a part of the extended sun salutation, the supta virasana should be kept longer in the first runs, so that the knee and thigh muscles can warm up and adapt.
                                                                    3. if you are more experienced and the muscles are stretched and warm and the knees are in good condition, this transition takes less than three seconds. If one of these conditions is missing, use much more care and time for this transition!
                                                                    4. gently bring the knees to the ground and tilt the pelvis with the powerful use of hip extensors, so that there are no disturbances of well-being in the area of the lumbar spine. Support with the arms appropriately
                                                                     
                                                                    known issues that can occur even when running correctly


                                                                      transition to uttanasana

                                                                      elegant jump into uttanasana
                                                                      instructions details
                                                                      1. take the pose as described above
                                                                      2. bend the knees
                                                                      3. Jump softly and silently between your hands with your feet, using your arms to slow down the landing.
                                                                      4. Align the body to uttanasana and stretch your legs.
                                                                      1. as many jumps this can cause "mind trouble", i. e. psychomental processes or circumstances may block the willingness to jump. This is also known from the reverse jump from uttanasana into downface dog. Often a real simultaneity is avoided and one tries to pull the second leg after as soon as possible after having jumped with the first leg. In any case, an asymmetric movement of the legs and a non-simultaneity in the landing of the feet could be seen then. For this jump, it is important to develop confidence in the power of the arms, that they can control the movement of the upper body and thus also guarantee the safety of the head. A variety of exercises are available to develop the power of the arms and the confidence in them and their capabilities. The more pronounced these two factors (trust and strength) are, the more one can try to slow down the landing, as if to stand in the air for fractions of a second and refuse to land as gravity would induces. The speed of the feet's landing cannot be influenced, of course, except via the arms (and the exact position of the feet), gravity inevitably affects the body over time in flight and establishes a stable position any possible way. If experienced practioneers achieve a good visible deceleration of the landing, this is the result of a well-coordinated jumping movement in which the landing is delayed by the power of the forearms, the triceps, the shoulders and the back muscles. In a hypothetical limit of the jumping process, the jump could be carried out in such a way that the centre of gravity gets under the hands, the forearms of the palmar flexors fix the angle of the arms to the ground, the triceps hold the arms half stretched into the elbows, the shoulders together with the muscles of the upper back hold the position of the upper body, the back muscles hold the upper body and the butt muscles toghether with the ischiocrurals hold the legs. Then, sufficient strength in all the muscles involved and corresponding flexibility in the wrist for this distinct dorsal flexion in the writs under heavy load provided, the jump would be frozen in the air. In every real workout, one tries to approach this and to let the corresponding muscle groups work as much as possible and to learn how to get the body's centre of gravity more and more favourably. With the more courageous practitioner, when he deals with this jump more intensively, he usually experiences a situation in which he misestimates a little bit and threatens to tip over to the front. This is a sign that the centre of gravity was already quite close the the theoretical optimum, but the muscels have not yet worked (or was able to do so) appropriately to deal with it. In addition to the strength of the palmar flexors, another important limitation is the flexibility in the sense of dorsal flexion in the wrist, so that the maximum achievable angle can easily be reached or even exceeded with bold execution.
                                                                      2. Land as gently and quietly as possible. This will require some practice and effort (see remark above)
                                                                      3. Land on the whole feet, not first with the heels or the balls. the feet don't have to perform a rolling movement when putting on the feet
                                                                      4. During landing the muscles of the forearms, shoulders and upper back should be felt clearly working.
                                                                      5. After landing the feet, all you need to do is to raise the pelvis a little and stretch your legs and arms; the centre of gravity should already fit and the shoulder area should be way down..
                                                                       
                                                                      known issues that can occur even when running correctly


                                                                        transition to ardha vasisthasana and back

                                                                        instructions details
                                                                        1. take the pose as described above
                                                                        2. lift your left hand off the ground
                                                                        3. turn the upper part of the body to the left, roll from the right ball of the foot to the right outer edge of the foot, place the left inner foot on the right, let the pelvis sink and stretch in the hips to 0° flexion.
                                                                        4. stretch your left arm towards the ceiling
                                                                        5. exorotate both arms, the upper palm faces the field of view
                                                                        6. bring the pelvis into the connecting line between the ankles and the sternum
                                                                        7. for the way back to the downface dog, take your left arm out of the pose, loosen the left inner foot from the right, come back to the right ball of your foot.
                                                                        8. turn your upper body to the ground and place your left hand shoulder-width away from the right hand on the ground
                                                                        9. tilt in the hip (maximum flexion) while you move your upper body to the thighs and align it exactly for downface dog.
                                                                        1. The distance of the right hand to the right foot should be such that the wrist is about one hand's own length (without fingers) from the perpendicular point of the shoulder (vertical projection onto the ground).
                                                                        2. The transition requires some strength in the forearm muscles and the shoulder in order to be able to handle the changes of the centre of gravity and force well. If you skimp on the use of this muscles, the transition is likely to become very unsteady, sometimes ending on the own buttocks.
                                                                        3. the transition back into the dog happens with elegant swing. The hand is firmly put on, the pelvis is moved backwards and upwards with a swing. As with the transition from upface dog to downfacedog, the force exerted can be shifted from the hip flexors to the shoulder.
                                                                         
                                                                        known issues that can occur even when running correctly


                                                                          transition to upface dog

                                                                          instructions details
                                                                          1. take the pose as described above
                                                                          2. continue to push the body strongly backwards, give up the work of the hip flexors and push the pelvis downwards with the use of the butt muscles and against the resistance offered by pushing the body backwards.
                                                                          1. continuously and strongly push backwards. Both poses contain this as an important feature. The heels are at any time maximum backward-down. There is no point in time when the heels or the whole body could be pushed further back with little effort. The aim of the transition is to keep the shoulders as little as possible forward while pushing the pelvis down. If one succeeds in pushing the shoulder strongly backwards, the strength required in the pelvis for the transition becomes increasingly greater until the hips are stretched, after that it becomes easier, which must not seduce however to work less then with the butt muscles on the extension in the hips, after all the wellbeing of the lower back in upface dog depends on it. From the point where the hips are stretched, the shoulders can be pushed a little further back for geometrical reasons. The transition is thus driven by the hip extensors, which push the pelvis downwards against the resistance of the shoulders. If it is carried out intensively, the lumbar and thoracic spine curves towards the convex at a very early stage in the transition.
                                                                          2. in downface dog, the upper body moves as far away as possible from the hands, which includes the movement of the shoulder blades towards the cranial (in the direction of the head). In upface dog, it is the reverse (depression of the shoulder blades). The transition is thus also a transition in the movement of the shoulder blades
                                                                          3. The hands push onto the ground all the time as much as possible to prevent lighter finger joints. In addition, the palmar flexors counteract the forward movement of the shoulders and thus offer additional resistance to the pelvic muscles (in addition to the resistance provided by the shoulders). In all cases, however, the strength of the pelvis is likely to be greater than the sum of the forces that can be applied from the forearms and shoulders, so that no matter how hard you press your shoulders backwards, the transition will be possible for the pelvic muscles are superior strong in relation to the shoulders. From what has been said, however, it is also clear that this is an pose or a transition, which makes it possible to strengthen the shoulder muscles as much as you like, provided that the hands and feet do not slip away. Moreover, this strengthening takes place over a very wide angular range, from approx. 180° frontal abduction in the direction (depending on the mobility of the hip flexors) of approx. 0° frontal abduction, i. e. over the entire range, which makes this strengthening all the more valuable and underlines its harmonic and harmonizing effect on the shoulder muscles. The changed angle in the wrists has a direct influence on the ability to push down the finger joints, so that the unwanted "mouse holes" in the downface dog may become larger.
                                                                          4. Often the idea of pushing the pubic bones forward and downwards against all resistance is felt helpful, while trying to push the body backwards with arms/shoulders as much as possible.
                                                                          5. While in downface dog the exorotation of the upper arms from the shoulders is clearly restricted - and also the range of the rotation - the exorotation in upface dog is a much larger one. For the transition to upface dog, this means that the upper arms are increasingly turned out further, to achieve a maximum exorotation at all times, which does not necessarily increase the ability to push down the inner finger joints in the upface dog. Quite the reverse, the further exorotation in upface dog aggravates pushing down the finger joints
                                                                           
                                                                          known issues that can occur even when running correctly


                                                                            transition to downface dog with stretched feet

                                                                            instructions details
                                                                            1. take downface dog as described above
                                                                            2. move the pelvis a little bit forward-down, rolling on your toes on the back of your feet.
                                                                            3. when the pelvis has sunk to its maximum and the butt muscles are working at their maximum, push your hands in the direction of the feet in order to push the pubic bones forwards and downwards.
                                                                            4. increase the distance between hands and feet so that the wrists are slightly before the shoulders
                                                                            5. keep the upper body lifted to the maximum, move the shoulder blades downwards and to the spine and push the hands backward to the maximum
                                                                            1. When both dog positions (head up and head down) are practiced alternately, the distance of the hands to the feet is then measured in such a way that in upface dog the wrists are slightly behind and not in front of the shoulders. For this variant of upface dog however, a larger distance is required (see there) with the wrists standing just in front of the shoulders, which means that the distance in the preceding downface dog should be increased a little bit.
                                                                             
                                                                            known issues that can occur even when running correctly


                                                                              transition to parsvakonasana

                                                                              instructions details
                                                                              1. take the pose as described above
                                                                              2. put your right foot to the left of your right hand, with your left hip stretched
                                                                              3. release the left hand from the ground
                                                                              4. turn the upper body as far as possible to the left and turn the rear left foot by 70° to the left so that the left heel and, if possible, the entire sole of the foot is placed the ground.
                                                                              5. take the left arm into the elongation of the left side of the trunc, turn it out, stretch it away from the trunk (the elevation movement of the shoulder blades)
                                                                              6. press the right thigh against the right arm
                                                                              1. Provided that the hips are halfway flexible, this transition should not pose any particular difficulty, and the body's centre of gravity will not change significantly. The distance of the foot placed next to the right hand to the rear foot should be such that the front lower leg is approximately vertical.
                                                                              2. take care to hold the front thigh vertically and to push it backwards by its own force
                                                                               
                                                                              known issues that can occur even when running correctly


                                                                                transition to stick pose

                                                                                instructions details
                                                                                1. take the pose as described above
                                                                                2. bend your arms in their own plane to the side, so move your elbows outwards to aim at the ground with your head.
                                                                                3. Place the head on the ground as soon as possible when bending the arms further and drag it forward over the ground until stick pose is taken
                                                                                4. on the further way into stick pose put the upper arms to the side of the upper body and complete the stick pose
                                                                                1. The transition from the downface dog to stick pose is one of the utmost powerful transitions in yoga. The upface dog is neither taken nor something similar is taken !
                                                                                2. with flexible shoulders the head can be put on the ground with a slight bending of the cervical spine already in downface dog
                                                                                3. the butt muscles inactive in downface dog must work in stick pose, the buttocks moving away from the back. Pelvis, shoulders, heels and head are at the same height above the ground, hips are stretched. A raised pelvis, a curvilinear back or shoulders that are held too low (together with a curved back) are attempts to ease the pose.
                                                                                4. Also during the transition and of course in stick pose, push the body backwards to hold the heels at all times as far back- down as possible, i. e. the ankles are always in maximum dorsal flexion.
                                                                                5. As soon as the head reaches the floor for the first time on its way into stick pose, the shoulders move horizontally forward until stick pose is taken properly. In stick pose keep the head in elongation of the thoracic spine.
                                                                                6. Make sure to keep the center lines of the feet in vertical planes, i. e. do not to let the heels move inwards.
                                                                                 
                                                                                known issues that can occur even when running correctly


                                                                                  (P) transition to stick pose with pelvis on a thumb

                                                                                  instructions details
                                                                                  1. take the pose as described above
                                                                                     
                                                                                    known issues that can occur even when running correctly


                                                                                      transition to dog elbow pose

                                                                                      instructions details
                                                                                           
                                                                                          known issues that can occur even when running correctly


                                                                                            transition to downface dog against own shoulder force

                                                                                            instructions details
                                                                                                 
                                                                                                known issues that can occur even when running correctly


                                                                                                  (P) transition to downface dog against resistance

                                                                                                  instructions details
                                                                                                       
                                                                                                      known issues that can occur even when running correctly


                                                                                                        transition to uttanasana backward

                                                                                                        instructions details
                                                                                                             
                                                                                                            known issues that can occur even when running correctly