uttanasana
"intensive stretching"

Feedback to: postmeister@yogabuch.de
last updated: 11.8.2017
name: uttanasana
trivial name: intensive stretching
level: B
classification .
classically: standing forward bend
psychomentally: . calming down, slightly introverted
physiologically: . intensive stretching of the ischiocrural group
effects:
preparations:
  • Since uttanasana is in practice much more problem-free and effective than sitting forward bends and is the simplest form of standing forward bends, it is difficult to indicate preliminary exercises. Rather we can give synergistic poses:
    1. parsvottanasana is, not least due to the asymmetry, considerably more intensive and has a slight balance component.
    2. prasarita padottanasana
    3. trikonasana effective in the leg to which the upper part of the body is moving, if you support yourself sufficiently deep enough
    4. parivrtta_trikonasana effective in the front leg
    5. ardha chandrasana effective in the standing leg
    6. parivrtta ardha chandrasana effective in the standing leg
    7. warrior pose 3rd effective in the standing leg
    8. hip opening 5 very effective stretching going beyond the uttanasana for the ischiocrural group
    of course, all sitting forward bends are also synergistic, but uttanasana would be used more as a preparation for them than vice versa:
    1. janu sirsasana
    2. ardha_baddha_padma_pascimottanasana
    3. tryangamukhaikapada_pascimottanasana
    4. upavista konasana forwand bend
    5. parsva upavista konasana
    6. parivrtta janu sirsasana
    7. parivrtta parsva upavista konasana
    8. pascimottanasana
    Poses that could be considered as preparation for uttanasana are:
    1. back stretching, also in step position
    2. downface dog and its single-legged variants
  • very rarely the muscles of the back are so tense that uttanasana is very uncomfortable, then try out:
    1. karnapidasana
    2. parsva upavista konasana
    3. the "desk"-variant of uttanasana
    4. headstand
    5. shoulderstand
  • post practice poses:
  • quite rarely and especially with still low flexion ability in the hips the uttanasana tends to discomfort in the muscles of the lumbar spine, then the following poses can be tried:
    1. downface dog and its single-legged variants
    2. warrior pose 1
    3. parivrtta_trikonasana
  • if the the neck shows complaint due to the slight passive forward bend in uttanasana, try:
    1. karnapidasana
    2. headstand
    3. shoulderstand
    4. pushing the head onto the floor
  • similar asanas:
    diagnostic hints (Nos.):
  • (880) overstretching knees: overstretching the knee is the ability to reach or even the current state of having an angle of more than 180° in the knee joint. To a certain extent, this is considered normal for the anatomists and is on average more widespread and pronounced in the female sex. However, it can also indicate a weakness of the quadriceps or the hamstrings. Furthermore, unphysiological sensations often occur in overstretching, which do not originate from stretching or exertion of the muscles and should be avoided, see alsoFAQ
  • (650) Kyphosis and lordosis of the spine : Irregularities in the kyphosis of the thoracic spine become well visible in uttanasana with rounded back. If the lumbar spine is not able to remove the lordosis, a hyperlordosis of the lumbar spine must be assumed. Physiologically, the back would start to round with the sacrum and slowly increase the curvature towards the back. Of course, the flexion of the spine depends on the degree of flexion in the hips: the greater the flexion in the hips, the smaller the curvature of the back, especially in the area of the lumbar spine. If there is poor flexion in the hips, the lumbar spine must be bent excessively. See also the FAQ
  • (651) pelvic obliquity/scoliosis of the spine: The lateral deviations of the spine from the sagittal plane, referred to as scoliosis, are also quite clearly visible in this pose. See the FAQ
  • (711) ischiocrural group: in forward bending movements (flexion in one or both hips), but also under load in the muscles of the back of the leg, various disorders can be found.:
    1. Shortening of the ischiocrural muscles, see FAQ.
    2. Damage to the ischiocrural muscles that causes pain or functional limitations can also be seen well here, from simple tension and strain to muscle tearing. Demolitions would lead to a reduction in strength when leaving the posture quickly
    3. Irritations of the n. ischiadicus: especially in forward bends, irritations of the n. ischiadicus, that innervates the leg and foot can become symptomatic, even if they are otherwise rather quiet. See also FAQ
    4. Baker cysts create a feeling of tension or foreign body in the back of the knee, see FAQ
  • (852) calves: In this pose the calf muscles are clearly stressed, the further the load moves from the heel to the ball of the foot, the greater the strength endurance requirement on the calf muscles (m. triceps surae). However, the calf muscles may tend to cramp if you keep the pose longer. If calf cramps occur quickly, this often indicates a lack of endurance or a supply problem such as magnesium deficiency in the blood or poor blood circulation. As a rule, this has nothing to do with nocturnal calf cramps, which are usually caused by prolonged stretching movements (planar flexion) in the ankle joint due to current dream events.
  • variants::
    1
    2
    arms stretched
    arms behind the back
    hands with brick behind the back
    stretching from bent knees
    balls of the feet on a brick
    grasp the big toe
    grasp the outer foot
    grasp the inner foot
    head lifted
    maximum endorotation of the legs
    with one leg lifted (eka pada prasarita)
    with a belt
    namaste on the back
    parsva
    parivrtta
    butts on the wall
    butts on the wall and brick behind the back
    butts on the wall and brick between the legs
    butts and heels on the wall
    rectangular
    forehead on the shinbone
    table
    entangling the lower legs
    pulling on the lower legs
    (P) back on the wall
    (P) butts on the wall
    (P) table: tilting the pelvis
    (P) table: stretching the back 1
    (P) rectangular: stretching the back
    transition to stick pose
    transition to utkatasana
    transition to upface dog
    transition to downface dog
    transition to rectangular handstand
    transition to headstand
    transition to handstand
    transition to rectangular elbowstand
    transition to elbowstand
    transition to tadasana
    transition to urdhva hastasana
    transition to karnapidasana
    transition to halasana
    transition to trikonasana
    transition to parivrtta trikonasana
    transition to ardha chandrasana
    transition to parivrtta ardha chandrasana
    transition to parsvakonasana
    transition to warrior pose 2nd
    transition to warrior pose 1st
    transition to warrior pose 3rd
    transition to ardha vasisthasana

    instruction details/hints
    1. stand in 
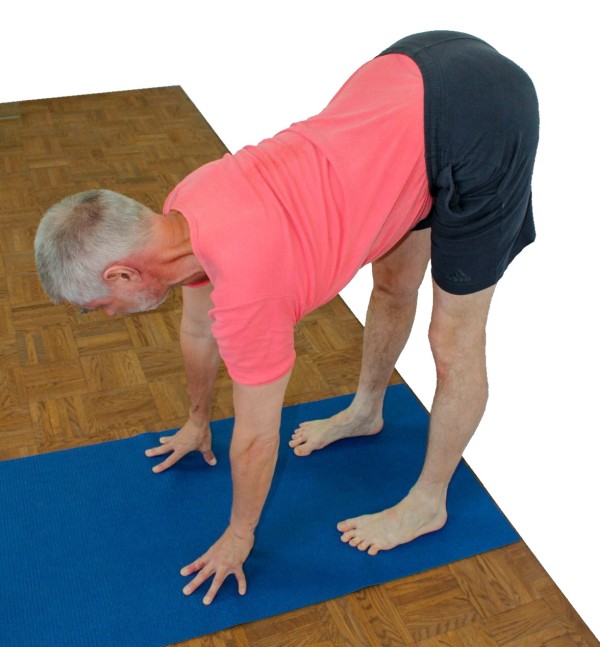
tadasana, feet hip wide, middle lines of the feet parallel, upper body stretched up
    2. stretch the knees and with some work of the Quadrizeps keep the knee caps lifted. Turn in the thighs slightly
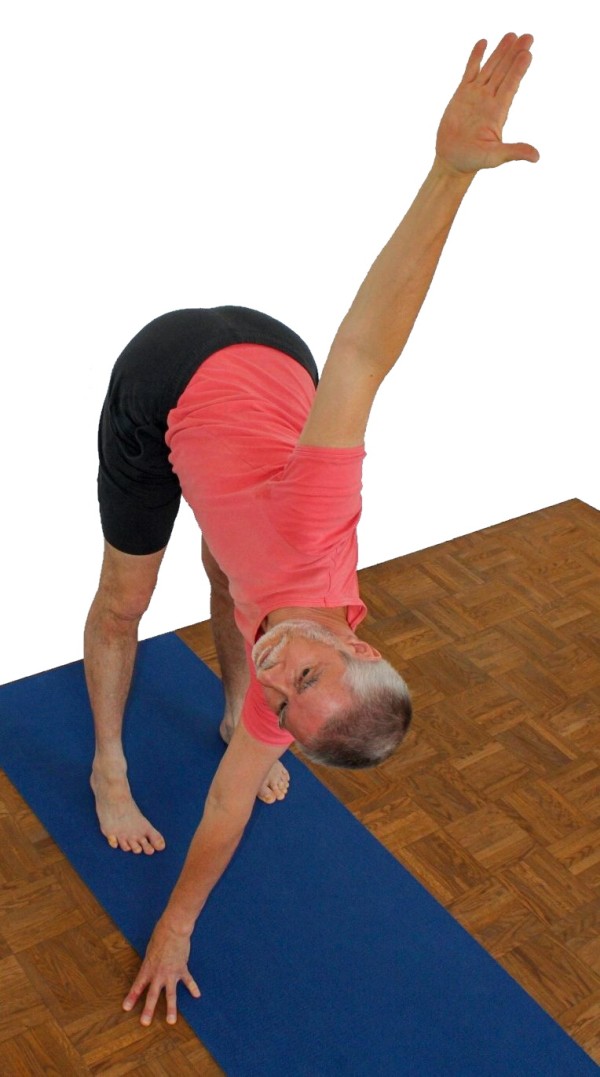
    3. grasp both elbows with the other hand and stretch them up to the ceiling. Elevate the shoulder blades. Stretch the upper body towards the ceiling as well
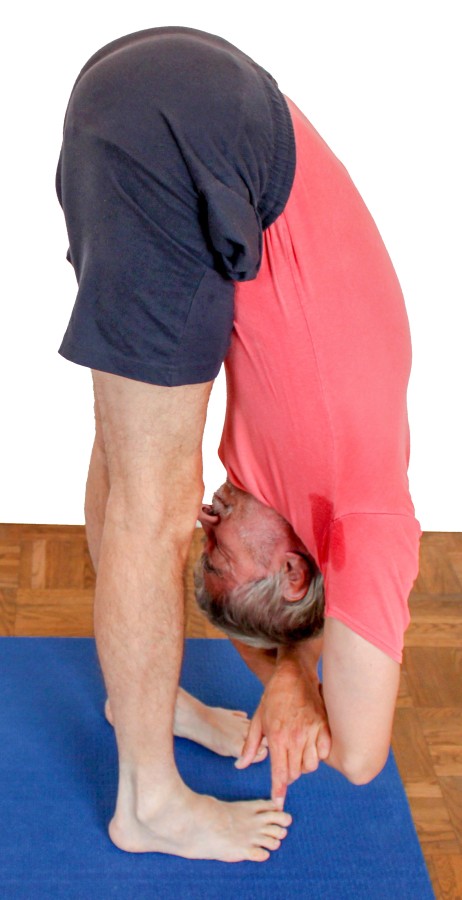
    4. tilt the pelvis forward to the maximum quickly while keeping the position of the arms and take the upper body down at the same speed as you tilt the pelvis.
    5. Now once again move your head, shoulders and arms down as far as possible. The pelvis tilts into flexion as much as possible by the power of the hip flexors, so that the maximum acceptable stretching sensation occurs in the back of the leg.
    6. keep the legs slightly endorotated
    1. when tilting the pelvis, the pelvis naturally moves slightly backwards so that the centre of gravity is still in the. base of support . Then move the pelvis forward again. The extent to which the pelvis moves to the front determines how intensively the calf muscles are brought to work. For people with weak calf muscles, especially those with inclination to develope a shinbone edge syndrome it is recommended to practice uttanasana (also) as calf strengthening. Experiment with other foot positions than parallel pointing forward, instead turn e. g. the feet noticeably out
    2. any relief of the back of the leg by using the back muscles can mean a lesser or greater load on the lower back. Therefore, always practice the exercise concerning the legs intensively! Never tilt the pelvis forward half-heartedly! Never hang almost passively in a pose! These prerequisites are even more valid for the rigid beginner than for the already very flexible person.
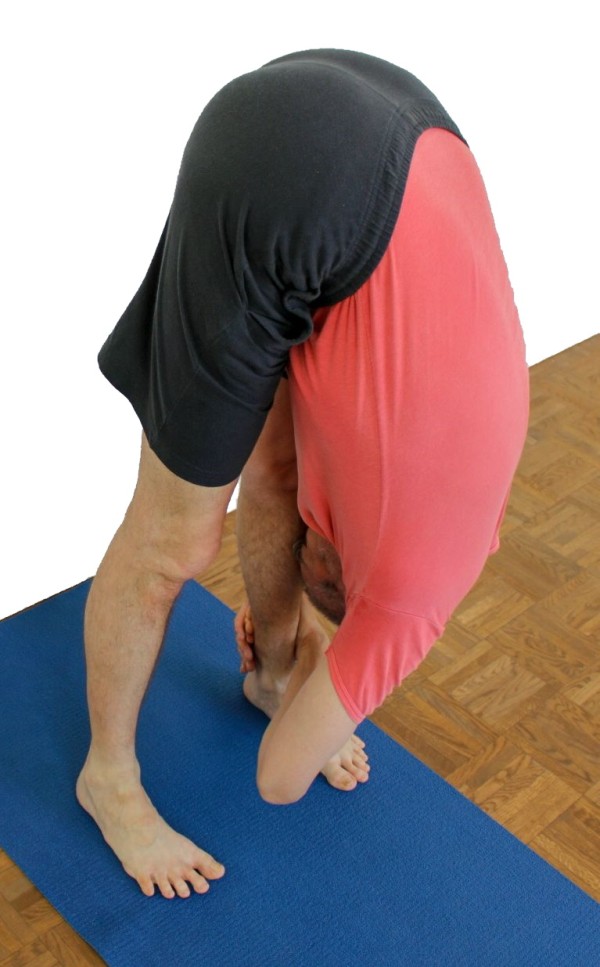
    3. Make sure not only to hang on the outer edges of the foot, which is usually associated with the tendency to turn out the legs. The legs should rather turn in, i. e. the inner knees move more strongly backwards than the outer knee. The slight endorotation of the legs causes, among other things, that the ischial bones move a little apart, which eases the flexion in the hips
    4. as in many bends forward, also here the last 1 to 2 degrees stretching in the knees are the most interesting.
    5. Trembling in the knees is a completely normal phenomenon for the stiff beginner and results from the gross imbalance between the poor ability of the Quadrizeps, in an almost straight knee (i. e. almost maximum contraction of the quadriceps) to perform further concentric contraction and the stiffness of the antagonists to be stretched. This often leads to a resonance phenomenon with amplitudes of under certain circumstances more than 1 cm. From a less physiological point of view, we observe here the start of the knee system from tamas to rajas.
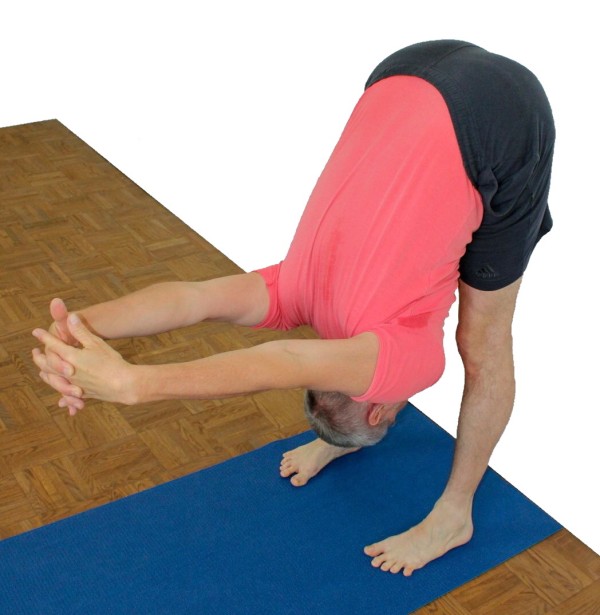
    6. to tilt the pelvis forward more easily, and to stretch the ischiocrurale Gruppe more intensively, you can
      1. grab your buttocks and pull them up. This causes an elevation of the ischial bones, which directly improves the stretching of some muscles, because they origin there.
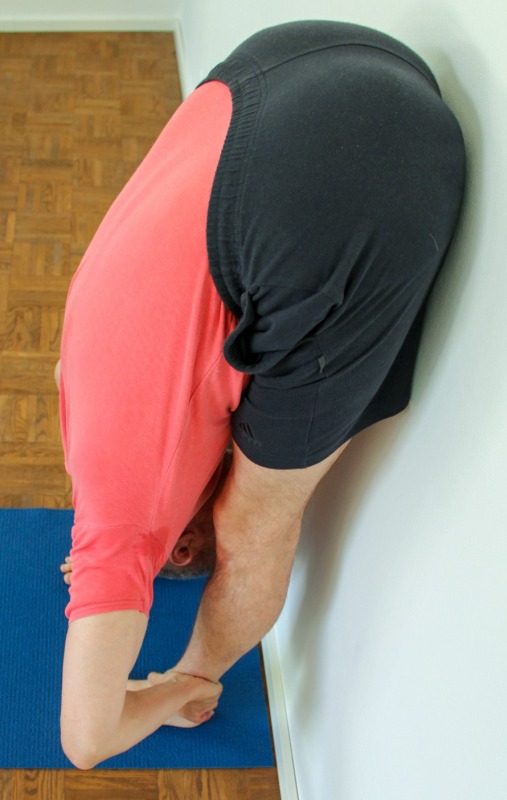
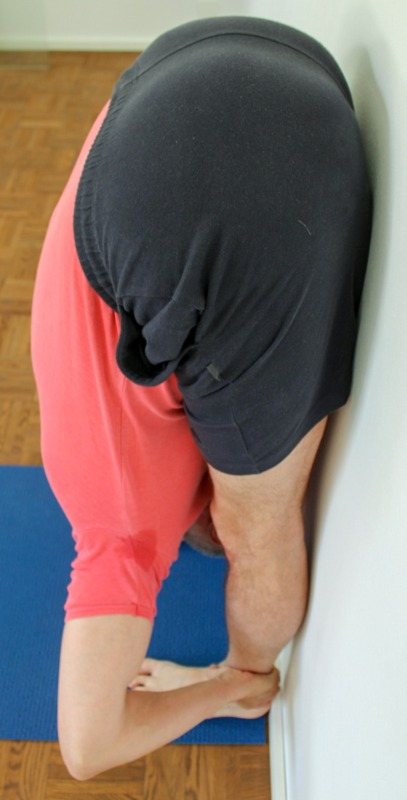
      2. bend the knees, than tilt the pelvis maximum into flexion with the power of the m.iliopsoas (or additionally with the power of the elbow flexors by pulling on the lower leg) In cases of halfway good flexibility the upper part of the body can be pressed onto the thighs. Restore the stretch of the knees trying to keep the contact between upper body and thighs, see the corresponding variant.
    7. do not use the m. rectus femoris, in order ti tilt the pelvis, but try to leave it soft, as using it might cause cramping.
    8. with more frequent intensive practice of forward bends some people have a tendency to strain the hamstrings at their origin on the ischial bone. That's usually not a serious injury, but in some forward bends, such as uttanasana, causes a painful sensation at the ischal bone a few centimetres down the leg. This disorder usually dissolves not easily unless you would not do any forward bends for months on end. But even this would improve the sensation in the affected region, but would not solve the underlying problem, and with the resumption of forward bends, the complaints would reappear. A remedy is achieved here by practicing the ischiocrural group in a different way than usually: stretch the knee from bent knee with the knee held in maximum Flexion in the hips, instead as commonly first stretch the knee and then bend the hips It is a good recommendation to practitioners and instructors to every now and then practise resp. let them practise this second way. This variant can be excellently combined with various applications of the arm, e. g. in the form of a pull on the lower legs. Another way to get this problem under control, is to stretch the affected ischiocrural group by application of physical pressure transversely to the alignment of the muscle fibres. This can easily be practised in single-sided forward bends like janu sirsasana or tryanga mukhaikapada pascimottanasana with a stick under the middle of the back of the upper leg, transversly orientated, on which the muscle is pushed then which makes it evade and thus stretches it. Another very helpful means to get these complaints under control is regenerative training of the hamstrings. The most effective exercise is deadlifting, in which the hip joints are bent only so far that no other sensation than stretching and exertion occurs. The point at which discomfort occurs, according to experience, depends more on the degree of flexion than on the weight.
    9. Leave the abdominal muscles (especially rectus abdominis) soft. It's not about moving your head and shoulders towards your lower leg, it's about moving down towards the ground. The upper part of the body does not do any bending beyond the effect of gravity (flexion of the spine), just as it would not extend in any way by force of the back muscles.
     
    known issues that may occur even when practicing correctly
    1. pain in the lower back
      Despite correct execution, pain in the lower back can occur (rather rarely). This is usually the case with people who have started to practice relatively stiffly and do not use the hip flexors in forward bends to enhance flexion, because they want to avoid at least a little bit of the stretching sensation in the ischiocrural group. This means nothing more than that they become accustomed to practicing forward bends incorrectly and develop more and more flexibility in the lumbar spine over time instead of stretching the back of the leg as urgently needed. If the process is already relatively advanced, one can see that the lumbar spine is quite impressive flexible in terms of forward bends in some cases. 
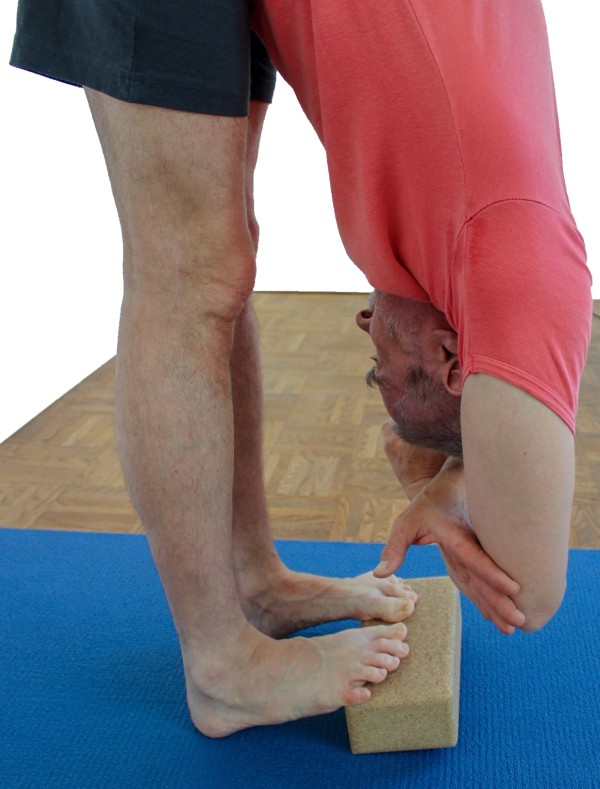
It can then be useful to protect the lumbar spine by placing your hands on upright blocks. It is fundamental to gain understanding and feeling for the powerful tilting of the pelvis into the flexion from the strength of the hip flexors! The feeling for this is usually experienced with less flexion in the hips easier than in maximum forward bend
    2. pain in the back of the knee
      see FAQ
    3. pain at the origin of the ischiocrural group at the ischial bone
      see FAQ
     

    variants

    1

    a variant to apply the arms
    instructions details
    1. take uttanasana as described above, but put the palms of the hands almost as far as possible behind and to the side of the feet on the ground so that the fingers point backward.
    1. the variants uttanasana 1 and 2 differ from each other mainly by the rotation of the forearm: at 1 it is pronated, at 2 supined, which results in a different use of the arm flexors. In addition, with this variant, the friction of the hand on the ground is somewhat greater, so that it does not slip away so quickly in the case of a large use of force.
     
    known issues that can occur even when running correctly


      2

      a variant to apply the arms
      instructions details
        1. the variants uttanasana 1 and 2 differ from each other mainly by the rotation of the forearm: at 1 it is pronated, at 2 supined, which results in a different use of the arm flexors. In addition, with this variant, the friction of the hand on the ground is somewhat greater, so that it does not slip away so quickly in the case of a large use of force.
         
        known issues that can occur even when running correctly


          arms stretched

          Stable, intensive variant that bends the lumbar spine less strongly.
          instructions details
          1. take uttanasana as described above
          2. put your fingertips on the ground and start to walk further and further forward with your fingers, your fingers being as light as possible.
          3. the pelvis does not move forwards in the process
          1. especially when relatively immobile beginners who do not have a strong body awareness start practicing forward bends intensively, there is a danger that the force of gravity of the upper body, arms and head does not lead to an extension of the ischiocrural group, but bends the lumbar spine. Reasons can be, conscious or unconscious avoidance of the intensive stretching sensation in the back of the leg or also wrong comprehension of the pose - which is usually the case and is the responsibility of the instructor - as well as the (not yet) found use of hip flexors for flexion in the hips to complement the effect of gravity and direct it to the right place of action. Once the habit of bending the lumbar spine (in a nonsensical measure) instead of stretching the ischiocrural group, a focused intervention is required! Quite often, these participants report an unpleasant feeling in the lumbar spine in their pose. At the same time, a prolonged period of exertion of intense force on the intervertebral discs of the lumbar spine is anything but desirable. This variant can help to convey what uttanasana is all about.
          2. Due to the only light touchdown of the fingers and their forward running, the spine is stretched from the thoracic spine to the lumbar area and at the same time the effective torque in the hip joints is increased, especially in the lower back, if the weight of the fingers on the floor is reduced further and further. This results in an improved stretching of the back of the leg with minimal stretching of the lumbar spine and correspondingly minimal strain on the intervertebral discs.
          3. This variant should, if necessary with appropriate support under the fingers, also be suitable for practitioners with intervertebral disc damage in the region of the lumbar spine where the normal uttanasana is contraindicated.
           
          known issues that can occur even when running correctly


            arms behind the back

            Enlargement of the tilting momentum in the hips, stretching of the shoulder joint in terms of retroversion
            instructions details
            1. take uttanasana as described above, but stretch your arms behind your back and let them sink over your back towards the ground.
            1. This variant has two advantages: the tilting momentum in the hips is greater than in the normal uttanasana due to the larger lever of the outstretched arms and in addition it is a good possibility to improve the shoulder flexibility in terms of retroversion.
            2. the arms turn out like in all other poses. Stretch your elbows. The palms of the hands point to the back and the wrists move away from each other. Release in the back of the shoulder so that the arms can sink further in the course of the pose.
            3. In cases of low shoulder flexibility in terms of retroversion, the arms may hardly be moved away from the back. If the ischiocrural group is still less flexible, the tare weight of the arms may pull them towards the back. In such cases, it is advisable for a partner to pull his or her arms away from the back with a the hand or to clamp a block between the back and wrists.
            4. Limited flexibility of the caput longum of the m. biceps brachii may result in the arms not being able to be stretched. Then use this posture to stretch the long part of the biceps.
            5. basically this posture can also be performed with external weight like a block or a dumbbell or as posture with support
             
            known issues that can occur even when running correctly


              hands with brick behind the back

              largely corresponds to the previous Veriante, possibly it is easier to stretch the arms.
              instructions details
              1. instead of interlocking your fingers, hold a block between your hands
              1. due to the greater distance between the hands it may be easier to lower or stretch the arms.
              2. The arms move apart. If they would push against the block like in upavista konasana with a block, it would presumably result in a rapid and pronounced cramping of the muscles moving the arms backwards and the shoulder blades inwards.
              3. Instead of a block, a small dumbbell can also be gripped at its ends. Due to its weight and the position at the end of the lever arm, the dumbbell has a clear influence on the center of gravity, so it has to be moved carefully over the head towards the ground.
               
              known issues that can occur even when running correctly


                stretching from bent knees

                instructions details
                1. take uttanasana, but bend the knees far
                2. press the upper body on the thighs
                3. stretch the knees slowly and controled without losing contact and pressure between upper body and thighs.
                4. the knees do not have to be stretched, the intensity of the stretch in the back of the leg is important
                1. This variant is very suitable for cases in which the origin of the ischiocrural group is irritated on the ischium. Often, a moderately intensive stretching of the back of the thigh can be achieved without causing pain in the original area. It seems that the tension of the muscles is initiated from below, from the extension of the knee and leaves the origin area largely unaffected. In a way, this can be explained by the friction of fascia.
                2. It is very helpful to hold the lower legs tightly with your forearms in order to maintain the pressure of the upper body on the thighs.
                3. diese Variante eignet sich in den meisten Fällen hervorragend um das Überstrecken der Knie zu vermeiden
                 
                known issues that can occur even when running correctly


                  balls of the feet on a brick

                  intense stretching of m. gastrocnemius
                  instructions details
                  1. take uttanasana as described above, but put the balls of the feet on a block.
                  1. depending on the chosen distance between the feet, one block across is sufficient. For larger distances, use two blocks.
                  2. don't put the balls of foot too tightly on the block, they have to be completely on the block. On the other hand, avoid placing your feet too far on the block, no part of the arch of the foot should be on the block, not least because otherwise the edge of the block will generate unpleasant pressure.
                  3. The significant elevation of the forefoot causes a distinct stretching of the m. gastrocnemius, which may possibly overlap the stretching of the ischiocrural group. Don't be surprised if the forward bend in the hips is limited due to this intensive stretching. The m. gastrocnemius is double-jointed and spans the knee joint whereas its synergists regarding the plantar flexion in the ankle only span the ankle, which means that it cannot be stretched with clearly bent knees. In addition, as an extremely strong muscle, it also needs a large force and the appropriate duration of exposure in order to achieve a considerable stretching effect. This exercise is a valuable way to stretch the m. gastrocnemius effectively and efficiently and is in this sense a good addition to the downface dog. It goes even further in its effect, as more weight (namely the whole body weight) is applied to the feet used for stretching.
                   
                  known issues that can occur even when running correctly


                    grasp the big toe

                    a variant to apply the arms
                    instructions details
                    1. take uttanasana as described above, but do not cross your arms, but reach with index finger and middle finger to the thick toe and pull the upper part of your body downwards.
                    1. Do not pull the thick toe away from the ground, otherwise the weight distribution on the balls of the toes changes too much. Press it only as forcefully on the ground as the pull requires
                    2. in this variant move outside also
                     
                    known issues that can occur even when running correctly


                      grasp the outer foot

                      a variant to apply the arms
                      instructions details
                      1. take uttanasana as described above, but do not cross the arms but briefly lift each outer foot to reach under the corresponding outer edge of the foot and pull on it.
                      1. For those who, due to good flexibility in the back of the leg and a lot of strength (and endurance) in the arms, can pull stronger on the thick toes than they can tolerate, the pull at the outer foot is recommended. Since the outer foot is bony, it provides a solid point at which the arm's strength can be permanently applied
                       
                      known issues that can occur even when running correctly


                        grasp the inner foot

                        a variant to apply the arms
                        instructions details
                        1. take uttanasana as described above, but do not cross over the arms but pull with each hands fingers at the corresponding innen edge of the foot.
                        1. This variant shows two disadvantages compared to the pull on the outer foot, namely that the inner foot edge is fleshy, i. e. muscular, rather than bony, and secondly the ergonomics is considerably worse due to the far bending wrist.
                         
                        known issues that can occur even when running correctly


                          head lifted

                          instructions details
                          1. take uttanasana as described above, grab the ankles with your hands and pull on them.
                          2. lift the head in elongation of the thoracic spine or if you can take this well further in reclination, and stretch the back as far as the length of the arms on one side and the flexibility of the ischiocrural group on the other side allow.
                          1. as always in poses with the head lifted, make sure that the neck muscles do not build up an unpleasantly high tonus.
                          2. Lifting the head and trying to stretch the back can increase the stretching effect in the back of the leg.
                           
                          known issues that can occur even when running correctly


                            maximum endorotation of the legs

                            learning the movement of the sitting bones
                            instructions details
                            1. take uttanasana as described above.
                            2. turn in the thighs in the hips as much as possible and push the heels away from each other on the ground to move the ischial tuberosity apart as much as possible.
                               
                              known issues that can occur even when running correctly


                                with one leg lifted (eka pada prasarita)

                                instructions details
                                1. take uttanasana as described above
                                2. Support yourself with your hands on the ground in front of you, shift your weight to one leg and slowly lift the other up to the maximum backwards.
                                3. make sure that the pelvis remains completely straight
                                4. If you stand firm enough, take both hands off the ground, grip the ankles and pull the trunc to the leg with your arms.
                                1. This pose has, in particular in the unsupported version with grabbed ankles, the character of a balance with intensive stretching. Since the centre of gravity depends heavily on the exact position of the raised leg, it is necessary to work very carefully. All movements of the pelvis, both the evasion and its correction, have a significant influence on the centre of gravity. Therefore, from the beginning, try to keep the pelvis completely straight instead of reaching an apparently good height with your leg, which is due only to the turning of the pelvis.
                                2. The pelvis tends to turn away from the standing leg, as this relieves the stretching of the standing leg. So make sure that the pelvis is (accordign to how you feel it) moved towards the supporting leg rather than away. This variant is one of the two variants of the standing split, the other one would be a very widely performed hasta padangusthasana forward, where upper body and raised leg resemble the krouncasana.
                                3. Even the loosening of the previously supporting hands from the ground has a significant influence on the centre of gravity. If necessary, run with your fingers further and further to your feet and then gradually take more and more weight off your hands while watching how you have to react to it.
                                 
                                known issues that can occur even when running correctly


                                  with a belt

                                  instructions details
                                       
                                      known issues that can occur even when running correctly


                                        namaste on the back

                                        a variant stretching the frontal deltoids
                                        instructions details
                                        1. from tadasana fold your hands in namaste on your back
                                        2. tilt in the hips forward in uttanasana as described above
                                        3. press the edges of the hand against the back, press the palms of the hand against each other and move the elbows upwards and in direction of the pelvis.
                                        1. As in other poses with namaste on the back, we may encounter limitations in the flexibility of the shoulder joints and forearms. The latter make it impossible to press the palms of the hands against each other, the former above all limit the pressure, the movement of the elbows backwards and towards the pelvis, but also the movement of the elbows inwards and thus the pressing of the palms of the hands
                                        2. Due to the lateral abduction angle of the arms, there is hardly any tendency to cramp in the muscles on the back of the shoulder, as described for example for the attempt to press sideways against the block in the variant "with a block behind the body"
                                         
                                        known issues that can occur even when running correctly


                                          parsva

                                          often helps with lower back pain
                                          instructions details
                                          1. take uttanasana as described above
                                          2. turn the pelvis 20° to one side and pull the upper body with both hands towards the corresponding leg
                                          1. This variant stretches the muscles of one side of the back more than the other. In addition, there is usually a slight lateral flexion of the lumbar spine, so that the spine can evade a little sideways. Taken together, this leads to a faster and more comfortable stretching of the autochthonous muscles in the lumbar spine area, which is found to be pleasant and helpful in many forms and causes of symptoms there. In contrast, the classical uttanasana can sometimes be unpleasant in lumbar spine complaints, the longer it is carried out, the more. This applies to those who are less flexible in the ischiocrural group, of course more, because here more bending occurs in the lumbar spine. If the variant is used for lumbar spine complaints, it is recommended to change sides every 20 - 30 seconds without lifting the upper body: Swing from one side directly to the other without lifting the upper body!
                                           
                                          known issues that can occur even when running correctly


                                            parivrtta

                                            instructions details
                                            1. take uttanasana as described above
                                            2. stretch the upper part of the body horizontally, place the left fingertips approximately 30 cm before the right foot
                                            3. turn your upper body to the right and stretch your right arm towards the ceiling
                                            4. turn the head to the right as well
                                            1. The ability to stretch the upper body horizontally naturally depends on the flexibility of the ischiocrural group. If necessary, take a block for ease.
                                            2. The rotation of the upper body does not only come from the trunk muscles. The arm, whose fingers support on the ground, works hard on the rotation. Similar to the parivrtta trikonasana, the fingertips press in the direction of the opposite foot
                                            3. Turn the head only so strongly that the neck muscles do not start to cramp.
                                            4. A slight slanting of the pelvis in this position seems hardly avoidable, just as little as the reduction of weight on one leg. Try to keep the weight as evenly distributed as possible on your feet and avoid moving the pelvis to one side and therefore changing the angle of the legs to pelvis and floor.
                                            5. As in other twisting positions, the stretching of the upper body decreases with increased rotation. Check again and again if you are still stretching your back with the strength of your back muscles
                                             
                                            known issues that can occur even when running correctly


                                              butts on the wall

                                              more relaxed variant
                                              instructions details
                                              1. Put the feet with a foot length or more distance from the wall and take uttanasana.
                                              1. The buttocks, which are leaning against the wall, largely relieve the calf muscles from their work. The question of where the centre of gravity is underneath the feet, or how the load is distributed between the heels and the ball of the foot, also comes into the background: the load is mainly on the heels.
                                              2. Depending on other demands on the calf muscles, e. g. athletic, they can set the limit of duration in correctly and long performed uttanasana. This variant bypasses this limit
                                              3. With good flexibility of the muscles at the back of the leg (ischiocrural group) gravity works here somewhat more favourably in the sense of the flexion in the hips.
                                               
                                              known issues that can occur even when running correctly


                                                butts on the wall and brick behind the back

                                                instructions details
                                                1. take uttanasana with the buttocks on the wall as described above. The arms move beyond the back and head towards the ground, with the fingers holding a block for weight-bearing.
                                                   
                                                  known issues that can occur even when running correctly


                                                    butts on the wall and brick between the legs

                                                    instructions details
                                                    1. take the variant with the buttocks on the wall as described above
                                                    2. grasp the end of a log or a light dumbbell with both hands and let your arms sink over your back and head towards the ground.
                                                    1. Basically, this variant is similar to prasarita padottanasana. Here too, the wrists move away from each other. It should not be attempted as in upavista konasana with Klotz, to hold the block between the forearms with counterpressure, as this can cause a pronounced tendency to cramp very quickly.
                                                     
                                                    known issues that can occur even when running correctly


                                                      butts and heels on the wall

                                                      instructions details
                                                      1. lean against the wall with your buttocks, your feet so far away from the wall that you stand stable
                                                      2. support yourself with the fingers of both hands on the ground.
                                                      3. Place a foot directly on the wall, so that the heel has contact with the wall.
                                                      4. Loosen one hand from the ground and grasp with this hand to the same side of the lower leg above the ankle.
                                                      5. Pull as hard as possible with your hand on the lower leg to pull the upper body as close to your legs as possible
                                                      6. also placed the second foot directly against the wall
                                                      7. take more and more weight off the fingers of the hand that is still on the ground and see if you can stand stable without your fingers on the ground.
                                                      8. Finally reach with the second hand to the corresponding lower leg and pull as tightly as possible with this arm on the equilateral lower leg.
                                                      9. If possible, put your nose or forehead on the wall.
                                                      1. Often, the flexibility of the backs of the legs is not sufficient to be able to stand with the heels on the wall without support from the fingers on the floor. A few centimetres distance can make this possible, as can the use of a partner who presses his back against the wall.
                                                      2. Leave the toes soft here too. The centre of gravity should be between the wall and the balls of the feet, but this requires a very good flexibility of the ischiocrural group.
                                                      3. The static posture requires a lot of effort on the calf muscles
                                                      4. The elbows move to the wall in order to achieve a better distribution of mass and a better centre of gravity - instead of outward as is standard in uttanasana - with very good flexibility they can also move outwards.
                                                       
                                                      known issues that can occur even when running correctly


                                                        rectangular

                                                        intense stretching and strengthening
                                                        instructions details
                                                        1. take urdhva hastasana
                                                        2. with still strictly stretched back tilt the pelvis forward in uttanasana, but only until the pelvis is horizontal.
                                                        3. Keep your arms turned out as much as possible, stretch out of your shoulders and move your arms as far as possible to the ceiling.
                                                        4. stretch the back
                                                        1. The requirement to tilt the pelvis into a horizontal position is naturally not feasible for those who are less flexible in the ischiocrural group. If the muscles on the back of the upper leg do not allow such a wide tilting, tilt it as far as possible and stretch the back from the pelvis.
                                                        2. As is often the case in similar poses, a tendency to cramp in the m. trapezius can also occur here. The maximum exorotation of the arms is then very important, even more so the forearms can be supined as much as possible by supporting. Then the palms face the ceiling rather than face each other. Make sure you stretch out of your shoulders (elevation of the shoulder blades)
                                                        3. In cases of very good flexibility in the ischiocrural group, the pelvis can tilt significantly beyond the horizontal. In combination with a horizontally held back, this results in an unpleasant hollow back, which is not in the sense of the pose. Tilt the pelvis only horizontally. If the body consciousness and external control are missing and an unpleasant hollow back appears, tilt the pelvis deliberately out of the flexion without lifting the back by use of the but muscles and the hamstrings.
                                                        4. As in all variants of the uttanasana, do not hang with the pelvis (and thus the centre of gravity) too far behind, but go to the limit (which is given by the centre of gravity and strength endurance of the calf muscles) to the front straight before the point where you would be forced to use the toes to support yourself.
                                                        5. This pose should be avoided if there is a manifest irritation of the muscle origin of the ischiocrural group on the ischial bone. Otherwise, it can be used to strengthen this anatomical structure without the loss of flexibility, which is often associated with strengthening. If there is a latent or manifest irritation, this variant can be carried out until shortly before the point where the pain occurs. Don't go into pain here, because it's not a constructive kind of stretching pain
                                                         
                                                        known issues that can occur even when running correctly


                                                          forehead on the shinbone

                                                          intense variant
                                                          instructions details
                                                          1. take uttanasana as described above. Press alternately the forehead on the left, then on the right lower leg and hold it there for approx. 30 seconds each.
                                                          1. Even if the uttanasana, like pascimottanasana, is not intended as a pose for deliberate far curving the back (bending the spine), the question arises as to whether and where the forehead is placed on the lower leg, only with quite good flexibility in the ischiocrural group and an excessive or non-physiological curvature of the spine or a loss of the stretching effect on the spine. Rather, by placing the forehead on a lower leg, over the back muscles, the stretching effect in the back of the leg is slightly increased in the sense of the pose.
                                                           
                                                          known issues that can occur even when running correctly


                                                            table

                                                            instructions details
                                                            1. take urdhva hastasana, tilt in the hips as far forward as the back can remain stretched.
                                                            2. With your arms turned out, put your fingertips under your shoulders and push your hands in the direction of your feet.
                                                            3. tilt maximum in the hips by the power of the hip flexors and stretch the back with the strength of the back muscles to the maximum, even beyond the stretched position, thus into a concave thoracic spine bend seen from above
                                                            4. The pelvis is as far forward as it is possible to bring hardly any weight to the fingertips
                                                            1. Push your fingers with all your strength in the direction of your feet, that helps a little bit to stretch your back. The weight on the fingertips should be just big enough to prevent the fingers from slipping away. If you have a lot of power, you might even be able to push your mat away on the ground with your fingers. Keep your arms turned out to let the triceps work correctly. If the twist is not complete, i. e. the inner elbow point to the pelvis, the elbow cannot bend due to its joint structure and does not remain stretched out due to triceps force as it should be, but because of the joint structure. Since the triceps are involved in both the extension of the elbow joint and with its long, biarticular head in the retroversion, it is completely and strongly working and can develop a tendency to cramp in individual cases.
                                                            2. Whether the back is straightened as desired in this pose or can even come into a back bend depends on several factors. Since the human arms (incl. hand and stretched fingers) are shorter than the legs, the pelvis has to tilt into flexion more than horizontally. Whether this is possible or not depends largely on the flexibility of the ischiocrural group. If this is not sufficient, the fingers should be placed on blocks so that the back can become at least halfway straight under appropriate use of force. In addition to the use of the back muscles to stretch the back, the hip flexors must be used vigorously to achieve the best possible flexion in the hips. It is helpful to move the ischial tuberosities not only upwards but also outwards. The second point that determines whether the back can be straightened is the flexibility of the back and the strength of the back muscles. Since the thoracic spine is inherently kyphotically and anatomically not excessively flexible, strength and acquired flexibility must be present in order to remove kyphosis and possibly go beyond it. This flexibility is achieved, for example, by lying on the roll at right angles to the spine underneath the shoulder blades. The stretching of the thoracic spine is supported by the arms, which push the hands in the direction of the feet, from which a momentum is generated in the shoulder joints for frontal adduction, which helps the thiracic spine - although not very strongly - to straighten.
                                                            3. When the head is taken into the reclination, this supports the stretching of the thoracic spine slightly. This should of course not be attempted with existing or known cramp tendency of the neck muscles. In these cases, it would be advisable to promote the flexibility to reclinate with purvottanasana for a longer period of time and to promote the strength of the neck muscles with warrior pose 3 and trikonasana / ardha chandrasana as well as headstand and shoulderstand. If the head is lowered, on the other hand, it suppresses the stretching of the thoracic spine a little. It is better then to keep it in elongation of the thoracic spine .
                                                            4. also in this variant the pelvis is again as far forward as possible, without any significant weight on the fingertips, see above.
                                                            5. The shoulder blades move towards the pelvis (depression of the shoulder blades) - which is already caused by the work of the arms alone - and tend to move towards each other. The upper part of the body does not sink down between the arms, but the whole shoulder area moves to the ceiling, while the middle back does the opposite: move to the floor.
                                                             
                                                            known issues that can occur even when running correctly


                                                              entangling the lower legs

                                                              instructions details
                                                              1. take uttanasana as described, but do not fold your arms, but clasp the lower legs with your forearms.
                                                              1. Depending on the flexibility, it is either easy or difficult and maybe clasping the legs causes very strong stretching. Accordlingly this variant varies considerably
                                                               
                                                              known issues that can occur even when running correctly


                                                                pulling on the lower legs

                                                                more intense stretching
                                                                instructions details
                                                                1. take uttanasana as described above, but don't cross your arms but reach with your hands to the ankles
                                                                2. with your hands don't pull jerkily but strongly on the ankles to tilt the pelvis further into the flexion
                                                                3. the elbows move outwards and the activity of the arm flexors (especially biceps brachii) should be clearly noticeable
                                                                1. Simplifying for all arm flexors only the m. biceps brachii is mentioned here. M. bracioradialis and m. brachialis are synergists, of course, which muscle carries the main load, also depends on the angle in the elbow and the given rotation of the forearm. Especially the angle in the elbow is different with everyone here. The m. brachialis and m. biceps brachii clearly differ in their beginnings and origins. Rarely is the flexibility in the back of the leg so good and at the same time the work in the arms so intense that a cramp tendency occurs in the arm muscles, but it is possible theoretically
                                                                2. With the hands on the shackles the lower legs can be turned in at the same time. In addition, the lower legs can be pulled away from each other
                                                                3. Without the use of arm flexors, this would result in a support of body weight that runs counter to the sense of posture.
                                                                 
                                                                known issues that can occur even when running correctly


                                                                  (P) back on the wall

                                                                  more intense stretching of the hamstrings with a supporter
                                                                  instructions details
                                                                  1. stehe je nach Beweglichkeit in den Beinrückseiten zwischen anderthalb und über zwei Fußlängen von der Wand entfernt mit den Gesicht zur Wand
                                                                  2. Bend the knees far, tilt the pelvis forward as far as possible to be able to press the upper body on the thighs as described above.
                                                                  3. Lean your back against the wall and begin to slowly stretch your legs further and further, while stretching your legs pushes the pelvis upward and the friction of the back at the wall tilts the pelvis further into the flexion
                                                                  4. at the end the legs should be stretched
                                                                  5. The partner then presses the body at the pelvis further towards the wall until the maximum tolerable stretching sensation is reached. The partner can press on the side of the butt muscles beside the ischial tuberosity or directly on the ischial tuberosity, while simultaneously pushing it upwards.
                                                                  1. This design can achieve very intense stretching in the back of the legs and requires careful use of the partner.
                                                                  2. This variant is unsuitable for beginners and those who are less flexible in the back of their legs.
                                                                  3. If the pressure of the back against the wall is too uncomfortable, the partner can hold a blanket between the back and the wall, which not only provides the desired softness/improved pressure distribution but also improves the possibly necessary sliding of the back on the wall.
                                                                  4. The optimal distance between the toes and the wall depends strongly on the flexibility of the ischiocrural group, the better, the smaller.
                                                                  5. This variant requires a certain amount of dorsal flexion in the ankles. However, it is very rarely not available for those for whom this variant is suitable.
                                                                   
                                                                  known issues that can occur even when running correctly


                                                                    (P) butts on the wall

                                                                    more intense variant with supporter for more advanced practioneers
                                                                    instructions details
                                                                    1. take variant butts and heels on the wall as described above
                                                                    2. the partner slowly pushes the back more and more towards the wall and downwards to tilt the performer into further flexion in the hips.
                                                                    1. This variant is not suitable for beginners and in the ischiocrural group still little flexible people. Only when the pelvis is able to tilt very clearly beyond the 90° flexion in the hips does this variant make sense.
                                                                     
                                                                    known issues that can occur even when running correctly


                                                                      (P) table: tilting the pelvis

                                                                      instructions details
                                                                      1. nehme uttanasana in der "Tisch"-Variante wie oben beschrieben ein.
                                                                      2. Standing behind the performer, the partner pushes the sacrum further into flexion in the hips, i. e. downwards and away from the buttocks, with both hands laid on top of each other. In doing so, he must take care not to push the pelvis of the performer forward in the direction of the head
                                                                      1. The direction in which the partner pushes on the performer's sacrum is decisive for success. The pressure is applied to the upper end of the sacrum/transition to lumbar spine and moves away from the pelvis, best would be perpendicular to the lever arm on which the hips are tilted.
                                                                       
                                                                      known issues that can occur even when running correctly


                                                                        (P) table: stretching the back 1

                                                                        instructions details
                                                                        1. nehme uttanasana in der "Tisch"-Variante wie oben beschrieben ein.
                                                                        2. the partner stands beside the performer and reaches with one hand from dorsal to underneath the collarbone to lift the shoulder area there while he pushes with the other hand from dorsal onto the thoracic spine to straighten it.
                                                                        1. Be careful to hold the collarbone securely with three or four fingers so that you cannot slip off, which could lead to reflex cramping of the back.
                                                                        2. Press approximately in the middle on the curvature of the thoracical spine
                                                                        3. Of course, the collar bone is pulled unilaterally, but this should give the performer a clear impulse to stretch his back.
                                                                         
                                                                        known issues that can occur even when running correctly


                                                                          (P) rectangular: stretching the back

                                                                          instructions details
                                                                          1. take uttanasana in variant "table" as described above
                                                                          2. the partner stands laterally next to the performer and supports the upper arms of the performer from below (i. e. from frontal) with bent arm and horizontally held forearm while he presses the thoracic spine with the other hand from dorsal to straighten it.
                                                                          1. It is not necessarily easy to keep your forearms exactly horizontal. The partner may have to bend his knees a little bit.
                                                                          2. Since force is exerted on the shoulder joints via the arms, the movements of the upper arms in the shoulder joints are important: stretch out, turn out, keep parallel.
                                                                          3. Press approximately centered on the curvature of the thoracic spine
                                                                           
                                                                          known issues that can occur even when running correctly


                                                                            transition to stick pose

                                                                            nice dynamic transition to stick pose
                                                                            instructions details
                                                                            1. take uttanasana as described above
                                                                            2. put your palms on shoulder wide in front of your feet, if necessary, bend your knees
                                                                            3. put as much weight as possible on your hands, keep a lot of weight on your hands and keep your elbows stretched
                                                                            4. Jump far back with your feet, stretch your knees in the flight of your legs and contract your butt muscles to get out of the flexion of the uttanasana.
                                                                            5. land with stretched hips, stretched arms on the ball of the foot and working butt muscles, bend your arms quickly and wide to stop just before the chest reaches the floor
                                                                            6. consolidate the stick pose further: push the body backwards using the force of your arms, check the straightness in the pelvis, the position of head, shoulders and pelvis
                                                                            1. this is a very dynamic, powerful transition. Not only must there be enough power available to execute stick pose, but also enough power to safely (!) stop the offensive movement of the upper body towards the ground by the power of triceps, pectoralis and frontal part of the deltoids. This immediately indicates that this is not an exercise suitable for beginners.
                                                                            2. ideally, the shoulder area is already in the correct position (corresponding to stick pose), when the ball of your foot lands on the ground. When landing, the legs are stretched and the hip extensors have stretched the angle between the pelvis and legs. On the front side of the body, the hip flexors and abdominal muscles must secure the pelvis and the lower torso against the effects of mass inertia, that would otherwise (accelerated as the trunc is) drop to the ground. Likewise, the quadriceps must keep the knees stretched so that the mass inertia does not throw the knees to the ground. Put simply: the whole body caudally of the sternum is stretched and tensioned as soon as possible in flight.
                                                                            3. To be on the safe side, at the beginning you will start with a significantly lower flexion of the elbow and only when your feet have reached the ground will you bend your arms to full stick pose. This is extremely sensible and can then be gradually expanded.
                                                                            4. once the feet have landed, carefully expand stick pose and push yourself backwards powerfully, which was not possible during flight
                                                                             
                                                                            known issues that can occur even when running correctly


                                                                              transition to utkatasana

                                                                              instructions details
                                                                              1. nehme uttanasana wie oben beschrieben ein
                                                                              2. strecke die Arme parallel nach vorn
                                                                              3. bend the knees and drop the pelvis while stretching and straightening your upper body at the same time, until the thighs are about horizontal.
                                                                              4. check the details of the resulting utkatasana
                                                                              1. In this variant, it may be a little more difficult for flexible people to find the correct position of the pelvis and not to fall into a hollow back. In case of doubt, try out both directions in which you can tilt the pelvis
                                                                               
                                                                              known issues that can occur even when running correctly


                                                                                transition to upface dog

                                                                                instructions details
                                                                                1. take uttanasana as described above, put your hands in front of and slightly outside your feet with your arms stretched.
                                                                                2. put as much weight as possible on your hands. Jump backwards and up with your feet, but leave the ankles as in uttanasana
                                                                                3. stretch your legs in the flight and tighten the butt muscles as much as possible.
                                                                                4. When the feet (with the underside of the toes) land on the ground, the upper body and pelvis should already be in approximately the right position for the upface dog
                                                                                5. Then consilidate upface dog head further
                                                                                1. This transition is not for beginners. In a sense, it is even more demanding than jumping into stick pose. The maximum tension of the pomusculature at the moment of landing is extremely important for the lower back
                                                                                2. If there is any doubt about the health of the lumbar spine, avoid this jump! This jump is contraindicated especially for known or suspected intervertebral disc events (lumbalgia, sciatica, disc prolapse, disc protrusion and the like), but also e. g. spondylolisthesis and spinal canal stenosis! Lumbago without neuroradicular symptoms is in the acute case a contraindication, but not after the acute period has been overcome. Nevertheless, more preparation is then needed. An asymptomatic or currently weakly pronounced chronic lumbago also means more preparation and requires careful perception of the effect of this jump on the lower back.
                                                                                3. Keep your arms as steady as possible. The whole body rotates in the shoulder joint around the calmly standing arms.
                                                                                4. Jump with your feet far backward-up, without pulling the shoulder area backwards.
                                                                                5. Ideally, the pelvis would be almost in the proper position when your feet land
                                                                                 
                                                                                known issues that can occur even when running correctly


                                                                                  transition to downface dog

                                                                                  instructions details
                                                                                  1. take uttanasana as described above, put your hands in front of and slightly outside your feet with your arms stretched.
                                                                                  2. put as much weight as possible on your hands. Jump with your feet barely backwards but more upwards, pushing your upper body as powerfully as possible backwards using the power of your arms
                                                                                  3. land with the feet with clearly bent knees in the position of the feet corresponding to downface dog
                                                                                  4. Stretch your legs, if possible without moving your pelvis and upper body forward again.
                                                                                  1. taking the position of the feet - in contrast to jumping into upface dog - should not be done by the feet jumping backwards and dragging behind the trunc, but by the fact that the arms and shoulders heave the body backwards from the hands, which is an extraordinarily powerful work of the shoulder muscles, all the more so because due to the influence of gravity on the body, there is only a limited time available for the feet to reach their destination. A jump "in slow motion" is therefore not possible, as "inbetween" gravity throws the feet back onto the ground. All the more important is the strength of the shoulder muscles and the palmar flexors, which push the body backwards by reducing the dorsal flexion in the wrist and enlarging the frontal abduction in the shoulders until the feet land on the ground.
                                                                                  2. Ideally, the upper body would be in the correct position when the feet land, so that for the full downface dog only the legs have to be stretched.
                                                                                  3. In order to get a feeling for the type and intensity of the work of the shoulder muscles, a chair can be lifted frontally from tadasana in the upper grip with (almost) stretched arm. A well and intensely made transition to downface dog feels very similar and no less intense.
                                                                                  4. one difficulty is to provide the required great strength of the shoulders and arms, but also deliberately not to use the hip flexors. The transition should - as far as possible - be managed by the strength of the shoulders. They push the upper body instead of the hip flexors pulling it backwards.
                                                                                   
                                                                                  known issues that can occur even when running correctly


                                                                                    transition to rectangular handstand

                                                                                    instructions details
                                                                                    1. stand with your back in front of a wall at a distance of less than one meter. take uttanasana as described above
                                                                                    2. put your hands shoulder-wide in front of your feet and shift as much weight as possible onto your hands
                                                                                    3. push the shoulders and chest towards the wall and, with bent knees, jump on the wall with both feet at the same time, at a height equal to the length of the upper body plus the length of the arms.
                                                                                    4. stretch your knees and consolidate the rectangular handstand
                                                                                    1. Of course, here the much more elegant jump into the rectangular handstand is described and not the method of placing one foot after the other on the wall.
                                                                                    2. a often made mistake is to not jump with your feet high enough. If the feet are placed too low on the wall, they fall much more easily to the ground, and additionally the higher position of the feet has the advantage that the feet are longer in the flight phase and more time is available to push the upper part of the body towards the wall, which increases the pressure when the feet reach the wall and makes it less likely to slip off. Another common mistake is to jump from a position too close to the wall. Here, too, the argument is that this shortens the time in which the upper body can be pushed towards the wall so that there is enough friction to prevent the feet from slipping.
                                                                                    3. the arms are mostly still during the jump. After the feet have landed on the wall and the legs are stretched, move the upper part of the body as far as possible to the wall, with the shoulders and arms also moving in the direction of the wall, so incline the arms to the wall.
                                                                                    4. Often there is a lack of mental readiness to jump with on both legs at the same time in the beginning. A help to overcome this obstacles can be the repeated attempt of soft landing at the transition back to uttanasana
                                                                                    5. with clearly bent knees on the wall. Stretched knees are not only forbidden for the protection of the knee joints, but the further the knees are bent, the longer the time until the landing and - in analogy to the argument used at the height of the feet - the more time is available to push the upper body towards the wall, which reduces the probability of slipping of the feet.
                                                                                     
                                                                                    known issues that can occur even when running correctly


                                                                                      transition to headstand

                                                                                      instructions details
                                                                                      1. take uttanasana as described above
                                                                                      2. bend your knees, place your hands in the pose that is typical for normal headstand and, if possible, place your elbows on the ground while bending your knees further.
                                                                                      3. shift more and more body weight to the arms and carefully (!) place your head on the ground in a typical headstand manner.
                                                                                      4. relocate the body weight remaining on your legs to your head and arms, and come up into the headstand with both legs stretched
                                                                                      1. this transition is not a beginner's exercise! It requires a high degree of flexibility, sufficient body awareness and a certain amount of strength.
                                                                                      2. The more elegant variant of the transition is described here. Of course, it is also possible to swing with one leg and if it has reached the vertical position (or wall in case of a leaning headstand), the other leg can be pulled up too.
                                                                                      3. After the head has been put on, the pelvis and upper body has to move slightly beyond the position of the head away from the feet for static reasons, so that the centre of gravity is in the trapezoid of elbows and wrists when the legs are lifted and swung up. Be careful not to concave shape the neck too much! Also take care to press the elbows onto the floor as forcefully and continuously as possible in order to take weight from the cervical spine. The less the pelvis is moved towards the wall, the stronger the shoulders must be pressed.
                                                                                      4. This transition is not elementary. It requires strength in the shoulders, but even more so much flexibility in the ischiocrural group and strength in the back, the pomusculature and the ischiocrural group. Ideally, the upper part of the body would be stretched at the moment of lifting the feet and slightly tilted beyond the vertical, the feet not far from the elbows and the hip joints would be in sharpest possible flexion, given by the thighs already pushing on the lower ribs
                                                                                      5. The transition should ideally be as slow as you like and reversible too, and it should be possible to stop at any angle of the legs to the ground for as long as you like.
                                                                                      6. when headstand is reached, the pelvis, which has previously been displaced beyond the head, must be moved back a little in the direction of the elbows so that the centre of gravity is as close as possible to the contact surface of the head - except in cases where substantial relief of the head is required or desired by massive work of the arms, then the centre of gravity must be moved further in the direction of the elbows.
                                                                                       
                                                                                      known issues that can occur even when running correctly


                                                                                        transition to handstand

                                                                                        instructions details
                                                                                        1. face the wall at a distance of less than one metre from a wall
                                                                                        2. Take uttanasana as described above, but put your hands shoulder-wide in front of your feet on the ground.
                                                                                        3. shift as much weight as you can onto your hands, keep your arms stretched.
                                                                                        4. bend your knees wide and jump into handstand with (usually) all the bounce of your legs.
                                                                                        1. this transition is not a beginner's exercise! It requires a high degree of flexibility and bounce, plus sufficient body awareness.
                                                                                        2. When bending the knees, the shoulder area will move slightly away from the wall, while jumping a little to the wall. The movement of the shoulders to the wall must be limited so that they do not hit the wall or come into a position in which they cannot be moved away from the wall by their own power any more! In addition to careful execution and experience, the strength of the palmar flexors of the forearms is decisive for this, which can keep the shoulders away from the wall by influencing the angle of the forearms to the ground, among other things.
                                                                                        3. During the upswing of the legs the knees are far bent, but when the feet hit the wall the knees are stretched. The process of stretching the knees during their flight phase is very important for whether and how the upswing succeeds: if they are stretched too early or too fast (at a given bounce force), the upswing is stalled (according to the principle of variable leverage and energy consumption depending on the lever) and the wall is not reached, whereas if they are stretched too late, the heels may land very rudely on the wall. This requires practice and body awareness
                                                                                        4. Depending on the available bounce, a slight bending of the arms is acceptable during the upswing. In view of the angle in the elbow joint and the mass of the upper body with the legs accelerated into the upward movement, there should be no doubt that the force of the triceps is sufficient to be able to stretch the elbows again before the feet hit the wall.
                                                                                         
                                                                                        known issues that can occur even when running correctly


                                                                                          transition to rectangular elbowstand

                                                                                          instructions details
                                                                                          1. stand with your back in front of a wall at a distance of less than one meter. take uttanasana as described above
                                                                                          2. bend your knees far, put your hands in the posture typical for elbow stand and, if possible, put your elbows on the ground while bending your knees further.
                                                                                          3. shift more and more body weight to the arms, pushing the upper part of the body towards the wall
                                                                                          4. shift the remaining body weight from your legs to your arms, if necessary by bending your knees further, and jump into rectangular elbowstand
                                                                                          5. consolidate rectangular elbowstand
                                                                                          1. this transition is not a beginner's exercise! It requires a high degree of flexibility, sufficient body awareness and a certain amount of strength.
                                                                                          2. Most of the time, the hands slip to each other when taking elbowstand and rectanulgar elbowstand as well as in the poses. This may be prevented by applying a great deal of force by the triceps, which pushes the flat hands onto the ground. But even then, the mat may still slip under your hands and fold. To prevent these effects, use a block in the longitudinal direction between the thumbs and the inner edges of the hands (on the index finger side), which mechanically blocks this evasive movement.
                                                                                          3. the knees must generally be bent very far in order to be able to put the the arms on. how far, of course depends on the flexibility of the ischiocrural group, this transition can only be practised if this is rather pronounced. It is of course advisable to prepare the ischicrurals with standing forward bends beforehand. If not enough flexibility is available, there is a risk that the elbows cannot be put on gently, which is necessary to avoid endangering them. !
                                                                                          4. The distance of the feet - and thus the elbows - from the wall must not be too small to be able to make the jump at all. If, on the other hand, it is clearly too large, this may endanger the shoulders
                                                                                          5. if the distance between elbows and feet is too small, this transition becomes extremely difficult
                                                                                           
                                                                                          known issues that can occur even when running correctly


                                                                                            transition to elbowstand

                                                                                            instructions details
                                                                                            1. stand in front of a wall less than one meter away. take uttanasana as described above
                                                                                            2. bend your knees wide, put your hands in the typical elbowstand pose and, if possible, put your elbows on the ground while bending your knees further.
                                                                                            3. shift more and more body weight to the arms, pushing the upper part of the body towards the wall
                                                                                            4. shift the remaining body weight from your legs to your arms, if necessary by bending the knees further, move your shoulders away from the wall and jump into elbowstand
                                                                                            5. consolidate elbowstand
                                                                                            1. this transition is not a beginner's exercise! It requires a high degree of flexibility, sufficient body awareness and a certain amount of strength.
                                                                                            2. Most of the time, the hands slip to each other when taking elbowstand and rectangular elbowstand as well as in the poses. This may be prevented by applying a great deal of force to the triceps, which pushes the palms onto the ground. But even then, the mat may still slip under your hands and fold. To prevent these effects, use a block in the longitudinal direction between the thumbs and the inner edges of the hands (on the index finger side), which mechanically blocks this evasive movement.
                                                                                            3. the knees must generally be bent very far so that the arms can be put on. Of course, how far depends on the flexibility of the ischiocrural group, this transition can only be practised if it is pronounced. It is of course advisable to prepare the leg backs with standing forward bends beforehand. If not enough flexibility is available, there is a danger that the elbows cannot be put on gently, but this is necessary to avoid endangering them!
                                                                                            4. The movement of the shoulders away from the wall is important so that they do not move uncontrollably in the direction of the wall and that the head might not be put ungently on the floor.
                                                                                             
                                                                                            known issues that can occur even when running correctly


                                                                                              transition to tadasana

                                                                                              instructions details
                                                                                              1. take uttanasana as described above.
                                                                                              2. Solve the entanglement of the arms and stretch the upper body from the current flexion in the hips. Stretch your arms towards the pelvis, palms facing the pelvis.
                                                                                              3. Raise the stretched upper body at the same speed as you raise the pelvis out of the flexion.
                                                                                              1. During this transition, care must be taken to ensure that the upper body lifts at the same speed as the pelvis. If the upper body is lifted faster, a hollow back is formed in between, which may cause the back muscles to develop an unpleasantly high tonus or a tendency to cramp. If the upper body is raised more slowly than the pelvis, the lumbar spine is bent (kyphotically) in between, which also represents an excessive and avoidable load on the lumbar spine.
                                                                                              2. In order to lift the upper body, the pelvis must occasionally move backwards a little so that the centre of gravity remains under the feet. Push it forward as little as possible later on.
                                                                                              3. take the force to the transition from the ischiocrural and the butt muscles
                                                                                               
                                                                                              known issues that can occur even when running correctly


                                                                                                transition to urdhva hastasana

                                                                                                instructions details
                                                                                                1. nehme uttanasana wie oben beschrieben ein.
                                                                                                2. Release the entanglement of the arms and stretch the upper body out of the current flexion in the hips and the arms in extension of the trunk forward-downward.
                                                                                                3. turn out the upper arms in the shoulders and let the palms of your hands point towards each other
                                                                                                4. Raise the stretched upper body at the same speed as you raise the pelvis out of the flexion.
                                                                                                5. when upper body and arms are in the vertical, urdhva hastasana is taken
                                                                                                1. During this transition, care must be taken to ensure that the upper body lifts at the same speed as the pelvis. If the upper body is lifted faster, a hollow back is formed in between, which may cause the back muscles to develop an unpleasantly high tonus or a tendency to cramp. If the upper body is raised more slowly than the pelvis, the lumbar spine is bent (kyphotically) in between, which also represents an excessive and avoidable load on the lumbar spine.
                                                                                                2. In order to lift the upper part of the body, the pelvis must temporarily move backwards slightly so that the centre of gravity remains under the feet. Later shift it forward as little as possible.
                                                                                                3. take the force to the transition from the ischiocrural and the butt muscles
                                                                                                 
                                                                                                known issues that can occur even when running correctly


                                                                                                  transition to karnapidasana

                                                                                                  instructions details
                                                                                                  1. take uttanasana as described above.
                                                                                                  2. bend the knees, let the pelvis sink and raise the upper body opposite the pelvis
                                                                                                  3. put your butts close to your feet on the ground, loosen your feet from the ground and roll backwards in karnapidasana
                                                                                                  1. Depending on the flexibility of the ankles, thighs and hips, it may not be possible to place the butts slowly and close to the feet on the floor, but only in the sense of an irreversible transition falling backwards, usually with a clear distance from the feet.
                                                                                                   
                                                                                                  known issues that can occur even when running correctly


                                                                                                    transition to halasana

                                                                                                    instructions details
                                                                                                    1. this transition is the same as the one described above to karnapidasana, only the pose taken after putting on the feet differs: halasana instead of karnapidasana
                                                                                                    2. take uttanasana as described above.
                                                                                                    3. bend the knees, let the pelvis sink and raise the upper body opposite the pelvis
                                                                                                    4. put your butts close to your feet on the ground, loosen your feet from the ground and roll backwards.
                                                                                                    5. Stretch back and legs, then halasana results
                                                                                                    1. Depending on the flexibility of the ankles, thighs and hips, it may not be possible to place the buttocks slowly and close to the feet on the floor, but only in the sense of an irreversible transition falling backwards, usually with a clear distance from the feet.
                                                                                                     
                                                                                                    known issues that can occur even when running correctly


                                                                                                      transition to trikonasana

                                                                                                      instructions details
                                                                                                      1. take uttanasana as described above.
                                                                                                      2. put your right hand forward pointing to the right beside your right foot
                                                                                                      3. Stretch the left arm to 90° to the spine in the shoulder line to the left.
                                                                                                      4. shift your body weight completely to your right foot, bend your right knee slightly and slightly lift your left foot off the ground.
                                                                                                      5. turn your upper body to the left and put your left foot at an angle of 70° to the right about one leg length away behind you (in the sense of your right foot) on the ground.
                                                                                                      6. stretch the left leg and improve trikonasana
                                                                                                         
                                                                                                        known issues that can occur even when running correctly


                                                                                                          transition to parivrtta trikonasana

                                                                                                          instructions details
                                                                                                          1. take uttanasana as described above
                                                                                                          2. with a slightly bent left arm, place the left fingertips pointing forwards in the right outer foot area on the ground without giving them any significant weight.
                                                                                                          3. raise the upper body a little, bend the right knee a little bit and stretch the right arm in the shoulder line to the right.
                                                                                                          4. exorotate the left leg a little bit and put the left foot in a close leg length distance at an angle of about 45° behind (in the sense of the right foot) onto the ground.
                                                                                                          5. stretch the right knee and the left arm and exorotation the upper body further
                                                                                                             
                                                                                                            known issues that can occur even when running correctly


                                                                                                              transition to ardha chandrasana

                                                                                                              instructions details
                                                                                                              1. take uttanasana as described above.
                                                                                                              2. touch down the fingertips of the right hand pointing forwards in the outer right foot area: next to the right foot and shifted forward about the length of the upper body.
                                                                                                              3. Stretch the left arm to 90° to the spine in the shoulder line to the left.
                                                                                                              4. shift your body weight completely to your right foot and slightly lift your left foot off the ground.
                                                                                                              5. turn the upper body to the left away from the support leg and quit the flexion in the left hip until it is stretched.
                                                                                                              6. lift the turned out left leg as much as possible
                                                                                                                 
                                                                                                                known issues that can occur even when running correctly


                                                                                                                  transition to parivrtta ardha chandrasana

                                                                                                                  instructions details
                                                                                                                  1. take uttanasana as described above.
                                                                                                                  2. With the left arm bent, place the fingertips of the left hand pointing forwards into the outer right foot area.
                                                                                                                  3. shift your body weight all the way to your right foot and slightly lift the left foot off the ground.
                                                                                                                  4. turn the upper body to the right, stretch it horizontally to the front and lift the left leg up backwards, until the left hip is stretched.
                                                                                                                  5. stretch the left arm without putting any significant weight on the fingertips
                                                                                                                  6. Put the head in extension of the thoracic spine. When you stand stable, turn your head to the right as much as possible
                                                                                                                     
                                                                                                                    known issues that can occur even when running correctly


                                                                                                                      transition to parsvakonasana

                                                                                                                      instructions details
                                                                                                                      1. take uttanasana as described above.
                                                                                                                      2. put your right hand facing forward next to your right foot on
                                                                                                                      3. lift the upper body a little, stretch your left arm into the extension of the left side of your body.
                                                                                                                      4. bend your right knee far, turn your upper body to the left and stretch it forward, while with your left leg straight and your left hip stretching, you put your left foot far behind (in the direction of the right foot) on the ground at an angle of 70°.
                                                                                                                      5. turn the upper body maximum to the left and adjust the distance of the feet so that the right lower leg is vertical.
                                                                                                                         
                                                                                                                        known issues that can occur even when running correctly


                                                                                                                          transition to warrior pose 2nd

                                                                                                                          instructions details
                                                                                                                          1. take uttanasana as described above.
                                                                                                                          2. release the entanglement of the arms, shift the body weight to the right foot and bend the right knee slightly.
                                                                                                                          3. put your left foot at an angle of 70° to the right far behind you, turn your upper body and pelvis to the left and straighten your upper body in a vertical position.
                                                                                                                          4. stretch your arms horizontally from the body to the side and bend your right knee to the right angle.
                                                                                                                             
                                                                                                                            known issues that can occur even when running correctly


                                                                                                                              transition to warrior pose 1st

                                                                                                                              instructions details
                                                                                                                              1. take uttanasana as described above
                                                                                                                              2. dissolve the entanglement of the arms
                                                                                                                              3. shift your body weight to your right foot and bend your right knee
                                                                                                                              4. lift the upper body a clear part of the way up and put your left foot on the ground at a 45° angle to the right far behind you.
                                                                                                                              5. bring the pelvis and the upper body into a vertical position, stretch your arms exorotated backwards and upside, fold your hands.
                                                                                                                              6. bend the right knee forward, keeping the pelvis upright and turning it straight forward
                                                                                                                                 
                                                                                                                                known issues that can occur even when running correctly


                                                                                                                                  transition to warrior pose 3rd

                                                                                                                                  instructions details
                                                                                                                                  1. take uttanasana as described above
                                                                                                                                  2. put the fingertips on the ground in front of the shoulders
                                                                                                                                  3. shift the weight completely to one foot and lift the other leg up and backwards.
                                                                                                                                  4. release the fingertips from the ground, stretch your arms as soon as possible and bring them into horizontal position.
                                                                                                                                  1. This variation can be practised in different ways and at different levels of difficulty. This description shows the simplest version
                                                                                                                                  2. If you are supple in the ischiocrural group, the pelvis can remain in a flexion of more than 90° flexion, which corresponds to a slight hollow back in the lumbar spine with a horizontal back, wich is not in the sense of this variant and can be perceived as unpleasant. Then tilt the pelvis slightly out of the flexion by power of the hamstrings and the butt muscles.
                                                                                                                                  3. Depending on the sequence of the three following items, the centre of gravity changes noticeably forward or backward, which must be corrected carefully and sensitively:
                                                                                                                                    1. Remove weight from fingers and lift hands off the ground
                                                                                                                                    2. Lifting the upper body into the horizontal position
                                                                                                                                    3. Lifting of the leg to be lifted
                                                                                                                                  4. Each of these three factors influences the centre of gravity. If these items are executed one after the other, it is comparatively easy to keep the center of gravity within the favorable range. Running all three at the same time requires some experience
                                                                                                                                  5. The instructions for the rectangular uttanasana and warrior pose 3rd regarding the tendency to cramp in the m. trapezius also apply here
                                                                                                                                   
                                                                                                                                  known issues that can occur even when running correctly


                                                                                                                                    transition to ardha vasisthasana

                                                                                                                                    instructions details
                                                                                                                                    1. take uttanasana as described above
                                                                                                                                    2. put your right hand on the ground, pointing forward next to your right foot
                                                                                                                                    3. bend your knees and jump back with your feet closed more than one leg length.
                                                                                                                                    4. turn the feet 90° to the left, so that the right outer edge of the foot lies on the floor.
                                                                                                                                    5. bring the head in extension of the thoracic spine, stretch in the hips and stretch the left arm to 90° to the spine to the left and up
                                                                                                                                       
                                                                                                                                      known issues that can occur even when running correctly